Mobile Hybrid Tools enables you to quickly create Cordova-based hybrid mobile applications using the Hybrid Mobile Project wizard. This wizard is a useful starting point for creating all new Cordova-based mobile applications in the IDE.
As illustrated in this article, from this foundation you can customize the application by adding a range of Cordova plug-ins for accessing device hardware with the Cordova Plug-in Discovery wizard. You can also test your Cordova-based hybrid mobile applications without leaving the IDE using CordovaSim, a mobile application simulator. The IDE also allows you to deploy your Hybrid Mobile project on the FeedHenry server.
The Hybrid Mobile Project wizard is also an ideal starting point for new users to Hybrid Mobile Tools and CordovaSim, guiding you through the necessary steps to set up the IDE and your system for developing Cordova applications before generating a basic Cordova project.
|
Before attempting to install or create a hybrid mobile project with JBoss Tools, ensure that the Android SDK is installed and up to date. Creating or installing hybrid mobile projects without a working and updated installation of Android SDK can result in unexpected errors. |
The instructions here demonstrate how to complete the following tasks:
1. Prerequisites
Ensure that the following prerequisites are met to create a hybrid mobile project:
1.1 Enable the JBoss Hybrid Mobile Tools + CordovaSim Feature
To enable the JBoss Hybrid Mobile Tools + CordovaSim feature:
-
In JBoss Central, click the
Software/Updatetab. -
In the
Features Availablelist, select theJBoss Hybrid Mobile Tools + CordovaSimcheck box and then clickInstall/Update. Figure 1. Hybrid Mobile Tools + CordovaSim Check Box Selected
 -
Follow the on-screen instructions to complete the installation.
During the installation process you may receive warnings about installing unsigned content. If this is the case, review the details of the content and if satisfied click OK to continue with the installation.
Once installation is complete, you are prompted to restart Eclipse. Click Yes to restart immediately and No if you need to save any unsaved changes to open projects. Note that IDE changes do not take effect until the IDE is restarted.
1.2 Install Android SDK
To install Android SDK:
-
Download Android SDK and then unzip the file at a desired location.
-
In the IDE, click
Window>Preferences. -
In the
Preferenceswindow,type filter textfield, typeHybrid Mobile. -
In the
Hybrid Mobilecategory, clickAndroid. -
Click
Browseto locate and select the Android SDK directory on your machine.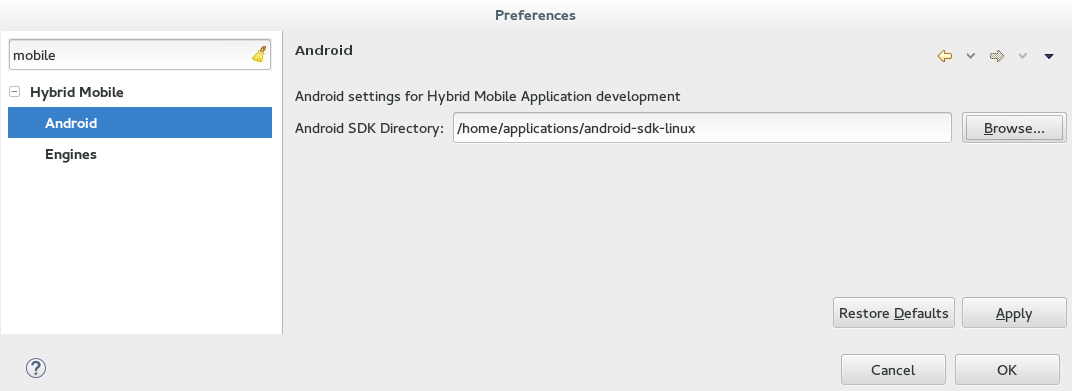 Figure 2. Select the Android SDK Location
 -
Click
Applyand then clickOK.
2. Create a Hybrid Mobile Project
After the project wizard requirements are installed, you can restart the Hybrid Mobile Project wizard and follow it through to completion to create a template-based project. Within the wizard you must specify identifiers for the project and application and select the Cordova engine version to be used for building the project.
To create a Hybrid Mobile project, complete the following steps:
-
In JBoss Central, under
Start from scratch, clickHybrid Mobile Project. -
Complete the fields about the project and application as follows:
-
In the
Project namefield, type a name for the project. -
In the
Namefield, type a name for the application -
In the
IDfield, type an alpha-numeric package name for the application; IDs are akin to Java package names and must begin with an alpha character and contain at least one dot.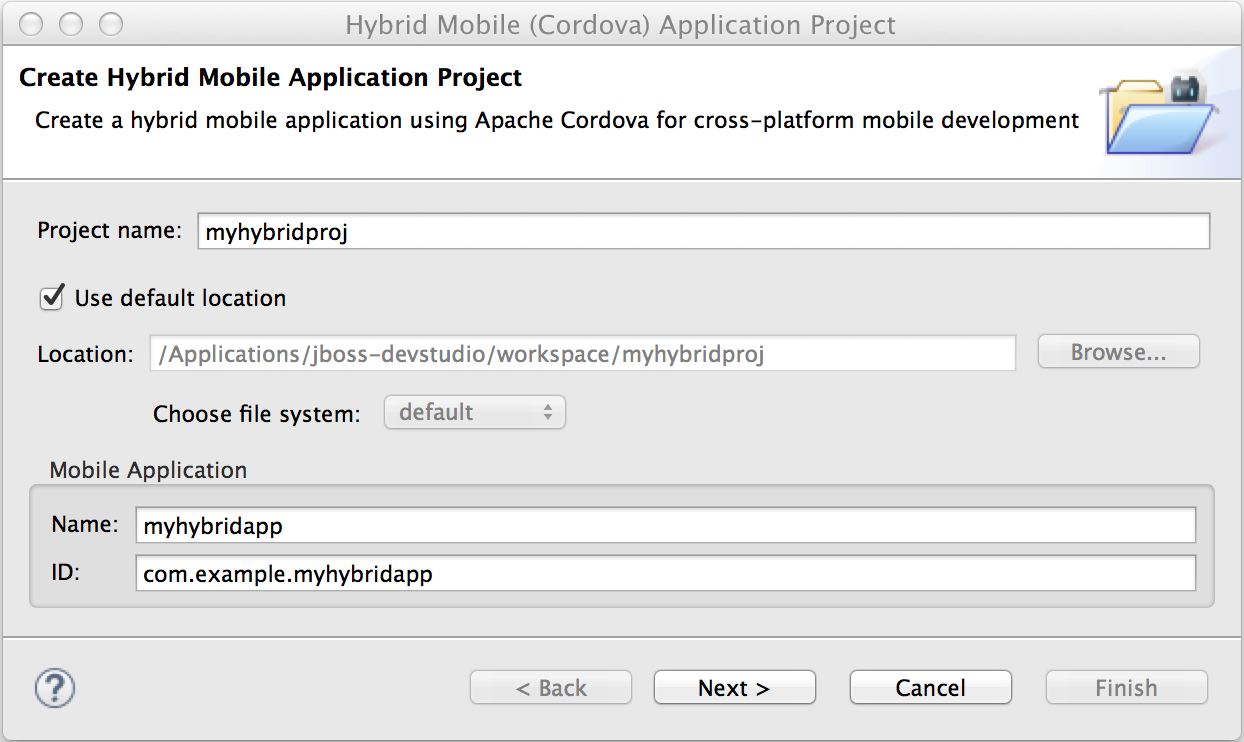 Figure 3. Provide the Project and Application Information
-
-
Click
Next. -
From the
Available Enginestable, select the latest Apache Cordova version. If theAvailable Enginestable is empty, first clickDownloadand follow the instructions to install the latest Cordova engine version on your system. -
Click
Finish.
Result: The project is created and listed in the Project Explorer view.
3. Customize the Hybrid Mobile Project
Before building and running the Hybrid Mobile application, instructions are given here for customizing the project by adding the Cordova Device Motion plug-in and modifying the source code to make use of it. The plug-in gives access to the mobile device accelerometer and the code snippets added to this project check for data every one second and display the X, Y, Z acceleration values on the front page of the application. This plug-in is just one of a catalog of plug-ins available to add to your Hybrid Mobile project.
To customize the Hybrid Mobile project with the Cordova Device Motion plug-in, complete the following steps:
-
In the
Project Explorerview, right-click{project name}and clickInstall Cordova Plug-in. -
In the
Findfield, entermotion. -
From the filtered list of plug-ins, select
org.apache.cordova.device-motionand clickFinish. -
In the
Project Explorerview, expand{project name} > www. -
Double-click
index.htmlto open it in the JBoss Tools HTML Editor. -
Edit
index.htmlas follows:-
Before the closing
</head>tag, add the following lines<script type="text/javascript" charset="utf-8" src="cordova.js"></script> <script type="text/javascript" charset="utf-8" src="js/index.js"></script> -
Replace the code inside the
<body></body>tags with the following lines<div class="app"> <h1>My Cordova Accelerometer App</h1> <div id="accelerometer">Waiting for accelerometer...</div> </div>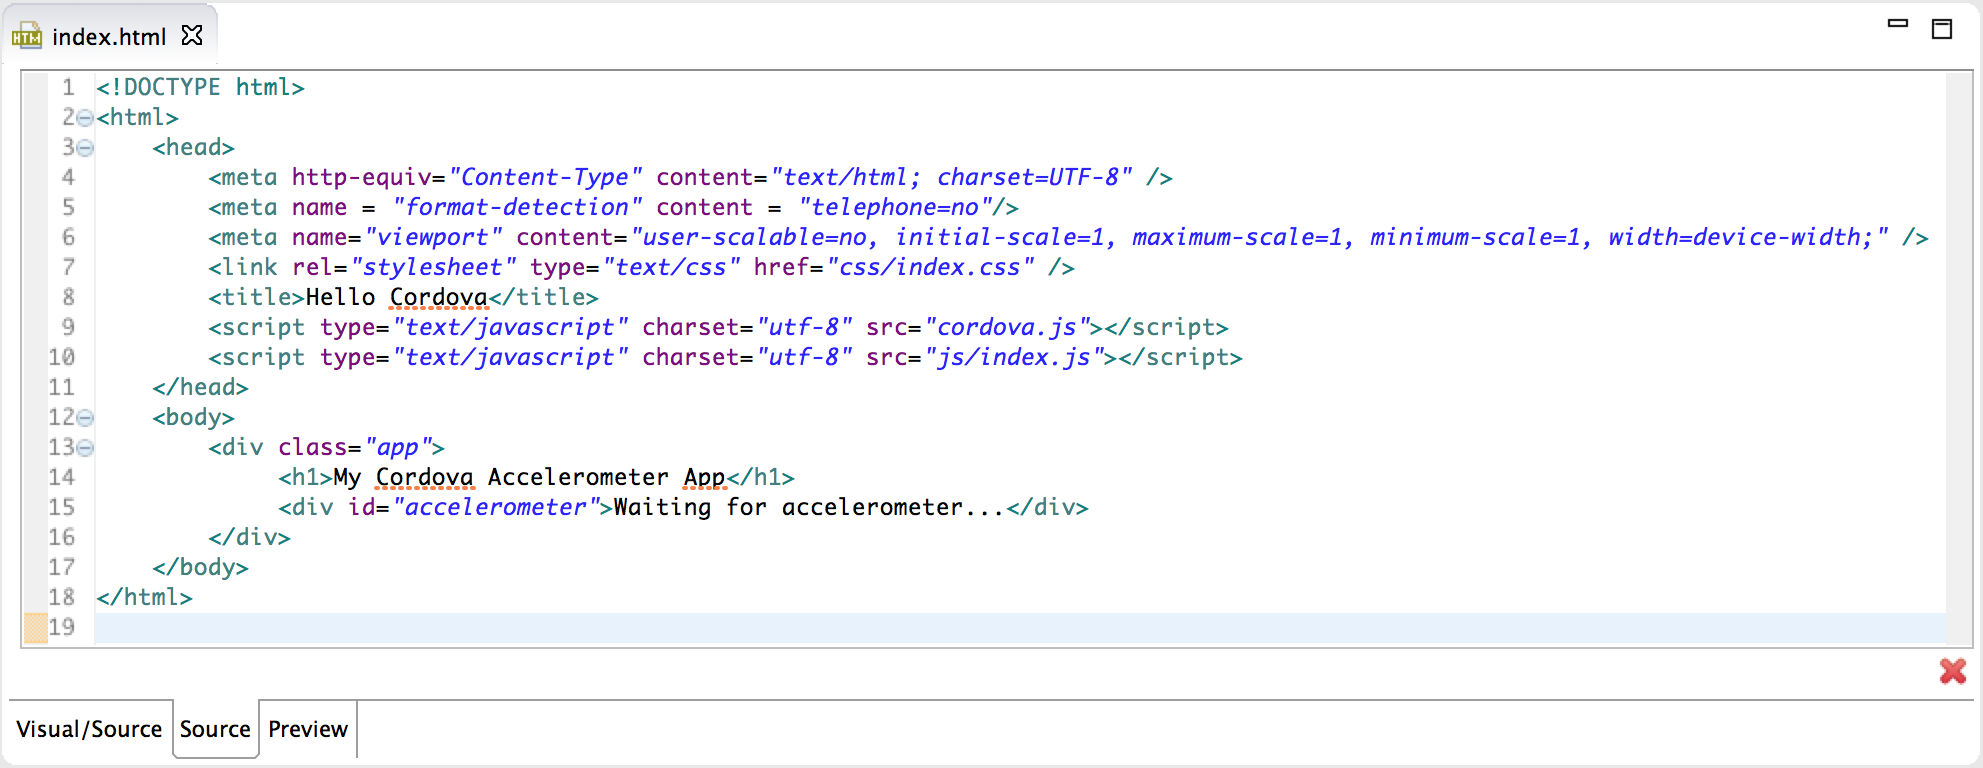 Figure 4. The Modified index.html File
-
-
Save the
index.htmlfile by pressing Ctrl+S (or Cmd+S). -
In the
Project Explorerview, expand{project name} > www > js. -
Double-click
index.jsto open it in the IDE JavaScript Editor. -
Replace the code in
index.jswith the following lines// The watch id references the current `watchAcceleration` var watchID = null; // Wait for device API libraries to load document.addEventListener("deviceready", onDeviceReady, false); // device APIs are available function onDeviceReady() { console.log("deviceready"); startWatch(); } // Start watching the acceleration function startWatch() { // Update acceleration every 1 seconds var options = { frequency: 1000 }; watchID = navigator.accelerometer.watchAcceleration(onSuccess, onError, options); } // Stop watching the acceleration function stopWatch() { if (watchID) { navigator.accelerometer.clearWatch(watchID); watchID = null; } } // onSuccess: Get a snapshot of the current acceleration function onSuccess(acceleration) { var element = document.getElementById('accelerometer'); element.innerHTML = 'Acceleration X: ' + acceleration.x + '<br />' + 'Acceleration Y: ' + acceleration.y + '<br />' + 'Acceleration Z: ' + acceleration.z; } // onError: Failed to get the acceleration function onError() { alert('onError!'); } -
Save the
index.jsfile.
Result: Your Hybrid Mobile Project is now customized and saved.
4. Test the Hybrid Mobile Application using CordovaSim
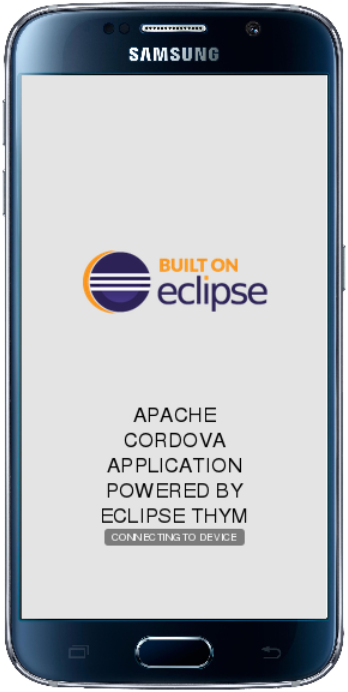
You can build and test the Hybrid Mobile application within the IDE using CordovaSim. CordovaSim is a mobile device simulator specifically for testing Cordova-based hybrid mobile applications. Using the CordovaSim control panel you can input sample data for mobile device hardware, as illustrated here for a device accelerometer.
To run and test your Hybrid Mobile application using CordovaSim, complete the following steps:
-
In the
Project Explorerview, right-click{project name}and click . -
In the CordovaSim control panel, expand
Accelerometerand drag the 3D device representation to generate device accelerometer data.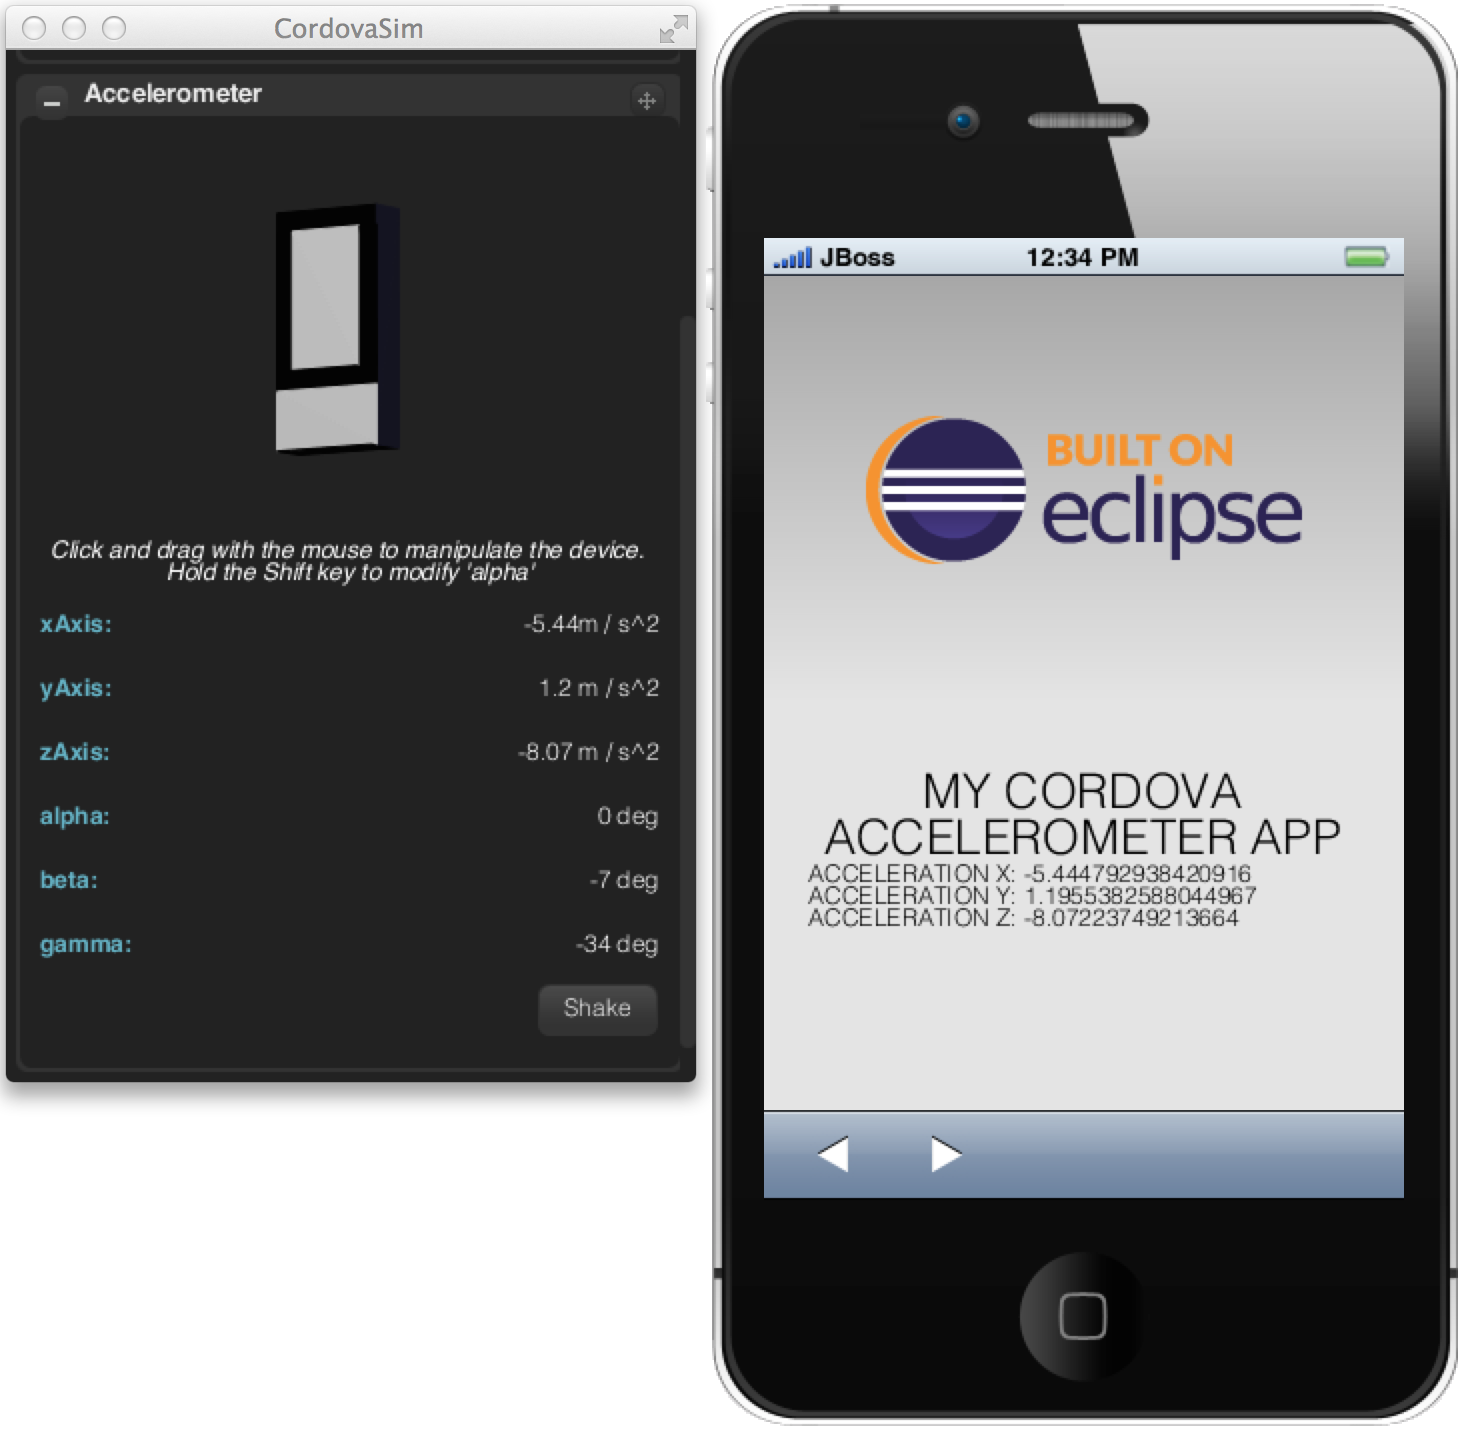 Figure 5. Generated Device Accelerometer Data Displayed in Application
Result: Your Hybrid Mobile application is running for testing.
5. Deploy the Hybrid Mobile Project on the FeedHenry Server
The IDE allows users to quickly and easily publish a Mobile Hybrid (Cordova) application, developed in the IDE, on the FeedHenry server.
The instructions here demonstrate to complete the following tasks:
5.1 Connect the Cordova Application to the FeedHenry Server
To connect the Cordova application to the FeedHenry server:
-
In the
Project Explorerview, right-click the{project name}and .Refer to the Create a Hybrid Mobile Project section to create the Hybrid Mobile (Cordova) application.
-
In the search field, type
FeedHenryand then selectNew FeedHenry Applicationand clickNext. -
In the
Create FeedHenry Applicationwindow, enter the following details:-
Ensure that the
Source projectfield displays the name of the master Cordova project -
In the
Select FeedHenry projectfield, select the FeedHenry project name -
In the
Git remote namefield, type a Git remote name for the FeedHenry repository
-
-
Click
Finish.
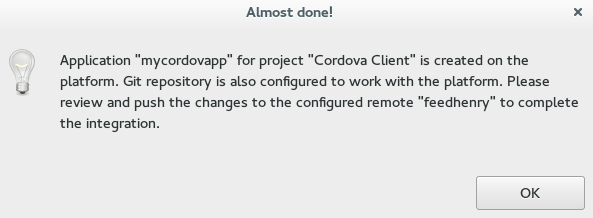
Result: The Almost Done window confirms that the project is created on the platform. The project structure in the Project Explorer view, shows the feedhenry.js and the fhconfig.json files.
5.2 Push the Cordova Application to the FeedHenry Server
To push the application to the FeedHenry server:
-
In the
Project Explorerview, right-click the{project name}and click . -
If you are prompted for a confirmation to connect, click
Yes. -
In the
Push Branch masterwindow, enter the following details:-
In the
Remotefield, enter the location for the remote Git repository. -
In the
Branchfield, typemaster.
-
-
Click
Next.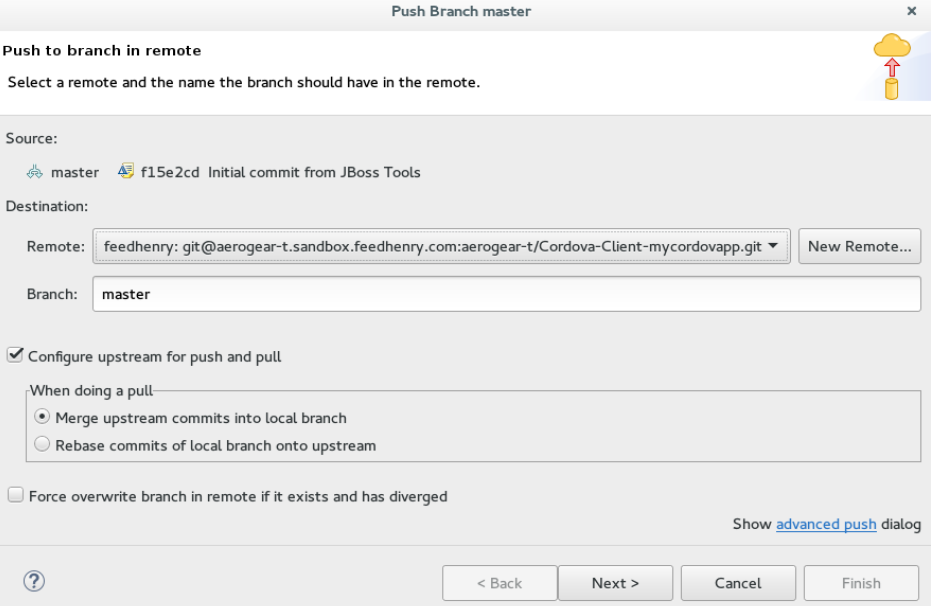 Figure 7. Details of the Push Added in the Push Branch master Window
 -
Confirm the details in the
Push Confirmationwindow and clickFinish. -
The
Pushed to gitwindow confirms the push. ClickOK. -
Log into FeedHenry at
https://[your-studio-domain].feedhenry.com. -
Click
Projectsand then click the relevant application.
Result: The Cordova application is visible in the FeedHenry instance.
6. Modify Icon for a Mobile Application
Define the icons for the Mobile Hybrid application using the icon tag in the config.xml file. If an icon is not specified, the Apache Cordova logo is used as the default icon.
To change the application icon:
-
Save the icon in the <workspace>
/www/res/icondirectory of your project. -
In the IDE, in the
Project Explorerview, locate theconfig.xmlfile.Note:If you are using Cordova 4.0.0 or lower, theconfig.xmlfile is located in the {project_name} >wwwdirectory. For Cordova versions higher than 4.0.0 theconfig.xmlfile is located, a level higher, in the project directory. -
Double-click
config.xmlto open it in the config.xml editor. -
Click the
config.xmltab to edit the file. -
To define a single default icon for all platforms, add the following code anywhere withing the widget tag in the
config.xmlfile:<icon src="www/res/icon[image name].png" />Icon Tag Added to the config.xml File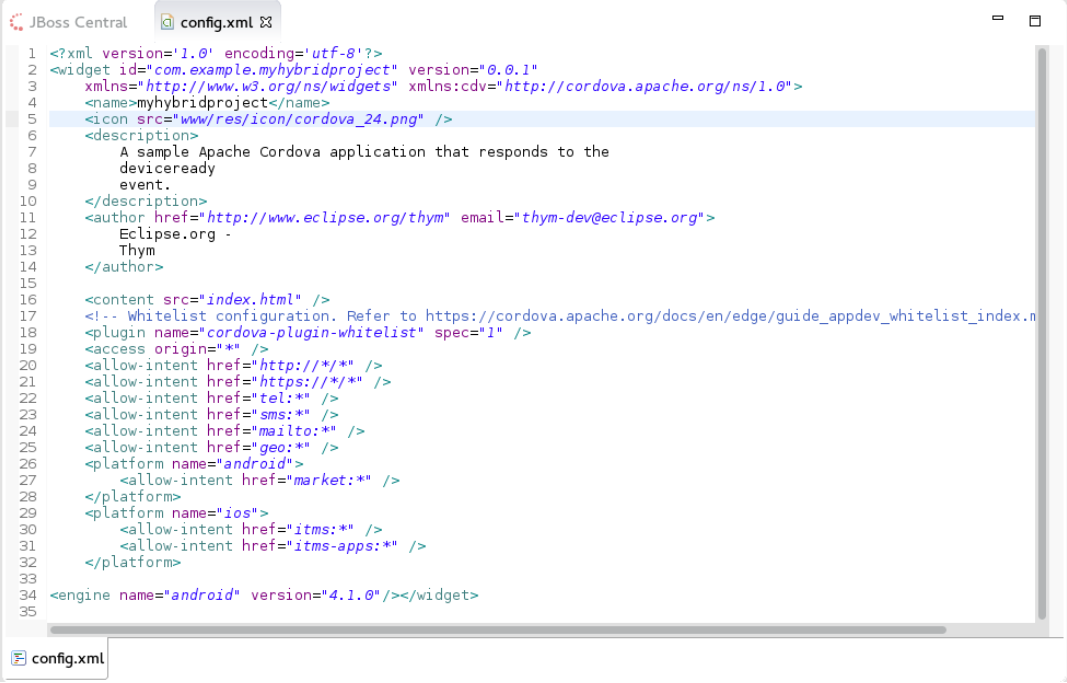
Alternatively,
-
To define a pixel-perfect icon for Android, add the following code in the
config.xmlfile:<platform name="android"> <icon src="www/res/android/[image name].png" density="ldpi" /> <icon src="www/res/android/[image name].png" density="mdpi" /> <icon src="www/res/android/[image name].png"density="hdpi" /> <icon src="www/res/android/[image name].png" density="xhdpi" /> </platform> -
To define a pixel-perfect icon for iOS, add the following code in the
config.xmlfile:<platform name="ios"> <icon src="www/res/ios/[image name].png" width="180" height="180" > </platform>
-
-
Save the
config.xmlfile. -
Right-click the application and click .
-
On the emulator, click the
Homebutton and then click theApplicationsbutton to view the modified icon for the application.
Result: The icon for the application is modified.
![]()
7. Edit an Application Splash Screen
You can edit the splash screen associated with your application using the splash tag within the platform tag in the config.xml file. If you are using Cordova 4.0.0 or higher, you must first install the new cordova-plugin-splashscreen to continue to use the splash screen and then use the steps below to edit the splash screen. For Cordova versions lower than 4.0.0, simply follow the steps below to edit the splash screen.
To change the application splash screen:
-
Save the image for the splash screen in the <workspace>
/www/resdirectory of your project. -
In the IDE, in the
Project Explorerview, locate theconfig.xmlfile.Note:If you are using Cordova 4.0.0 or lower, theconfig.xmlfile is located in the {project_name}>wwwdirectory. For Cordova versions higher than 4.0.0, theconfig.xmlfile is located, a level higher, in the project directory. -
Double-click
config.xmlto open it in the config.xml editor. -
Click the
config.xmltab to edit the file. -
To define the splash screen add the following code within the widget tag in the
config.xmlfile:Note:You can use any density that exists in the Android project.<platform name="android"> <splash src="www/res/[image name].png" density="land-hdpi"/> <splash src="www/res/[image name].png" density="land-ldpi"/> <splash src="www/res/[image name].png" density="land-mdpi"/> <splash src="www/res/[image name].png" density="land-xhdpi"/> <splash src="www/res/[image name].png" density="port-hdpi"/> <splash src="www/res/[image name].png" density="port-ldpi"/> <splash src="www/res/[image name].png" density="port-mdpi"/> <splash src="www/res/[image name].png" density="port-xhdpi"/> </platform> <preference name="SplashScreenDelay" value="10000" /> -
Save the
config.xmlfile. -
Right-click the application and click .
Result: The edited splash screen appears while the application is starting.
Did You Know?
-
You can manually initiate installation of JBoss Hybrid Mobile Tools and CordovaSim by locating them in the JBoss Central
Software/Updatetab or by dragging the following link into JBoss Central: https://devstudio.jboss.com/central/install?connectors=org.jboss.tools.aerogear.hybrid -
You can change the Cordova engine associated with the project after it is created. In the
Project Explorerview, right-click the project and clickProperties. ClickHybrid Mobile Engineand select the engine you want to use. ClickOKto save the engine change and close thePropertieswindow. -
You can download multiple Cordova engines to your system with which to build your projects. The
Downloadwizard can be accessed from theHybrid Mobile Enginepane in the projectPropertieswindow, in addition to theHybrid Mobile Projectwizard. -
From the IDE you can also initiate testing of Cordova projects with a connected Android device, system Android Emulator, and system iOS Simulator. The project is built in the necessary native format during the process.
-
With the CordovaSim control panel, you can generate simulated data for a range of device hardware, including geolocation and battery status. CordovaSim also manages camera actions, enabling you to upload system images to simulate receiving camera data.
-
A
Shakebutton underAccelerometerin the CordovaSim control panel enables you to simulate a hardware-shake gesture and test the impact on your application.