Create and Import Node.js Applications
Node.js is an event-based, asynchronous I/O framework and is used to develop applications that run JavaScript on the client and server side. This allows the application to re-use parts of the code and to avoid switching contexts. Node.js is commonly used to create applications such as static file servers, messaging middleware, HTML5 game servers, web application framework, and others.
JBoss Tools supports node.js application development using the npm package installer and offers a built-in debugging tool to identify and fix issues with applications. In the subsequent sections, instructions are available for the following tasks:
Setting Up Prerequisites for Node.js Development
Ensure that the following prerequisites are met to start developing node.js applications in JBoss Tools:
-
Install npm. On Red Hat Enterprise Linux and Fedora, use the
sudo dnf install npmcommand. See the npm documentation (https://docs.npmjs.com/getting-started/installing-node) for installation information about other operating systems. -
Install JBoss Tools.
Result: You are now ready to start developing Node.js applications with JBoss Tools.
Creating a new JavaScript Application
To create a new JavaScript project and application in JBoss Tools:
-
To create a new JavaScript project:
-
Click and type
JavaScriptin the search text box. -
Select
JavaScript Projectand click Next. -
In the
Project Namefield, add a name for your new project. -
Ensure that the rest of the fields, which are set to the default settings, are as required, and then click Finish to create the new project.
-
If asked to view the JavaScript perspective, click Yes. Your new project is listed in the
Project Explorerview.
-
-
To interactively create a
package.jsonfile:-
Click and then type
npmin the search box. -
From the search results, click npm Init.
-
Set the Base directory to your JavaScript project folder in your JBoss Tools workspace.
-
Optionally, clear the
Use default configurationcheck box to supply non-default values for these fields. -
Click Finish to continue with the default values for the
package.jsonfile or to continue after changing the default values.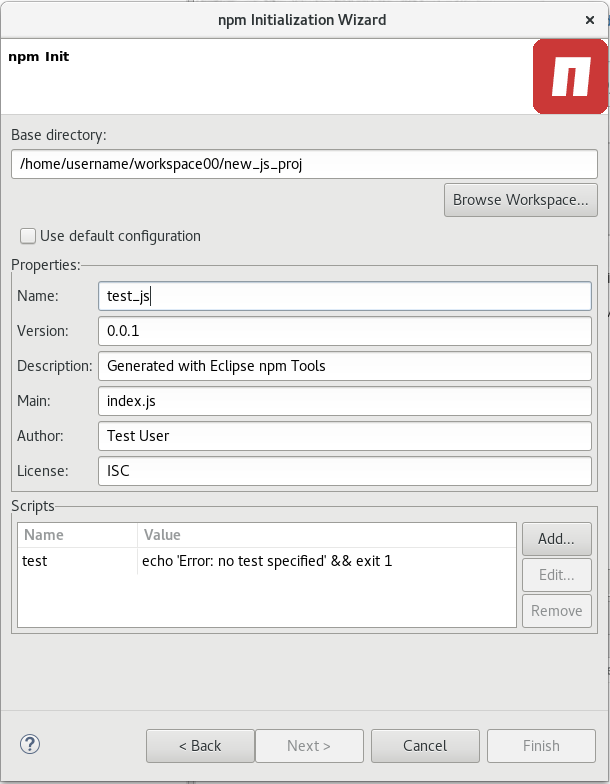 Figure 1. Generate a New package.json File
 -
The new
package.jsonfile is generated and displayed for editing. If required, manually edit the file in the displayed pane and save the changes.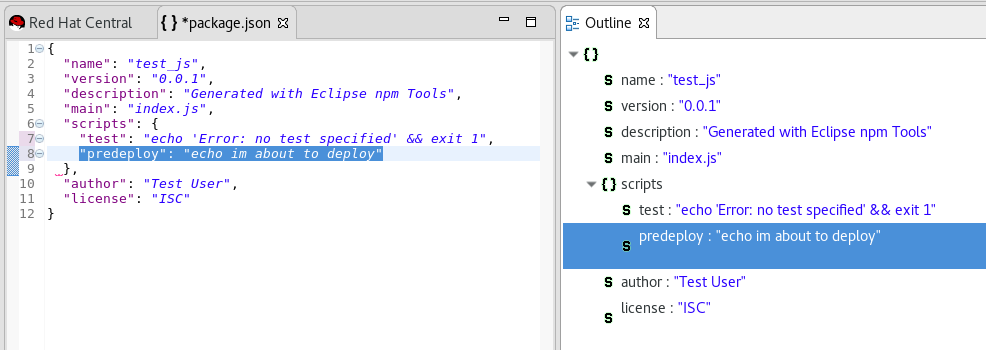 Figure 2. Manually Edit the Generated package.json File
-
-
Manually edit the
package.jsonfile to add dependencies. Dependencies are modules which provide extended functionality, such as libraries and frameworks. See the following screen capture for an example of the required format for dependencies and developer dependencies.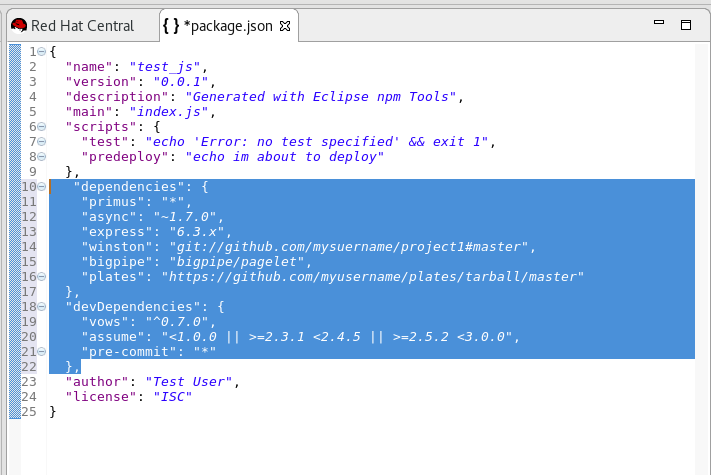 Figure 3. Adding Dependencies to the package.json File
For further details about dependencies, see the NPM documentation: https://docs.npmjs.com/files/package.json#dependencies
-
Create a new JavaScript file with the required business logic:
-
In the
Project Explorerview, right-click the name of your project, and select . -
In the dialog box, add a name for the new file, for example
index.js, and click Finish to create the new file. -
The new file displays for editing in a new tab. Add the required business logic to the your JavaScript files and save the changes.
-
-
Run the project files by right-clicking the
index.jsfile in your project and select . TheConsoleview appears and displays details about the application as it runs, or errors if it is unable to run the application.
Result: You have created a new JavaScript project and application.
Importing an Existing JavaScript Project
You can import an existing JavaScript project directly into JBoss Tools and then make changes and run the project as follows:
-
Import an existing project into JBoss Tools:
-
Click .
-
In the
Importdialog box, expand the General option. -
Click Existing Projects into Workspace and then click Next.
-
In the
Import Projectsdialog box:-
Click either the
Select root directoryorSelect archive fileoptions based on your project format. -
Click Browse to add the path to the project root directory or archive file.
-
In the
Projectsbox, select one or more projects to import into the workspace. -
If required, click the
Search for nested projectsoption to locate nested projects in the root directory or archive file. -
Click the
Copy projects into workspaceoption to save a copy of the imported project in the workspace directory specified for JBoss Tools. -
If required, select the
Add project to working setscheckbox and add the details for a new or existing working set. -
Click Finish to add the project to the workspace. The
Project Explorerview now contains your imported project.
-
-
-
If required, expand the project in the
Project Explorerview and either double-click the project files to edit them, or right-click and select to add a new JavaScript file for your project. -
Run the project files by right-clicking the
index.jsfile in your project and click . TheConsoleview appears and displays details about the application as it runs, or errors if it is unable to run the application.
Result: You have imported an existing JavaScript project into JBoss Tools.
Debugging Node.js Applications
After either creating a new Node.js project or importing an existing one and then running the project, some errors may appear. JBoss Tools includes a debugger to help identify and resolve these issues. To use the debugging feature:
-
Start the debugger for your project:
-
In the
Project Explorerview, expand your project. -
Right-click the
index.jsfile for your project and click . -
Select the
Remember my decisioncheck box in the dialog box to apply your selection to subsequent perspective shifts and then click Yes or No to continue.
-
-
Review the elements of your project’s JavaScript files to locate errors in one of two ways:
-
Expand any variable listed in the
Variablestab to view additional objects and edit the details for each item. -
Hover the mouse cursor over any variables in the
index.jstab to view and edit its property details.
-
-
Make changes to the files to address the errors:
-
Edit the
index.jsfile in the appropriate view. -
Save the changes. The
Consoleview runs the updated file and displays changes.
-
-
After debugging the errors, use the Resume, Suspend, and Terminate buttons (
 ) as follows to test your changes:
-
The Resume button (green triangle) continues running the project files.
-
The Suspend button (two yellow rectangles) temporarily stops running the project files to allow users to make changes.
-
The Terminate button (red square) ends the running of the project files.
-
-
Repeat steps 4 through 6 as necessary to locate and fix errors found by the debugger.
-
When debugging is concluded, click and select
Project Explorerfrom the options. This displays the list of projects again.
Result: You have debugged your application and returned to the Project Explorer view.