Red Hat Developer Studio offers Forge Tools for developing Java EE applications and to extend the IDE functionality in Eclipse. Start developing Java EE applications using either the Forge context menu or the command line from the IDE.
Create a New Project
After you have created a Forge project you can set up persistence, add entities and fields, and create scaffold for the project.
To create a new project:
-
Press Ctrl+4 to start Forge and open the JBoss Forge context menu.
-
Click
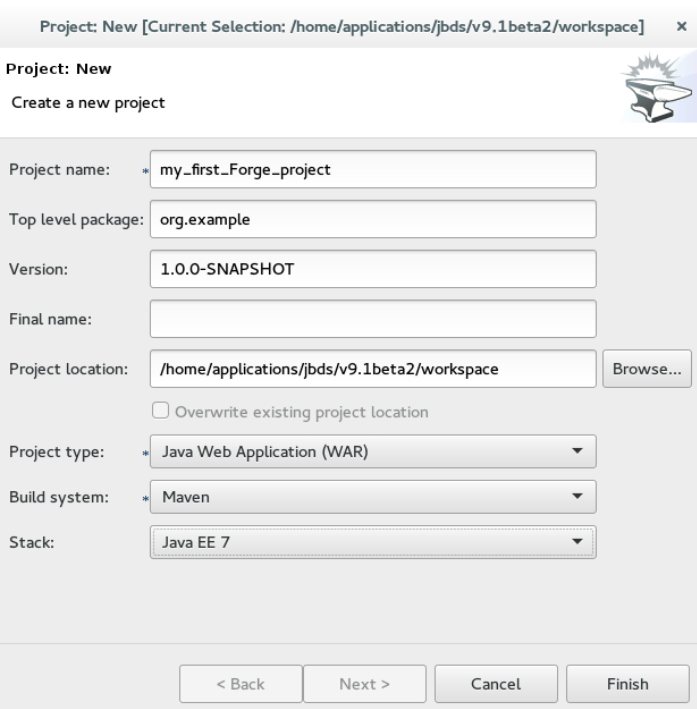
Project:Newto open theCreate a new projectwindow. -
In the
Create a new projectwindow:-
In the
Project namefield, type a project name. -
In the
Top level packagefield, type{com.example}as the top package. -
In the
Project locationfield, enter a target location for the Forge project. -
In the
Stacklist, clickJava EE 7.
-
-
Click
Finish.
Result: The project is listed in the Project Explorer view.
Set Up Persistence
Setting up the JPA prerequisites, creates the persistence.xml file in the project and adds the required dependencies to the pom.xml file.
Note: While creating the JPA entity, the Forge console automatically detects any prerequisites that must be set up and prompts you to create those at runtime.
To set up persistence:
-
Press Ctrl+4 to open the JBoss Forge context menu.
-
Click
JPA: New Entity. The window is populated with default values. -
Click
Nextto continue using the default values or edit the fields to change the values. -
In the
Configure your connection settingswindow, ensure that the fields display the appropriate values and then clickNext. -
In the
Create a new JPA entitywindow:-
In the
Package Namefield, type the package name. -
In the
Type Namefield, type a name for the new entity.
-
-
Click
Finish.
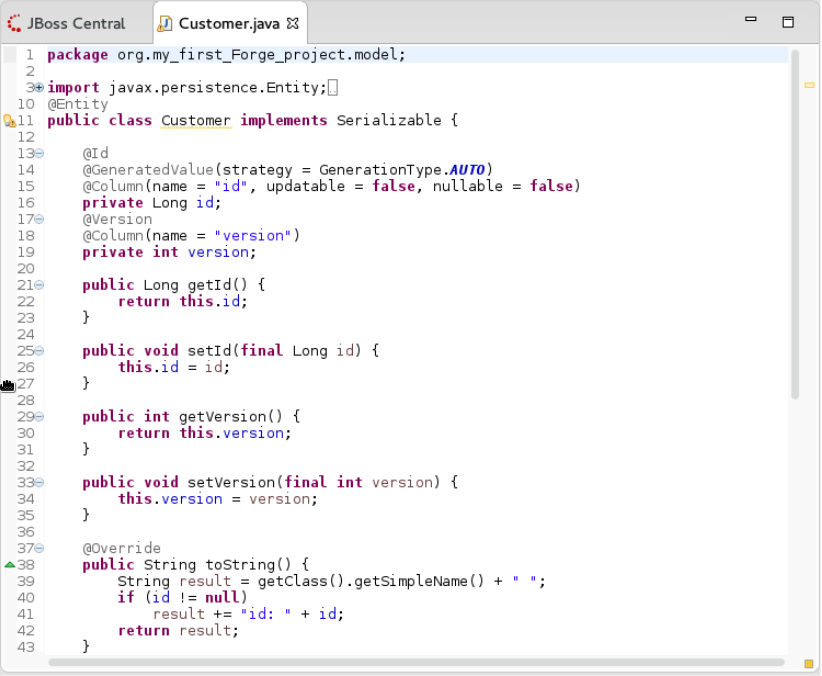
Result: The new entity appears in the JBoss editor and is also listed in the Project Explorer view with the name: {entity_name}.java.
Add Fields to the Entity
To add fields to the entity:
-
Press Ctrl+4 to open the JBoss Forge context menu.
-
Click
JPA: New Field. -
In the
Create a new fieldwindow:-
In the
Target Entityfield, select{package_name.model.entity}. -
In the
Field Namefield, typeFirstName.
-
-
Click
Finish.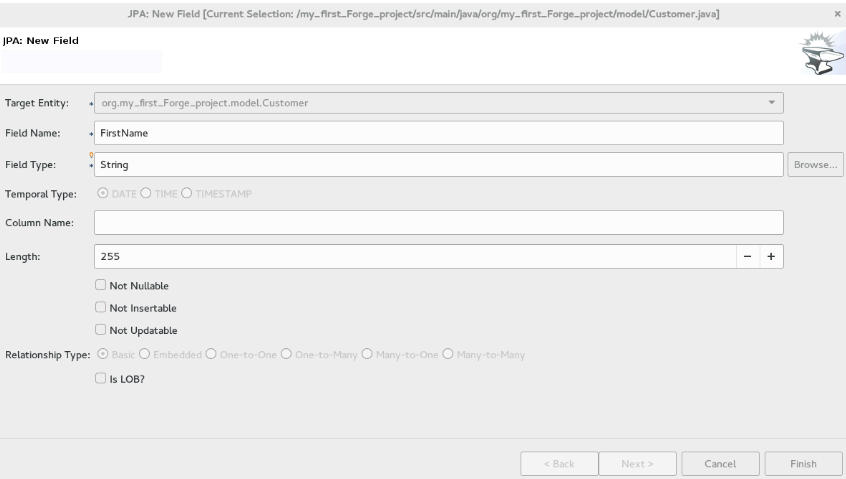 Figure 3. Add Field to the Entity
 -
Repeat steps 1 through 4 to add more fields to the entity.
Result: The fields are added to the Customer.java file.
Create Scaffold
Scaffolding is automatic code generation by a program, using available information, usually a database to generate a basic CRUD (create, read, update, delete) admin interface. The Scaffold Generate command is used to create the scaffold.
To create the scaffold:
-
Press Ctrl+4 to open the JBoss Forge context menu.
-
Click
Scaffold Generate. -
In the
Scaffold Typelist, clickAngular JSand then clickNext. -
If your project is not configured to use all the technologies that you want to use, Forge prompts you to set up the dependencies. Click
Next. -
In the
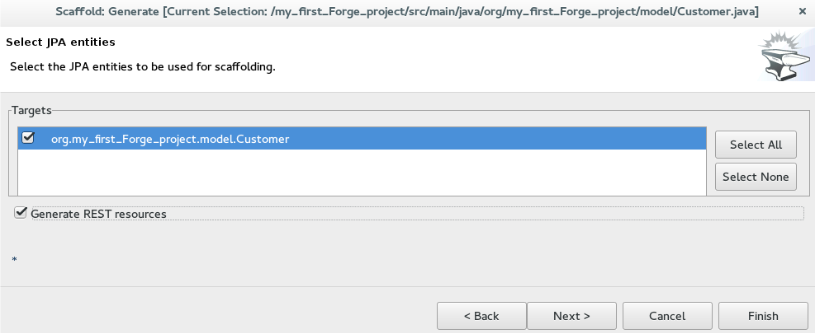
Select JPA entitieswindow:-
Select the check box in the
Targetsfield. -
Select the
Generate REST resourcescheck box.
-
-
Click
Finish.
Result: The entities are created and listed in the Project Explorer view.
Run and Test the Application
In this example we use the JBoss EAP server to run the application.
To run the application:
-
In the
Project Explorerview, right-click the application and clickRun As>Run on Server. Alternatively, drag and drop the application from theProject Explorerview to theJBoss EAP {version}server in theServersview. The application opens in the default browser. -
Click
Customersand then clickCreateto create a new customer. -
In the
FirstNameand theLastNamefields, enter the first and last names and clickSave. The customer is added to the application.
Use the Search for Customers section to search for customers by their first and/or last names.
Create Extensions/Add Ons
The add ons/extensions run inside the IDE. After adding commands and features to the add-on, no further changes are required for the extensions or add-ons to run in another IDE.
To create an add-on:
-
Press Ctrl+4 to open the JBoss Forge context menu.
-
Click
Project:New. -
In the
Create a new projectwindow:-
In the
Project namefield, type a name for the add-on. -
In the
Project typelist, clickForge Addon (JAR).
-
-
Click
Next. -
In the
Furnace Addon Setupwindow,Depend on these addonssection, Forge automatically selects the prerequisites. Review the dependencies and clickFinish. -
Press Ctrl+4 to open the Forge context menu.
-
Select
Java: New Classto open theJava: New Classwindow. -
In the
Type Namefield, typeCustomCommandand clickFinish. The CustomCommand.java file opens in the JBoss editor. -
To change this Java class into a Forge command:
-
Press Ctrl+4 to open the Forge context menu.
-
Select
Addon: New UI Commandto open theGenerates a UICommand implementationwindow. -
In the
Generates a UICommand implementationwindow:-
In the
Type Namefield, typeCustomCommand. -
In the
Command namefield, typecustom.
-
-
Click
Finish.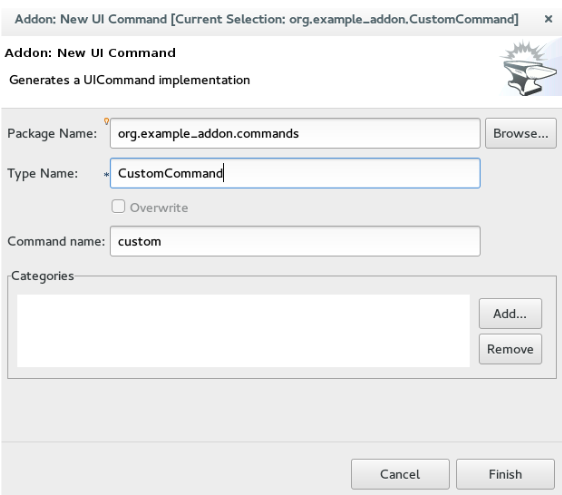 Figure 5. Add a Command
The command is listed in the CustomerCommand.java file.
-
-
Press Ctrl+4 to open the Forge context menu.
-
Select
Build and Install an Addonto open theBuild and install a Forge addonwindow. -
Click
Finishto install the add-on into the IDE. -
To execute the installed command:
-
Press Ctrl+4 to open the Forge context menu.
-
Select
custom. -
Add parameters to the method in order to add user input to the command. Copy and paste the following command in the CustomCommand.java file:
        package org.jboss.forge.addon.commands;

        import org.jboss.forge.addon.configuration.Configuration;
        import org.jboss.forge.addon.resource.URLResource;
        import org.jboss.forge.addon.ui.command.AbstractUICommand;
        import org.jboss.forge.addon.ui.context.UIBuilder;
        import org.jboss.forge.addon.ui.context.UIContext;
        import org.jboss.forge.addon.ui.context.UIExecutionContext;
        import org.jboss.forge.addon.ui.input.UIInput;
        import org.jboss.forge.addon.ui.metadata.UICommandMetadata;
        import org.jboss.forge.addon.ui.metadata.WithAttributes;
        import org.jboss.forge.addon.ui.util.Metadata;
        import org.jboss.forge.addon.ui.util.Categories;
        import org.jboss.forge.addon.ui.result.Result;
        import org.jboss.forge.addon.ui.result.Results;

        import java.lang.Override;
        import java.lang.Exception;

        import javax.inject.Inject;

        public class JIRASetupCommand extends AbstractUICommand
        {
               @Inject
               @WithAttributes(label = "JIRA URL", required = true)
                private UIInput<URLResource> url;

        @Inject
        private Configuration config;

        @Override
        public UICommandMetadata getMetadata(UIContext context)
        {

             return Metadata.forCommand(getClass())
                    .name("JIRA: Setup")
                    .description("Setup the JIRA Addon")
                    .category(Categories.create("JIRA", "Setup"));
        }

        @Override
        public void initializeUI(UIBuilder builder) throws Exception

        {
              builder.add(url);
        }

         @Override
         public Result execute(UIExecutionContext context)
         {
               String targetUrl = url.getValue().getFullyQualifiedName();
               Configuration subset = config.subset("jira");
               subset.setProperty("url", targetUrl);
               return Results.success("JIRA URL set to: "+targetUrl);
          }
         }
-
-
To rebuild and install:
-
In the
Project Explorerview, click the created add-on. -
Press Ctrl+4 to open the Forge context menu.
-
Select
Build and Install an Addon. -
Click
Finishto install the add-on into the IDE. -
Press Ctrl+4 to open the Forge context menu.
-
Click
JIRA: Setup.
-

Result: The add-on is created and listed in the Forge context menu.

