Hibernate Tools is a collection of tools for projects related to Hibernate version 5 and earlier. The tools provide Eclipse plugins for reverse engineering, code generation, visualization and interaction with Hibernate. Use the Hibernate Tools to easily generate, test and prototype your Hibernate or JPA mapped projects. You can also use Hibernate to Run queries, browse mappings and generate code for your data projects.
Create a JPA Project and Connect to the Sakila-h2 Database
Prerequisite
To connect to the sakila-h2 database:
-
Download the sakila-h2 database from <<https://github.com/maxandersen/sakila-h2, h2 version of the Sakila database>>.
-
On the terminal, navigate to the directory where you have saved the
sakila-h2.jarfile and run the following command to start the database:$ ./runh2.sh.
To create a JPA project and connect to the database:
-
In the workspace, click
File>New>Otherand then search forJPA Projectand double-click it to open theNew JPA Projectwizard. -
In the
New JPA Projectwizard:-
In the
Project namefield, type a name for the project. -
In the
Target runtimefield, click a runtime server that you wish to use. -
In the
JPA versionlist, click2.1.
-
-
Click
Next.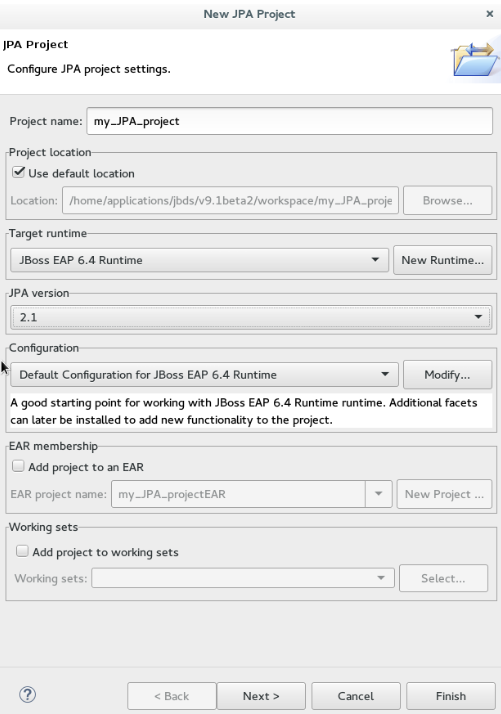 Figure 1. Create a New JPA Project
 -
In the
Java Configure project for building a Java applicationwindow, select the source folder on the build path and clickNext. -
In the
JPA Facetwindow, clickAdd connection. -
In the
New Connection Profilewindow:-
Click
Generic JDBC. -
In the
Namefield, typesakila.
-
-
Click
Next. -
Click the
New Driver Definitionicon (image::hibernate_dev_app_newdriverdef_icon.png)[New Driver Definition Icon]) located next to theDriversfield. -
Click the
Name/Typetab, clickGeneric JBDC Driverand then click theJAR listtab. -
Click
Add JAR/Zipand then select the previously downloaded sakila-h2.jar file.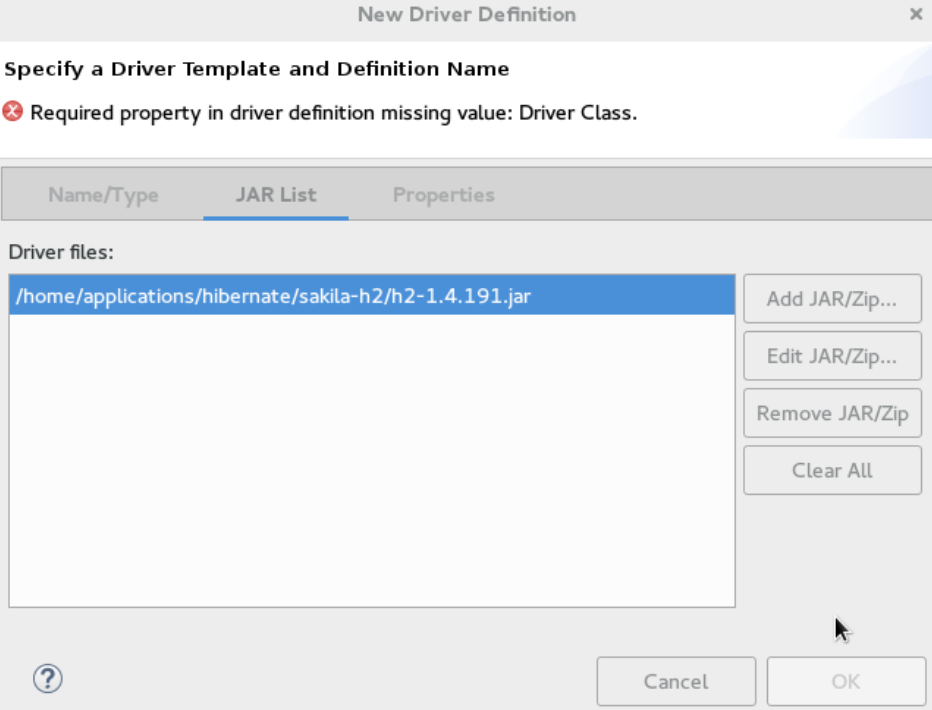 Figure 2. Select sakila-h2.jar File
 -
Click the
Propertiestab and enter the following details in thePropertiestable:-
Click
Connection URLand typejdbc:h2:tcp://localhost/sakila. -
Click
Driver Class, and then click the ellipsis icon . -
In the
Available Classes from Jar Listwindow, clickBrowse for class. ClickOKwhen the required driver is found. -
Click
User ID, typesa.
-
-
In the
New Driver Definitionwindow, clickOK. -
In the
New Connection Profilewindow, clickFinishto return to theJPA Facetwindow. -
In the
Platformlist, clickHibernate (JPA 2.1). -
In the
JPA implementationpane,Typelist, either clickUser Libraryand then clickManage libraries(). In thePreferences (Filtered)window add the libraries, OR clickDisable Library Configuration. -
Click
Finish.
)
Result: The project is created and is listed in the Project Explorer view.
Generate DDL and Entities
DDL, Data Definition Language, is a syntax to define data structures. Generate DDL and entities to enable Hibernate runtime support in an Eclipse JPA project.
To generate DDL and Entities:
-
In the
Project Explorerview, right-click the {project_name}. -
Click
JPA Tools>Generate Tables from EntitiesorGenerate Entities from Tables. TheGenerate Entitieswindow (or theGenerate Tables from Entitieswindow) appears. -
In the
Generate Entitieswindow:-
In the
Output directoryfield, change the default directory, if required. -
Optionally, in the
Packagefield, type the package name. -
Ensure that the
Use Console Configurationcheck box is selected. -
In the
Console Configurationlist, ensure that the relevant configuration is shown.
-
-
Click
Finish.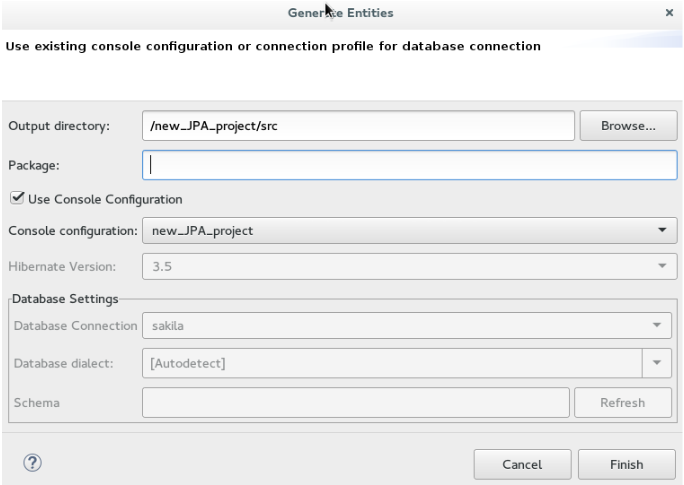 Figure 3. Generate Entities
Create a Hibernate Mapping File
Hibernate mapping files specify how your objects relate to database tables. To create basic mappings for properties and associations, i. e. generate .hbm.xml files:
-
Create a new Hibernate Mapping file:
-
Click
File>New. -
In the
Newwizard, locateHibernateand then clickHibernate XML Mapping file (hbm.xml).
-
-
Click
Next. -
In the
New Hibernate XML Mapping files (hbm.xml)window:-
Click
Add Classto add classes or clickAdd Packagesto add packages.
-
Note: You can create an empty .hbm file by not selecting any packages or classes. An empty .hbm file is created in the specified location.
-
Click the
depth controlcheck box to define the dependency depth used when choosing classes. -
Click
Next. -
Select the target folder location.
-
In the
File namefield, type a name for the file and clickFinish.
Result: The hibernate.hbm.xml file opens in the default editor.
Create a Hibernate Configuration File
For reverse engineering, prototype queries, or to simply use Hibernate Core, a hibernate.properties or hibernate.cfg.xml file is needed. Hibernate Tools provides a wizard to generate the hibernate.cfg.xml file if required.
To create a Hibernate Configuration file:
-
Create a new cfg.xml file:
-
Click .
-
In the
Newwizard, locateHibernateand then clickHibernate Configuration File (cfg.xml).
-
-
Click
Next. -
In the
Create Hibernate Configuration File (cfg.xml)window, select the target folder for the file and then clickNext. -
In the
Hibernate Configuration File (cfg.xml)window:-
The
Containerfield, by default, shows the container folder. -
The
File namefield, by default, shows the configuration file name. -
In the
Database dialectlist, click the relevant database. -
In the
Driver classlist, click the driver class depending on the database dialect that you just selected. -
In the
Connection URLlist, click the relevant URL. -
Click the
Create a console configurationcheck box to use the hibernate.cfg.xml file as the basis of the console configuration.
-
-
Click
Finish.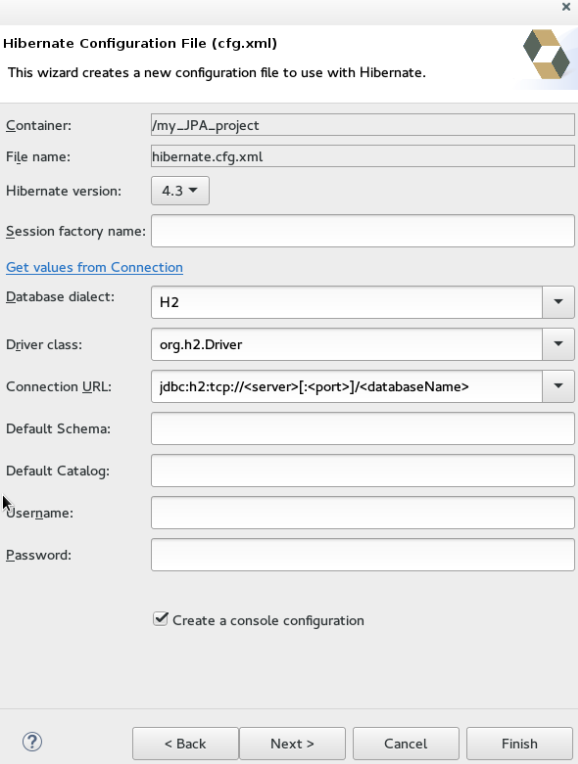 Figure 4. Create a New cfg.xml File
Result: The new hibernate.cfg.xml file opens in the default editor.
Create a Hibernate Console Configuration
A Console configuration describes how the Hibernate plugin configures Hibernate. It also describes the configuration files and classpaths needed to load the POJOs, JDBC drivers, etc. It is required to make use of query prototyping, reverse engineering and code generation. You can have multiple console configurations per project, but for most requirements, one configuration is sufficient.
To create a Hibernate console configuration:
-
Create a cfg.xml file:
-
Click .
-
In the
Newwizard, locateHibernateand then clickHibernate Configuration File (cfg.xml).
-
-
Click
Next. -
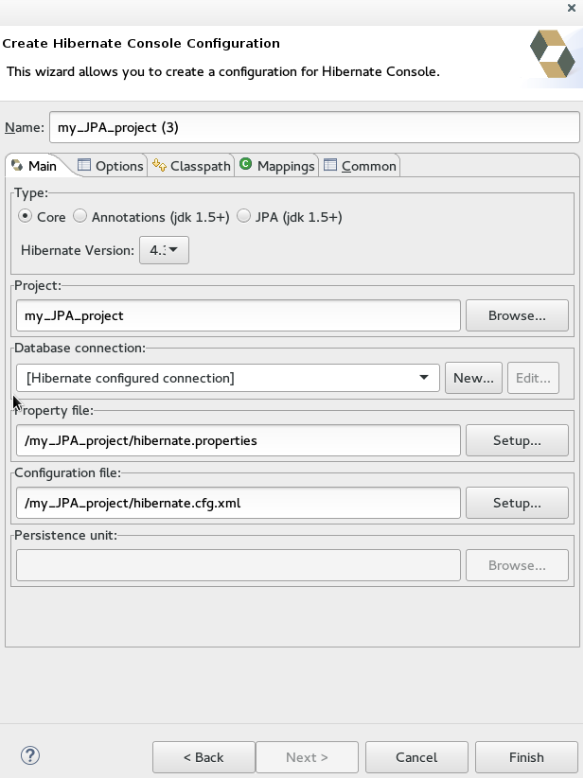
In the
Create Hibernate Configurationwindow,Maintab:-
In the
Namefield, the generated name provided by default can be edited if required. -
In the
Typefield, clickCore. -
In the
Hibernate Versionlist, select the relevant version. -
In the
Projectfield, type a project name or clickBrowseto locate an existing project. -
In the
Database connectionfield, clickNewto configure a new database connection or leave as is to use the default connection. -
In the
Property filefield, clickSetupto set the path to the first hibernate.properties file found in the selected project (refer to the Did You Know, Setup Property File section for detailed steps). Once created the path of the .properties file displays in theProperty filefield. -
In the
Configuration filefield, clickSetupto set the path to the first hibernate.cfg.xml file found in the selected project (refer to the Did you know, Setup Configuration File section for detailed steps). Once created the path of the hibernate.cfg.xml file displays in theConfiguration filefield.
-
-
Click
Finish.
Modify the Hibernate Configurations
You can edit the Hibernate Configurations from the Hibernate Configurations view.
To modify the Hibernate Configurations:
-
Click and then click
Hibernate Configurations. -
In the
Hibernate Configurationsview, right-click the {project_name} and clickEdit Configuration. -
The
Edit launch configuration propertieswindow displays. Edit the fields. -
To close the
Hibernate Configurationsview, right-click the configuration and then clickClose Configuration.
Generate Code and Reverse Engineering
Hibernate tools’ reverse engineering and code generation features allow you to generate a range of artifacts based on a database or an existing Hibernate configuration, like mapping files or annotated classes. Among others, these generated artifacts can be POJO Java source files, hibernate.hbm.xml files, hibernate.cfg.xml generation and schema documentation.
To generate code:
-
Configure Hibernate:
-
Click .
-
Search for
Hibernateand double-click it. TheHibernate Configurationsview appears.
-
-
View the Hibernate Code Generation Configurations:
-
In the toolbar, next to the
Runicon, click the down arrow. -
Click
Hibernate Code Generation Configurations.
-
-
Expand
Hibernate Code Generationand then clickNew_configuration. -
In the
Create, manage, and run configurationswindow, in theNamefield, type a logical name for the code generation launcher. If you do not specify a name, the default name,New_Generation, is used. -
In the
Maintab, enter the following details:The
At least one exporter option must be selectedwarning indicates that for the launcher to work you must select an exporter on theExportertab. The warning disappears after you select an exporter.-
In the
Console Configurationlist, click the name of the console configuration to be used when generating code. -
In the
Output directoryfield, clickBrowseand select an output directory. This is the default location where all output will be written. You can enter absolute directory paths, for example: d:/temp. Note that existing files will be overwritten/ if the correct directory is not specified. -
To reverse engineer the database defined in the connection information, click the Reverse engineering from JDBC connection check box. JBoss Developer Studio generates code based on the database schema when this option is used.If this option is not enabled, the code generation is based on the existing mappings specified in the Hibernate Console configuration.
-
In the
Packagefield, add a default package name for any entities found when reverse engineering. -
In the
reveng.xmlfield, clickSetupto select an existing reveng.xml file, or create a new one. This file controls certain aspects of the reverse engineering process, such as:-
how JDBC types are mapped to Hibernate types
-
which tables are included or excluded from the process
-
-
In the
reveng. strategyfield, clickBrowseand provide an implementation of a ReverseEngineeringStrategy. this must be done if the reveng.xml file does not provide enough customization; the class must be in the classpath of the Console Configuration because if not, you will get a class not found exception.Refer to the Did You Know, Create, manage, and run configurations window, Main tab, Check Boxes section for details of the selected check boxes.
-
The
Exportertab specifies the type of code that is generated. Each selection represents an Exporter that generates the code. In the Exporter tab:-
Click the
Use Java 5 syntaxcheck box to use a Java 5 syntax for the Exporter-
Click the
Generate EJB3 annotationscheck box to generate EJB 3 annotations -
Select the Exporters from the
Exporterstable. Refer to the Did You Know, Exporter section for details about the exporters.Each Exporter selected in the preceding step uses certain properties that can be set up in the
Propertiessection. In thePropertiessection, you can add and remove predefined or custom properties for each of the exporters.
-
-
-
-
Click
Addnext to thePropertiestable to add a property to the chosen Exporter. In the resulting dialog box, select the property from the proposed list and the appropriate value for it. For an explanation of the property and its value, refer to the Did You Know, Exporter Property and its Values section. -
Click the
Refreshtab and enter the following:-
Click the
Refresh resources upon completioncheck box to refresh the resources and click one of the following:-
The entire workspace: To refresh the entire workspace. -
The selected resource: To only refresh the selected resource -
The project containing the selected resource: To refresh the project containing the selected resource -
The folder containing the selected resource: To refresh the folder containing the selected resource -
Specific resources: To refresh specific resources; then clickSpecify Resourcesto open theEdit Working Setwindow and select the working set.
-
-
Click the
Recursively include sub-folderscheck box to refresh the sub-folders.
-
-
Click the Common tab and enter the following:
-
In the Save as pane, click Local file to save the configuration as a local file, OR click Shared file and then select a shared file location.
-
In the Display in favourites menu pane, click the menu to display the configuration.
-
In the Encoding pane, click the format that you want the configuration to be encoded to.
-
In the Standard Input and Output pane, click the Allocate console check box and optionally click the Input File and Output File check boxes and select the relevant options.
-
Click the Launch in background check box to show the configuration launch progress in the background.
-
-
Click Apply and then click Run.
Did You Know {#dyk}
Set Up the Property File # {#setup_property_file}
To set up the property file:
-
In the Create Hibernate Configuration window, Main tab, click Setup.
-
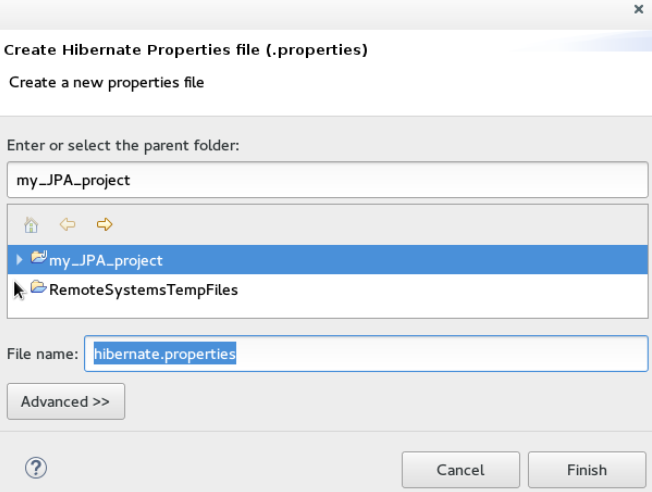
In the Setup property file window, clicCreate new to create a new property file (or click Use existing to choose an existing file as a property file).
-
In the Create Hibernate Properties file (.properties) window, click the parent folder name and then click Finish.
Set Up the Configuration File ## {#setup_config_file}
To set up the configuration file:
-
In the Create Hibernate Configuration window, Main tab, click Setup.
-
In the Setup configuration file window, click Use existing to choose an existing file as a property file (or click Create new to create a new property file).
-
In the Select hibernate.cfg.xml file window, expand the parent folder, choose the file to use as the hibernate.cfg.xml file, and then click OK.

Create, manage, and run configurations Window, Main tab, Check Boxes # {#main_tab_checkboxes}
The following check boxes are selected by default in the Create, manage, and run configurations window, Main tab:
-
Generate basic typed composite ids: When a table has a multi-column primary key, a <composite-id> mapping will always be created. If this option is enabled and there are matching foreign-keys, each key column is still considered a 'basic' scalar (string, long, etc.) instead of a reference to an entity. If you disable this option a <key-many-to-one> property is created instead. Note that a <many-to-one> property is still created, but is simply marked as non-updatable and non-insertable.
-
Detect optimistic lock columns: Automatically detects optimistic lock columns. Controllable via reveng. strategy; the current default is to use columns named VERSION or TIMESTAMP.
-
Detect many-to-many tables: Automatically detects many-to-many tables. Controllable via reveng. Strategy.
-
Detect one-to-one associations: Reverse engineering detects one-to-one associations via primary key and both the hbm.xml file and annotation generation generates the proper code for it. The detection is enabled by default (except for Seam 1.2 and Seam 2.0) reverse engineering. For Hibernate Tools generation there is a check box to disable this feature if it is not required.
Exporter Property and its Values # {#exporter_values}
-
jdj5: Generates Java 5 syntax
-
ejb3: Generates EJB 3 annotations
-
for_each: Specifies for which type of model elements the exporter should create a file and run through the templates. Possible values are: entity, component, configuration.
-
template_path: Creates a custom template directory for this specific exporter. You can use Eclipse variables.
-
template_name: Name for template relative to the template path.
-
outputdir: Custom output directory for the specific exporter. You can use Eclipse variables.
-
file_pattern: Pattern to use for the generated files, with a path relative to the output dir. Example: {package-name}/{class-name}.java.
-
Dot.executable: Executable to run GraphViz (only relevant, but optional for Schema documentation).
-
Drop: Output will contain drop statements for the tables, indices, and constraints.
-
delimiter: Is used in the output file.
-
create: Output will contain create statements for the tables, indices, and constraints.
-
scriptToConsole: The script will be output to Console.
-
exportToDatabase: Executes the generated statements against the database.
-
outputFileName: If specified the statements will be dumped to this file.
-
haltOnError: Halts the build process if an error occurs.
-
Format: Applies basic formatting to the statements.
-
schemaUpdate: Updates a schema.
-
query: HQL Query template
Exporter # {#exporter}
-
Domain code (.java): Generates POJOs for all the persistent classes and components found in the given Hibernate configuration.
-
Hibernate XML Mappings (.hbm.xml): Generate mapping (hbm.xml) files for each entity.
-
DAO code (.java): Generates a set of DAOs for each entity found.
-
Generic Exporter (<hbmtemplate>): Generates a fully customizable exporter that can be used to perform custom generation.
-
Hibernate XML Configuration (.cfg.xml): Generates a hibernate.cfg.xml file; used to keep the hibernate.cfg.xml file updated with any newly discovered mapping files.
-
Schema Documentation (.html): Generates a set of HTML pages that document the database schema and some of the mappings.
-
Schema Export (.ddl): Generates the appropriate SQL DDL and allows you to store the result in a file or export it directly to the database.
-
HQL Query Execution Exporter: Generates HQL Query according to given properties.
Troubleshooting
Problems while loading database driverclass
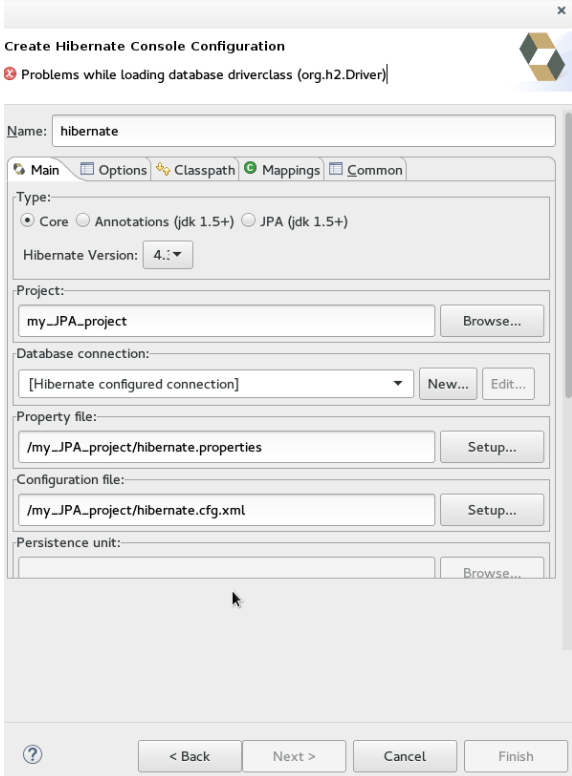
Error message: Problems while loading database driverclass (org.h2.Driver)
Resolution: To avoid this error, you must select a predefined DTP connection profile in the Database Connection dropdown. Also, the jar can be added on the Classpath page of the Console Configuration wizard if you don’t want to have it on the project classpath.
-
Right-click {project_name} > Properties > Java Build Path.
-
Click the Libraries tab and then click Add External JARs.
-
Navigate to the downloaded database JAR file and click OK.
-
In the Properties for {project_name} window, click Apply and then click OK.