In the context of application development, Maven provides a standardized build system for projects. One of the main benefits of using Maven with your project is that it facilitates fetching dependencies from one or more repositories. This article serves as an introduction to using Maven with the IDE and contains instructions for the following tasks:
Root Maven projects can serve as aggregators for multiple Maven modules, also known as sub-projects. For each module that is part of a maven project, a <module> entry is added to the project’s pom.xml file. A pom.xml that contains <module> entries is often referred to as an aggregator pom.
When modules are included into a project it is possible to execute Maven goals across all of the modules by a single command issued from the parent project directory.
Note that the provided instructions pertain to the creation of a parent+module project structure. If you prefer to create just a simple project, simply start with an archetype or don’t use the pom packaging in step 2.a.
|
1. Create a New Maven Project
Use the following instructions to create the parent project of a multi-module Maven project. The instructions provided ensure that the packaging option is set to pom, which is a requirement for multi-module Maven projects. Alternately, to create a standalone Maven project instead, set the packaging option to an option other than pom.
-
Create a new project:
-
In the workspace, navigate to .
-
Type
mavenin theFilterfield and selectMaven Project. -
Click
Nextto continue.
-
-
Enter the initial project details:
-
Check the
Create a simple project (skip archetype selection)check box. If this check box is selected, theSelect an Archetypestep of the wizard is skipped and the project type is set to pom, which is required to create a Maven Module based on this Maven project. Alternately, to create a standalone project, uncheck theCreate a simple project (skip archetype selection)check box and follow the instructions in the wizard. -
Ensure that the
Use default Workspace locationcheck box is not checked and specify a non-default location for your workspace files using theBrowsebutton. Using a non-default workspace location is recommended because this allows other tools to access the workspace location easily. -
The following optional steps are available for further configuration, if required:
-
(Optional) Check the
Add project(s) to working setcheck box to add the newly created projects to a working set. -
(Optional) Click
Advancedto view additional optional advanced configuration for the new Maven project, such as:-
Resolve Workspace projects: dependencies opened as workspace projects will be resolved without having to install them to your local Maven repository first. This way, any changes made to one of these dependencies will have an immediate effect on other projects consuming it (compilation, refactoring, etc.). WhenResolve Workspace projectsis disabled, dependencies existing in the workspace must be installed to your local Maven repository after any change (by runningmvn install), in order to see effects in projects consuming them. -
Profiles: select a set of Maven profiles to activate or deactivate in the workspace. Profiles are defined in the projectpom.xml, or inherited from a parentpom.xml, or defined in the relevantsettings.xml. -
Name templates: allows you to disambiguate projects names in the workspace by prepending or appending the group ID or SCM branch names to the default artifact ID.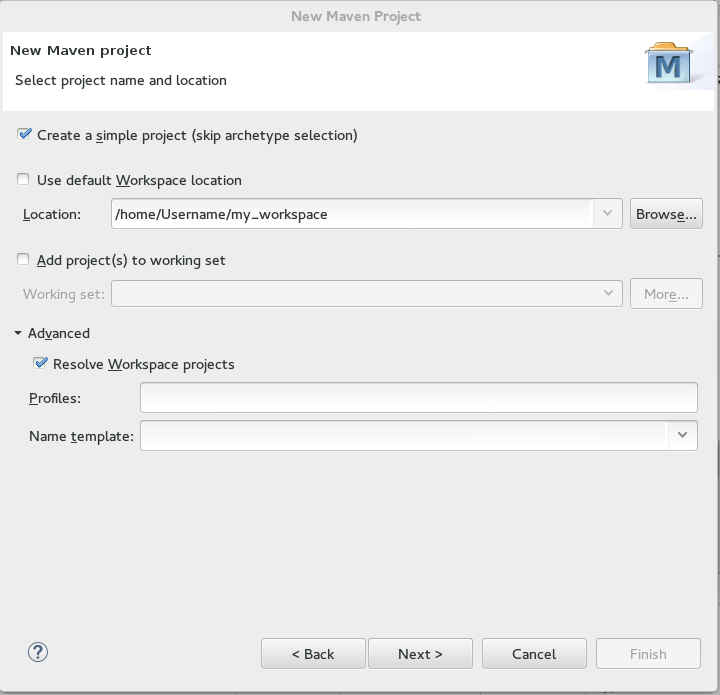 Figure 1. Create a New Maven Project
-
-
-
When the configuration is complete, click
Nextto continue.
-
-
Configure the project details:
-
Enter the desired group ID, which is similar to an organization namespace (for example, com.company.businessunit.project), in the
Group Idfield. -
Enter the desired artifact ID value, which is the name for your project, in the
Artifact Idfield. This value must not include any spaces and the only special characters allowed are periods ('.'), underscores ('_'), and dashes ('-'). -
Set the
Versionfield’s value to0.0.1-SNAPSHOTor a similar value. For details about the appropriate version build numbers, see Project Versions -
Set the value of the
Packagingfield topom. -
(Optional) Add a name for your project in the
Namefield. -
(Optional) Add a description for your project in the
Descriptionfield.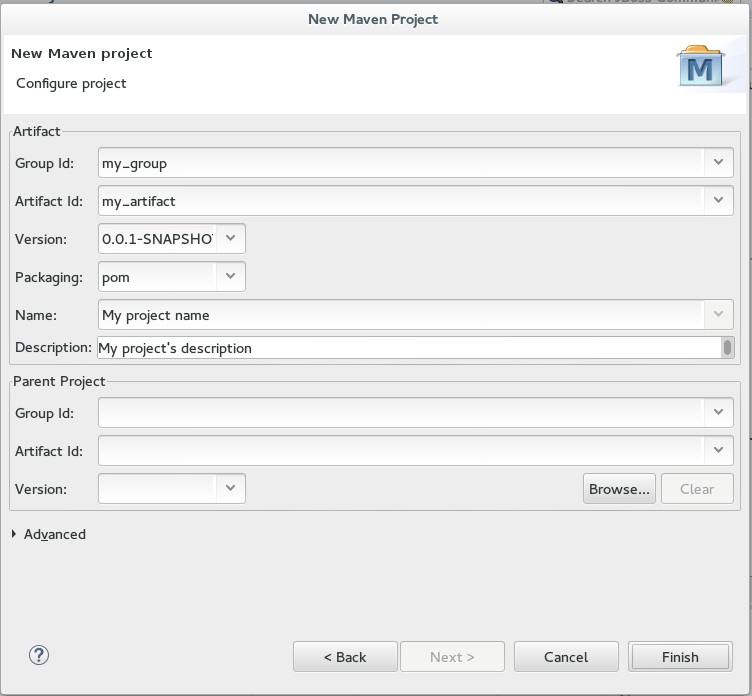 Figure 2. Configure Project Details
 -
Click
Finishto conclude the new Maven project creation wizard.
-
Result: Your new Maven project is created and appears in the Project Explorer view.
2. Create a New Maven Module
Each Maven project with a packaging pom can include multiple Maven modules. Follow the instructions to create your first Maven module:
Prerequisites
-
You must have an existing Maven project available with the packaging type pom. See Create a New Maven Project for instructions to create a new Maven project.
Creating a New Maven Module
-
Create a new Maven module as follows:
-
In the Project Explorer view, right-click the recently created pom project and select .
-
From the wizard selection screen, expand
Mavenand selectMaven Module. -
Click
Next >to continue.
-
-
Enter the initial module details:
-
Ensure that the
Create a simple project (skip archetype selection)check box is not checked. If this check box is selected, theSelect an Archetypestep of the wizard is skipped. -
Enter the desired module name in the
Module Namefield. This value corresponds to the Maven project’s Project ID. -
Use the
Browsebutton to locate the desired parent project and select it. -
The following optional steps are available for further configuration, if required:
-
(Optional) Check the
Add project(s) to working setcheck box to add the newly created projects to a working set. -
(Optional) Click
Advancedto view additional optional advanced configuration for the new Maven project, such as:-
Resolve Workspace projects: dependencies opened as workspace projects will be resolved without having to install them to your local Maven repository first. This way, any changes made to one of these dependencies will have an immediate effect on other projects consuming it (compilation, refactoring, etc.). WhenResolve Workspace projectsis disabled, dependencies existing in the workspace must be installed to your local Maven repository after any change (by runningmvn install), in order to see effects in projects consuming them. -
Profiles: select a set of Maven profiles to activate or deactivate in the workspace. Profiles are defined in the projectpom.xml, or inherited from a parentpom.xml, or defined in the relevantsettings.xml. -
Name templates: allows you to disambiguate projects names in the workspace by prepending or appending the group ID or SCM branch names to the default artifact ID.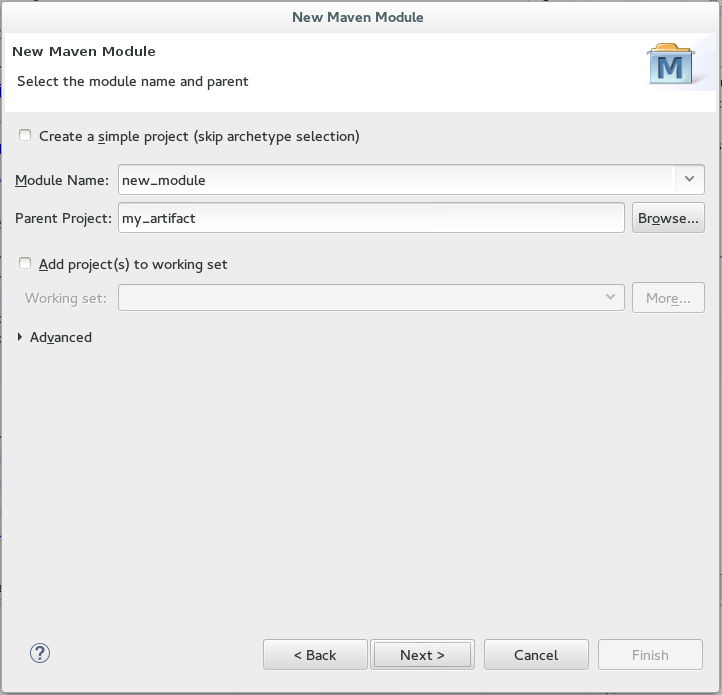 Figure 3. Set the Module Name and Parent
-
-
-
When the configuration is complete, click
Nextto continue.
-
-
Enter the module archetype information:
-
Ensure that the
Show the last version of Archetype onlycheck box is checked. This ensures that only the latest version of each archetype displays. -
Select an archetype based on the purpose of the project you are creating. Use the keyword maven-archetype-quickstart in the
Filterfield to locate a sample Maven project archetype.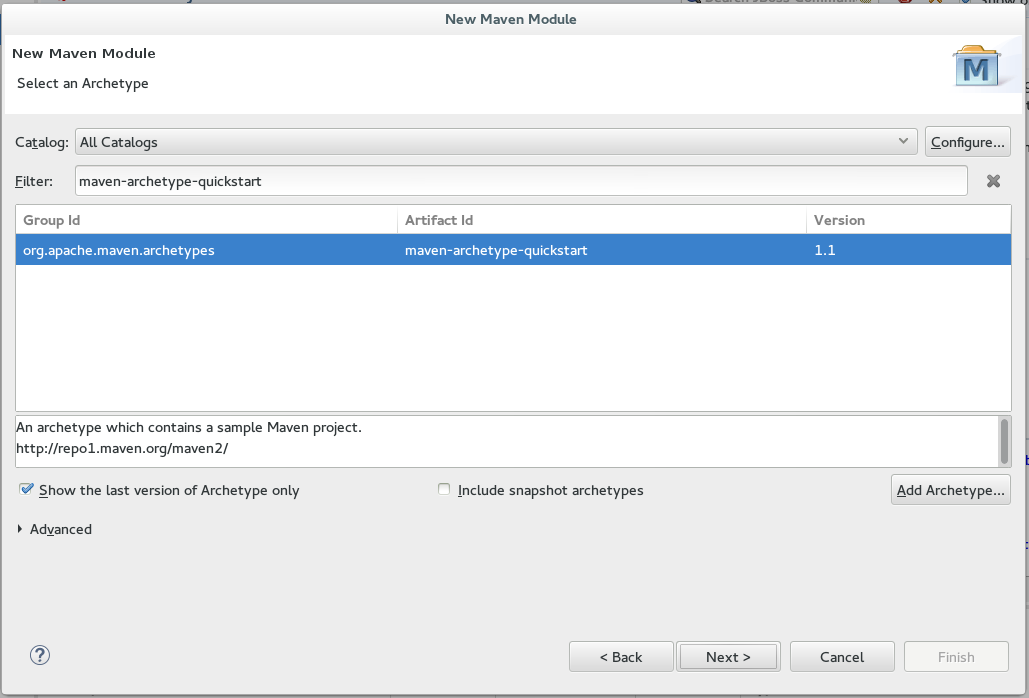 Figure 4. Select a Module Archetype
 -
Click Next to continue.
-
-
Enter the module details:
-
Add the same group ID value that was used for the Maven project to the
Group Idfield. -
Add the desired version number in the
Versionfield. For details about the appropriate version build numbers, see Project Versions -
The
Artefact IdandPackagefields are automatically populated based on the parent project details.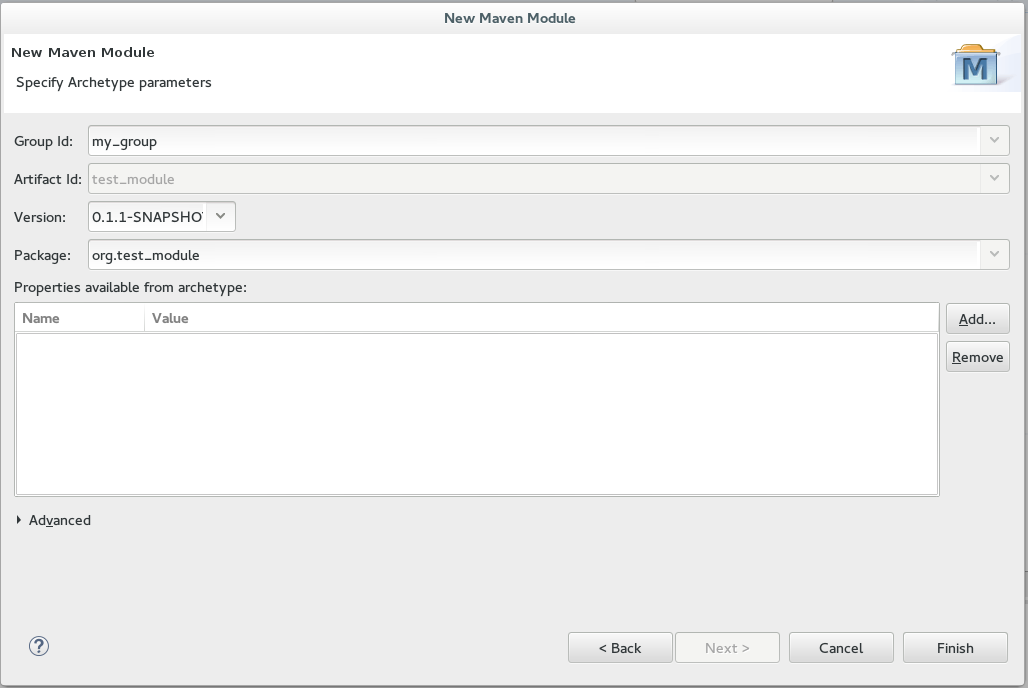 Figure 5. Configure the Module Archetype Parameters
 -
Click
Finishto conclude setting up the Maven module.
-
-
(Optional) To change the settings for the created Maven module, expand the module name in the
Project Explorerview and double clickpom.xmlfrom the expanded list. AnOverviewtab appears and all settings can be changed from this tab.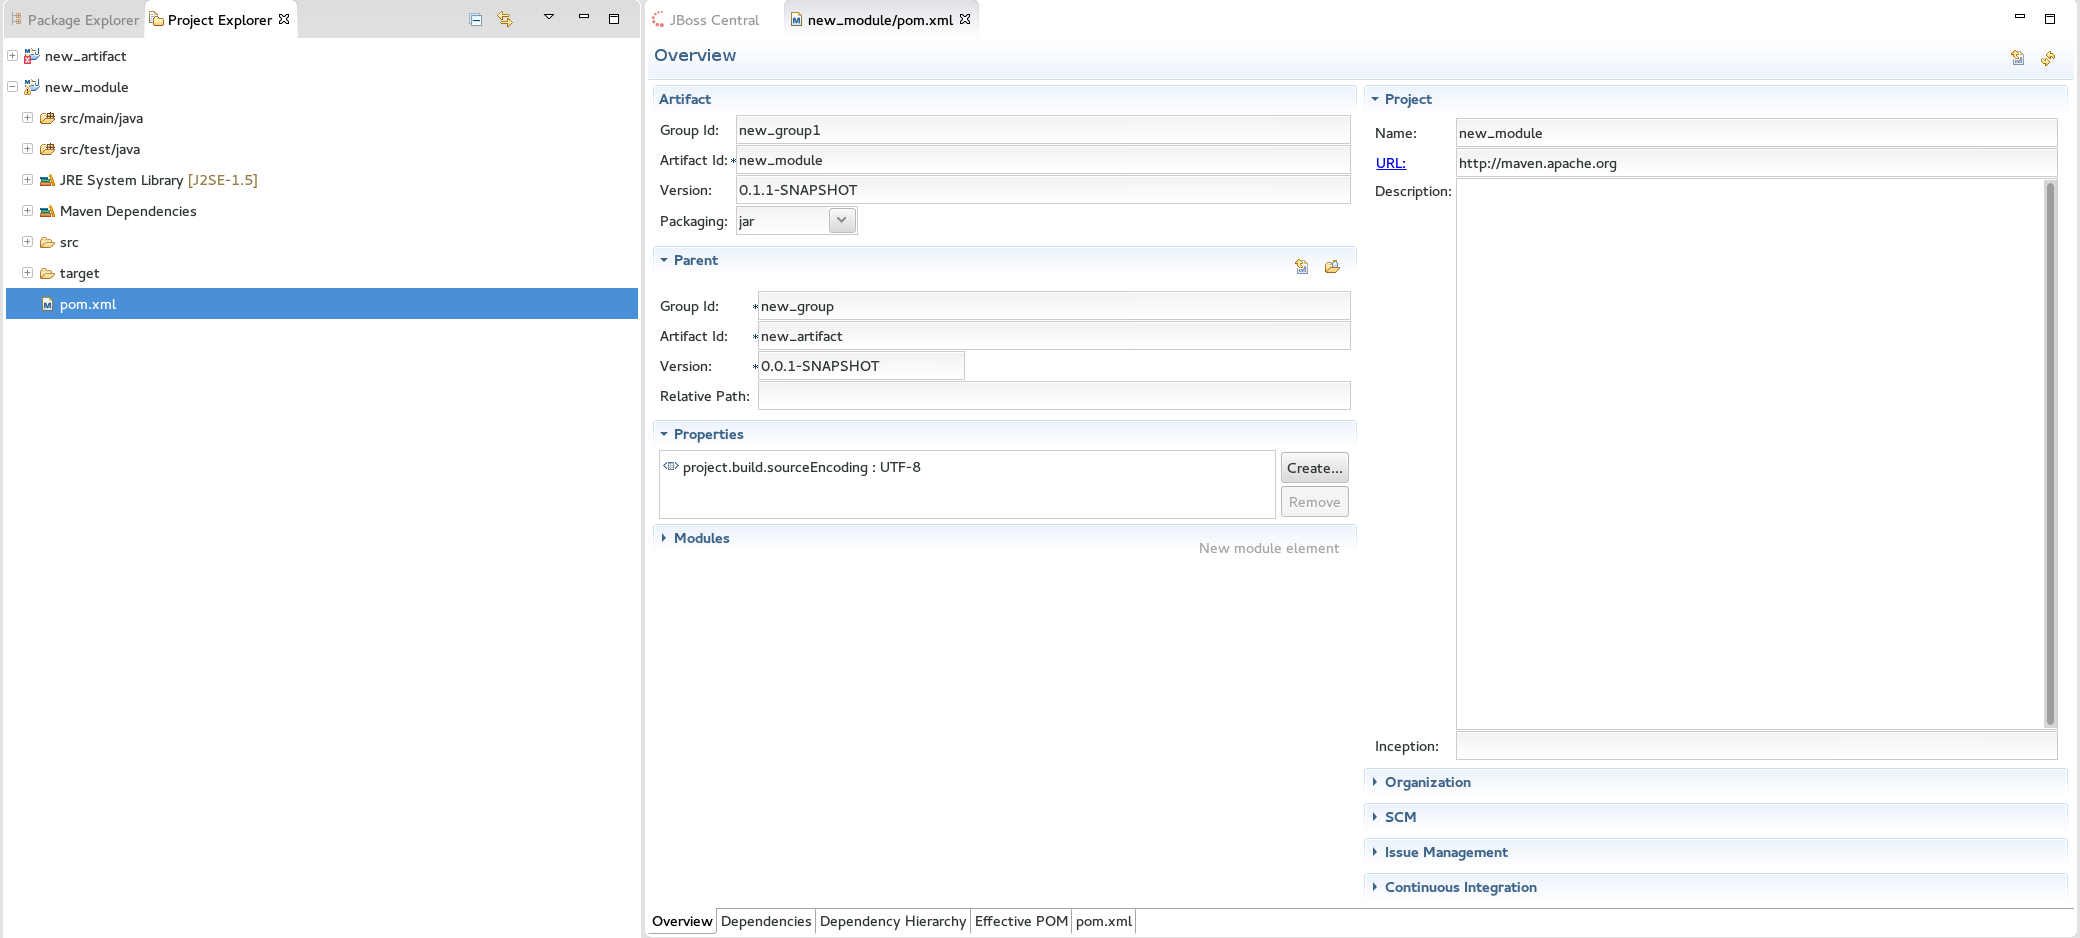 Figure 6. Change the Module Settings from the Overview View
Result: Your new Maven module is created and appears in the
Project Explorerview. Additionally, a hierarchical view of the nested projects is now available in the Project Explorer view as well (see Nested/Hierarchical view of projects).
3. Add Maven Support to an Existing Non-Maven Project
The previous tasks contain instructions to create a new Maven project and Maven module. However, for an existing application that was not created with Maven support, use the following instructions to add Maven support to the non-Maven project:
Adding Maven Support to an Existing Non-Maven Project
-
Right-click the project name in the
Project Explorerview. -
From the displayed options, click
Configure. -
From the displayed sub-menu, click
Convert to Maven Project. -
Configure details for the new pom file:
-
The basic fields for the new pom file are prepopulated based on the project details. If required, edit the existing values.
-
(Optional) Add a name for the new project in the
Namefield. -
(Optional) Add a brief description for the project in the
Descriptionfield.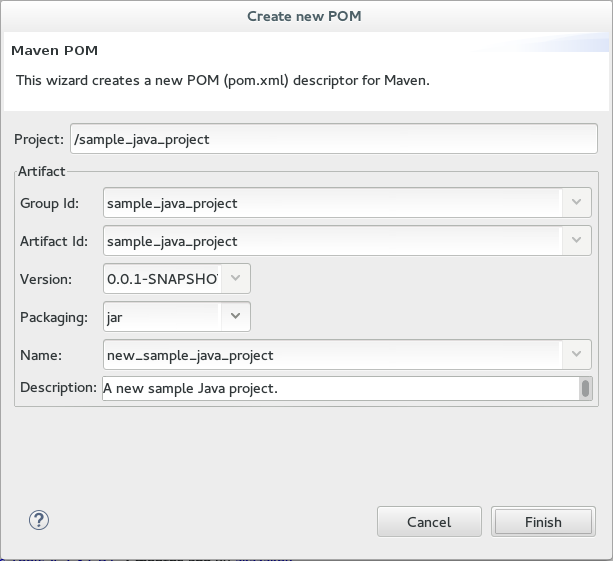 Figure 7. Create a New Pom Descriptor
 -
Click
Finishto finalize the pom information.
-
-
If the project references java dependencies, a wizard appears displaying all these dependencies and a green check mark when each dependency is identified. Learn more about dependency identification in the Did You Know section.
-
Check the
Delete original references from projectcheck box to avoid retaining duplicate or stale dependencies in your project.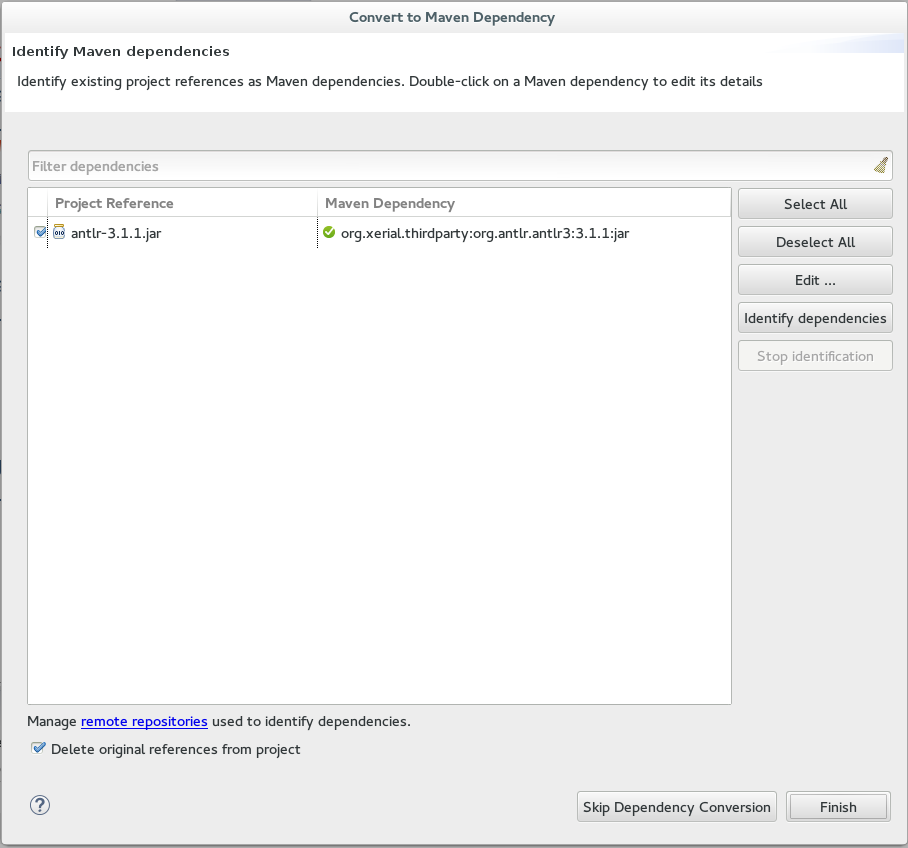 Figure 8. Identify Maven Dependencies
 -
Click
Finishwhen all dependencies are converted.
Result: The existing project is now configured for Maven support.
Did You Know?
-
The wizard used to convert a non-Maven project to a Maven project attempts to identify all the project’s classpath entries and their equivalent Maven dependencies. From the list of identified dependencies, users can select which ones will be added to the generated Maven pom.xml file. When identifying dependencies, one of several strategies may be used:
-
Checking if the jar contains the relevant maven metadata.
-
Identify the dependency using the Nexus indexer.
-
Identify the dependency using the JBoss Nexus instance REST API (if we are online) via a SHA1 search.
-
Identify the dependency using the
search.maven.orgREST API (if we are online) via a SHA1 search.
-
-
All unchecked dependencies will be ignored and are not added to the generated pom.xml. However some of these can be added as transitive dependencies to your project. For instance, if you add
jsp-apibut removeservlet-api, the latter appears in the project classpath, as it is a dependency ofjsp-api. -
You can double-click on a dependency from a list (or click the
Editbutton) to edit its Maven coordinates or scope. Selecting several dependencies (ctrl+click) and clicking theEditbutton allows batch editing of their scope.
Troubleshooting
-
Error Message:
Unidentifiable Dependencyin theMaven Dependencycolumn.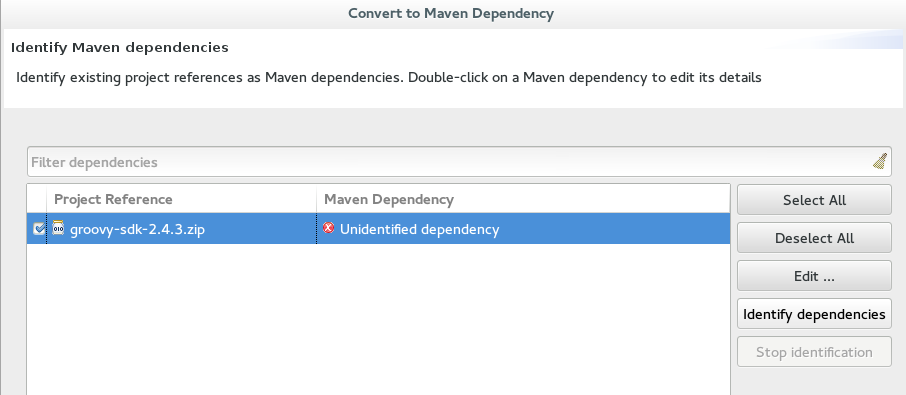 Figure 9. Unidentifiable Dependency
-
Issue: Either:
-
the jar file is corrupted/invalid.
-
the jar file is valid but does not contain any metadata used for identification.
-
-
Resolution:
-
Make sure that jar exists as a Maven artifact. If needed, you can install it to your local repository and then Click on the
Identify dependenciesbutton. -
Double click on the dependency, or click on the
Edit…button and set the expected maven coordinates.
-
-
-
Error Message: Some selected dependencies can not be resolved. Click here to configure repositories in your settings.xml.
 Figure 10. Dependencies Can Not Be Resolved Error
-
Issue:: This error displays when a dependency can be identified (that is, whether it contains the pom properties or other metadata) but the dependency is not available in any repository defined in your settings.xml.
-
Resolution: Click the
herelink in the error message and compare the old and new settings for the dependency and add a new and correct repository. Users may choose to use one of the predefined repositories from Red Hat.
-