OpenShift Tools enables you to deploy existing workspace projects to OpenShift Online using the OpenShift Application wizard. The wizard creates a templated OpenShift application based on your cartridge choices, modifies the project as necessary for use with OpenShift Online and commits the project code to the local application Git repository ready for publishing. The wizard can also generate a server adapter for easy publishing of the application both for first deployment and for future changes.
The instructions here demonstrate how to complete the following tasks:
Prepare a Workspace Project for OpenShift Online Deployment
In preparing workspace projects for OpenShift Online, the OpenShift Application wizard merges the existing project content with the key metadata files from a new OpenShift application and connects the project to the OpenShift application Git repository.
To prepare an existing workspace project for OpenShift Online, complete the following steps:
-
In the
Project Explorer, right-click{project name}and click . -
Complete the fields about your OpenShift Online account as follows:
-
In the
Connectionlist, select the connection. -
In the
Passwordfield, type your OpenShift Online account password.
-
-
Click
Next. -
Complete the fields about the type of OpenShift application you want to create as follows:
-
Ensure
Create a new OpenShift applicationis selected. -
Expand
Basic Cartridgesand select the core cartridge to match the application type; for example, for applications with Java-based server-side functionality selectjbossas-7,jboss-wildfly-8, orjbosseap-6.
-
-
Click
Next. -
Complete the fields about your OpenShift application as follows:
-
Ensure that the 'Domain' list displays the domain in which you want to host your application.
-
Ensure the
Namefield contains a valid alphanumeric name for your application. -
In the
Gear profilefield, select the gear size that you want for your application or leave blank to use the default gear profile. -
Select the
Enable Scalingcheck box to make your application scalable.
-
-
Click
Next. -
Complete the fields about the corresponding workspace project as follows:
-
Ensure the
Create a new projectcheck box is clear. -
Ensure the
Use existing projectfield lists the workspace project that you want to deploy on OpenShift. -
Ensure the
Create and set up a server adapter for easy publishingcheck box is selected.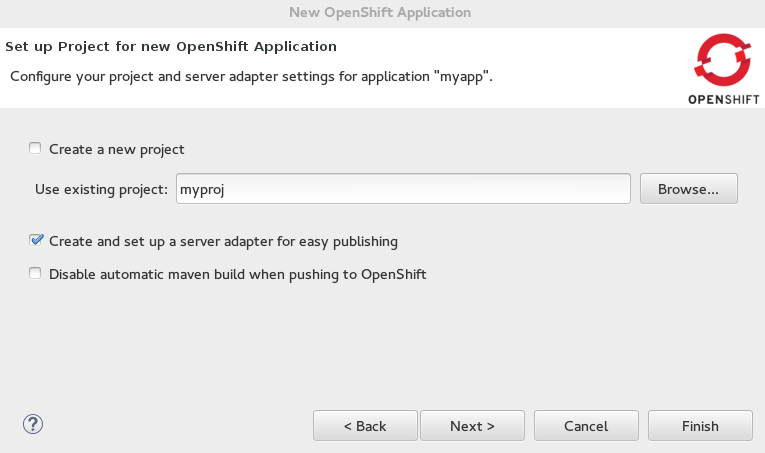 Figure 1. Existing Workspace Project Selected for the New OpenShift Application
-
-
Click
Next. -
Ensure the location in the
Git Clone Destinationfield exists and corresponds to where you want to make a local git repository for the project source code. -
Ensure a public SSH key is uploaded to OpenShift Online and private key location specified in the IDE preferences by clicking
SSH Keyswizard and reviewing the information. -
Click
Finish. -
At the prompt informing that changes will be made to the workspace project, click
OK.
If you are prompted that the authenticity of the host cannot be established and asked whether you want to continue connecting, ensure that the host name matches that of your application and domain and click Yes.
2. Deploy the OpenShift Online Application
When the workspace project is prepared, you must republish the OpenShift Online application to push the project source code to your waiting OpenShift Online application and trigger a build and redeployment of the application. Republishing can be achieved using the server adapter created by the OpenShift Application wizard and completes the deployment of the workspace project to OpenShift Online.
To deploy the OpenShift Online application, complete the following steps:
-
In the
Serversview, right-click{application name} at OpenShiftand clickFull Publish. -
When prompted if you want to publish the committed project changes to OpenShift, click
Yes.
The Console view becomes the view in focus showing the application publication progress. After the workspace project is published at OpenShift Online, the following message displays in the Console view:
Deployment completed with status: success3. View the Deployed OpenShift Online Application
After the application is published, you can view the live version at the OpenShift Online application URL.
To view the OpenShift Online application in a web browser, complete the following steps:
-
In the
OpenShift Explorerview, expand the connection and the domain. -
Right-click
{application name}and click .
Your deployed OpenShift Online application is displayed in the IDE default web browser.
Did You Know?
-
You can find the URL of your OpenShift Online application from the
OpenShift Explorerview by right-clicking{application name}and clickingDetailsor from theServersview by right-clicking{application name} on OpenShiftand clicking . -
You can set the preference for which type of web browser the IDE opens by default. Click and click the type of web browser.
-
If your project is large, it may require more time than the default set by the IDE to push changes to the application OpenShift Online Git repository. You can increase the Git timeout by clicking and changing the
OpenShift request timeout (in seconds)value. -
You can also access the same wizard for deploying an existing workspace project to OpenShift Online from JBoss Central by click
OpenShift ApplicationunderStart from scratch.