OpenShift Tools enables you to import existing OpenShift Online applications into the IDE so that you can take advantage of the IDE features in further developing your applications. As illustrated in this article, during the import process you can configure the IDE for easy republishing to OpenShift Online.
The instructions here demonstrate how to complete the following tasks:
1. Import an Existing OpenShift Online Application
Applications associated with your OpenShift Online account(s) are listed in the OpenShift Explorer view. The source code for these applications can be individually imported into the IDE using the OpenShift Tools Import OpenShift Application wizard.
To import an existing OpenShift Online application as a new project in the existing IDE workspace, complete the following steps:
-
In the
OpenShift Explorerview, ensure your OpenShift Online connection is listed or click theConnectionicon and complete your OpenShift Online account details to create a new connection.
 -
In the
OpenShift Explorerview, expand the connection and domain to locate the application you want to import. -
Right-click
{application name}and clickImport Application. -
Complete the fields about the application to be imported as follows:
-
Ensure that
Use my existing OpenShift applicationis selected. -
Ensure that the name of the application you want to import is listed. If this is not the case, type the name of the application or click
Browseto select the application.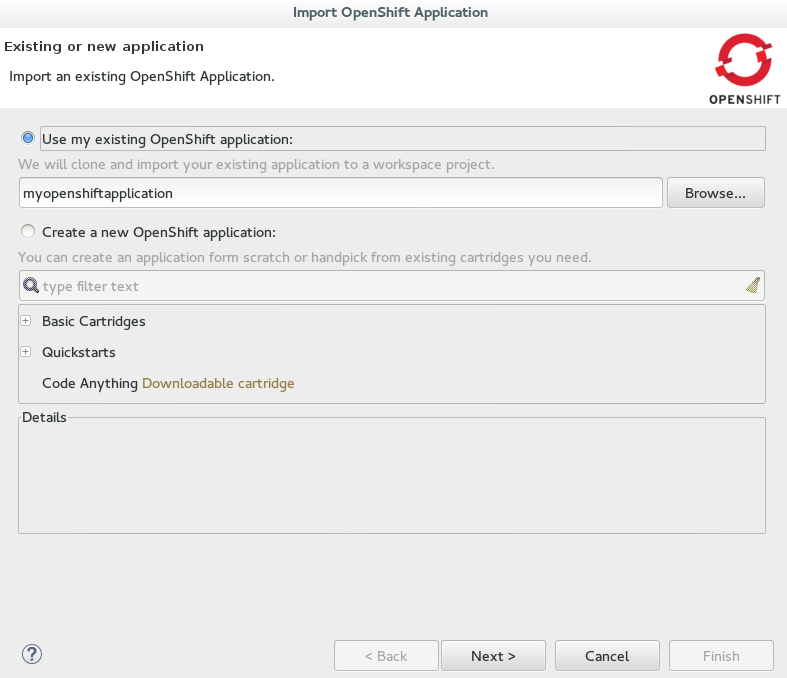 Figure 1. Existing OpenShift Online Application Information Provided
-
-
Click
Next. -
Complete the fields about the corresponding new workspace project as follows:
-
Ensure the
Create a new projectcheck box is selected. -
Ensure the
Create and set up a server adapter for easy publishingcheck box is selected.
-
-
Click
Next. -
Ensure the location in the
Git Clone Destinationfield corresponds to where you want to make a local copy of the OpenShift Online application Git repository. -
Ensure a public SSH key is uploaded to OpenShift Online and private key location is specified in the IDE preferences by clicking
SSH Keys Wizardand reviewing the information. -
Click
Finish.
If you are prompted that the authenticity of the host cannot be established and asked whether you want to continue connecting, ensure that the host name matches that of your application and domain and click Yes.
When the import process is complete, the project is listed in the Project Explorer view and a server adapter is listed for the application in the Servers view.
OpenShift Tools makes a number of small changes to the application source code on import. It adds several IDE-specific files to the project and modifies the .gitignore file so that you are not prompted about these files each time you commit project changes to the Git repository.
2. Modify the Application Source Code
The files contained in your project depend on the type of project that you have imported. Here a common OpenShift application file, index.html, is changed as an example of modifying the project source code. You can opt to change this file or another file of your project.
To modify the index.html file, complete the following steps:
-
In the
Project Explorerview, expand{project name} > src > main > webapp. -
Double-click
index.htmlto open it in the JBoss Tools HTML Editor. -
After the opening <body> tag add the following line:
<h1>This is a change made to my OpenShift Online app from the IDE.</h1> -
Save the
index.htmlfile by pressing Ctrl+S (or Cmd+S).
Note that in the Project Explorer view, index.html has > prepended to show that the source code has changed since the last Git commit.
3. Republish the Modified Application
You must commit and push any changes you have made to the project source code and then republish the application before you can see changes reflected in the OpenShift Online application. As an example of committing and pushing source code changes to the OpenShift Online application repository and republishing the application, here the index.html file changed earlier is used. You can opt to use the project file that you changed earlier.
To commit and push the index.html changes and republish the application to OpenShift Online, complete the following steps:
-
In the
Serversview, right-click{application name} at OpenShiftand clickPublish. Or you can drag the{project_name}from theProject Explorerview and drop it on the server adapter in theServersview. -
Complete the fields about the project changes to commit and push to the OpenShift Online application Git repository as follows:
-
In the
Commit messagefield, type the following messageAdded new heading in body of index.html
-
In the table of files, ensure the
index.htmlfile is selected.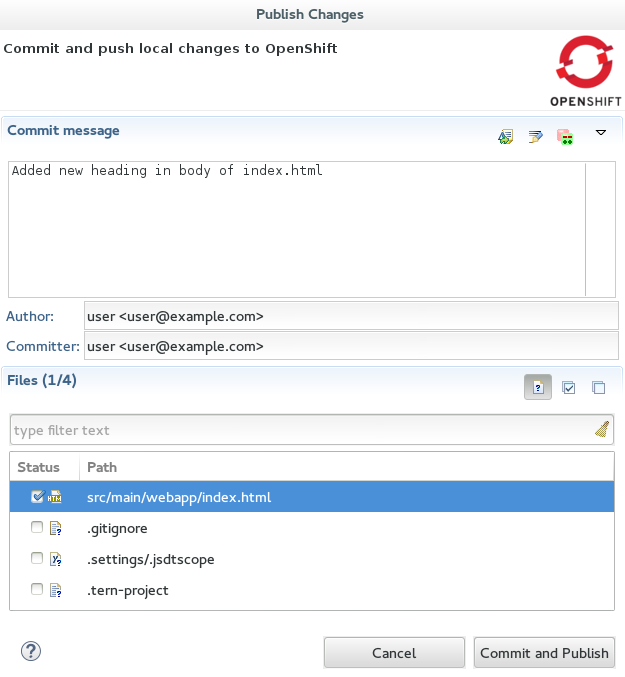 Figure 2. Commit Message Provided and Changed Project File Selected
-
-
Click
Commit and Publish.
The republishing process can take some time. When the Console view shows Deployment completed with status: success, the republishing process is complete.
4. View the Modified Application
After the modified application is republished, you can view the live updated version at the OpenShift Online application URL.
To view the modified OpenShift Online application in the IDE default web browser, complete the following steps:
-
In the
OpenShift Explorerview, expand the connection and the domain. -
Right-click
{application name}and click .
Your modified and republished OpenShift Online application is displayed in the IDE default web browser.
Did You Know?
-
On the first occasion that you republish your application to OpenShift Online, you may be prompted to provide a username and email address for use by Git. The IDE looks for a default Git configuration file on your system from which to obtain this information and if the IDE cannot find the file it prompts you to provide the values. You can specify the location of your system Git configuration file in the IDE Preferences, under .
-
You can review the progress of republishing applications to OpenShift Online in the
Consoleview. -
You can also open the OpenShift application in a web browser from the
Serversview by right-clicking{application name} at OpenShiftand clicking . -
You can change the IDE default web browser to be either the IDE internal web browser, BrowserSim (when installed) or an external web browser. Click and select from the available web browser options or click to extend the list of available external web browsers.