Happy to announce 4.6.0.AM1 (Developer Milestone 1) build for Eclipse Photon.0.M6.
Downloads available at JBoss Tools 4.6.0 AM1.
Happy to announce 4.6.0.AM1 (Developer Milestone 1) build for Eclipse Photon.0.M6.
Downloads available at JBoss Tools 4.6.0 AM1.
JBoss Tools 4.5.3 and Red Hat JBoss Developer Studio 11.3 for Eclipse Oxygen.3a are here waiting for you. Check it out!
JBoss Developer Studio comes with everything pre-bundled in its installer. Simply download it from our JBoss Products page and run it like this:
java -jar jboss-devstudio-<installername>.jar
JBoss Tools or Bring-Your-Own-Eclipse (BYOE) JBoss Developer Studio require a bit more:
This release requires at least Eclipse 4.7 (Oxygen) but we recommend using the latest Eclipse 4.7.3a Oxygen JEE Bundle since then you get most of the dependencies preinstalled.
Once you have installed Eclipse, you can either find us on the Eclipse Marketplace under "JBoss Tools" or "Red Hat JBoss Developer Studio".
For JBoss Tools, you can also use our update site directly.
http://download.jboss.org/jbosstools/oxygen/stable/updates/
Our main focus for this release was on adoption of Java10, improvements for container based development and bug fixing. Eclipse Oxygen itself has a lot of new cool stuff but let me highlight just a few updates in both Eclipse Oxygen and JBoss Tools plugins that I think are worth mentioning.
When working with both CDK and upstream Minishift, it is recommanded to distinguish environments through the MINISHIFT_HOME variable. It was possible before to use this parameter but it requires a two steps process:
first create the server adapter (through the wizard)
then change the MINISHIFT_HOME in the server adapter editor
It is now possible to set this parameter from the server adapter wizard. So now, everything is correctly setup when you create the server adapter.
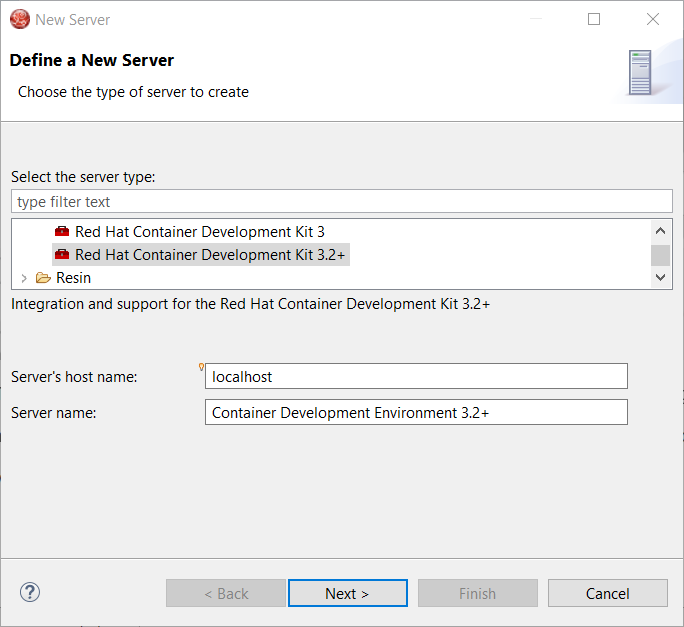
Let’s see an example with the CDK server adapter.
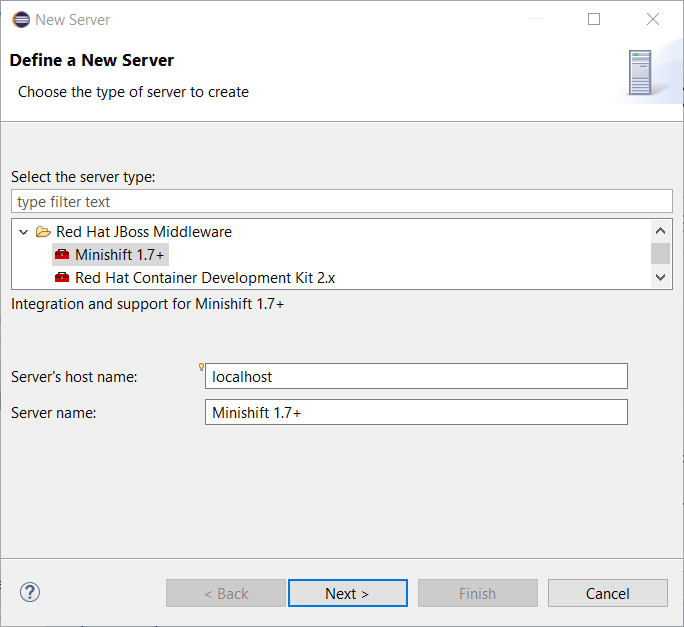
From the Servers view, select the new Server menu item and enter cdk in the filter:
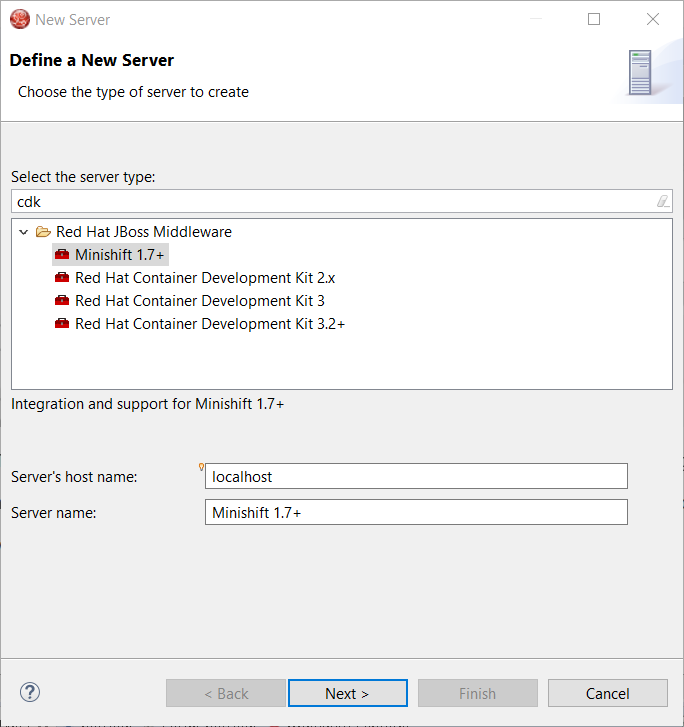
Select Red Hat Container Development Kit 3.2+
Click the Next button:
The MINISHIFT_HOME parameter can be set here and is defaulted.
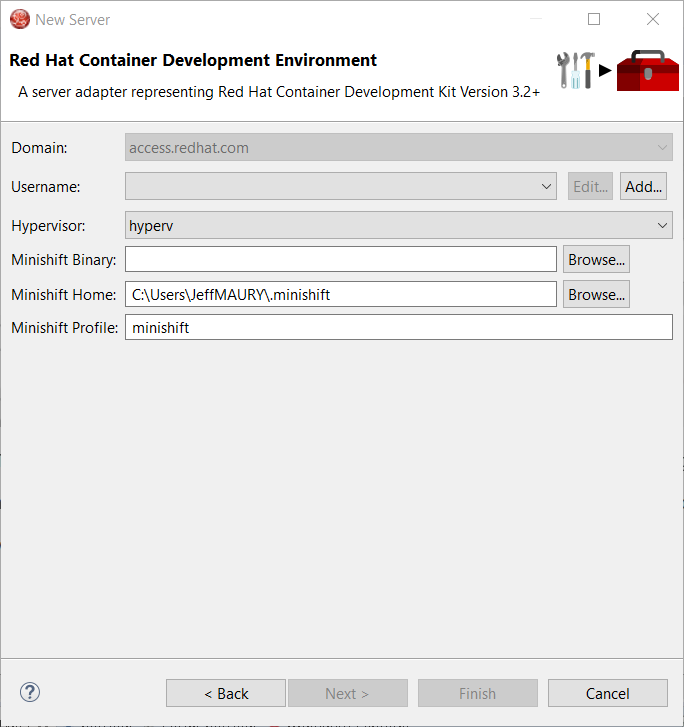
When working with both CDK and upstream Minishift, you needed to have previously downloaded the CDK or Minishift binary. It is now possible to download the runtime to a specific folder when you create the server adapter.
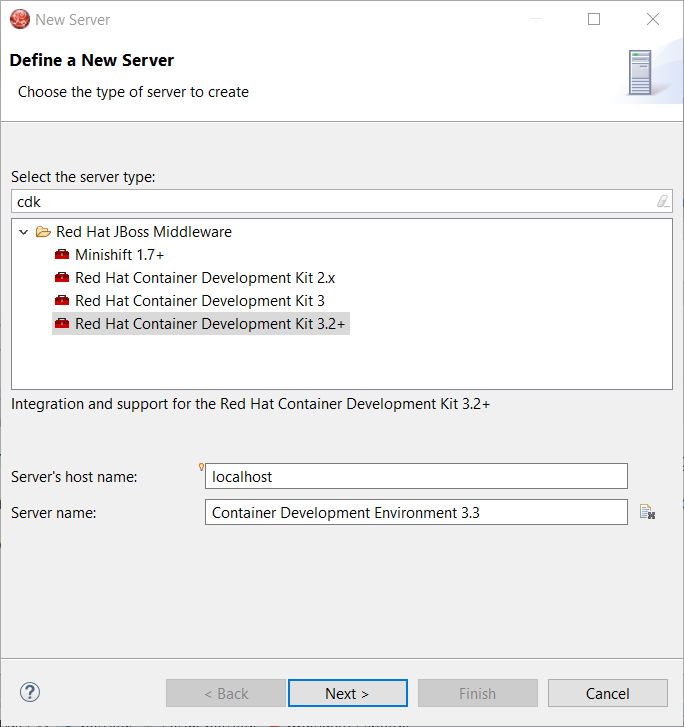
Let’s see an example with the CDK server adapter.
From the Servers view, select the new Server menu item and enter cdk in the filter:
Select Red Hat Container Development Kit 3.2+
Click the Next button:
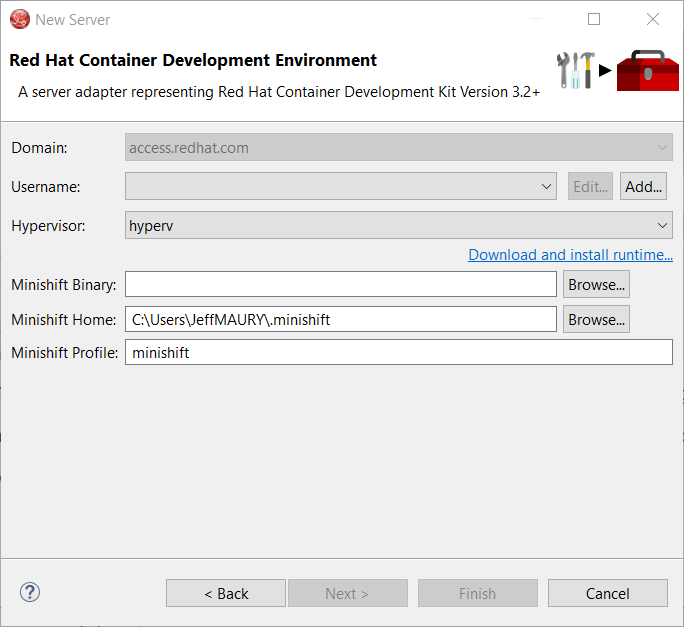
In order to download the runtime, click the Download and install runtime… link:
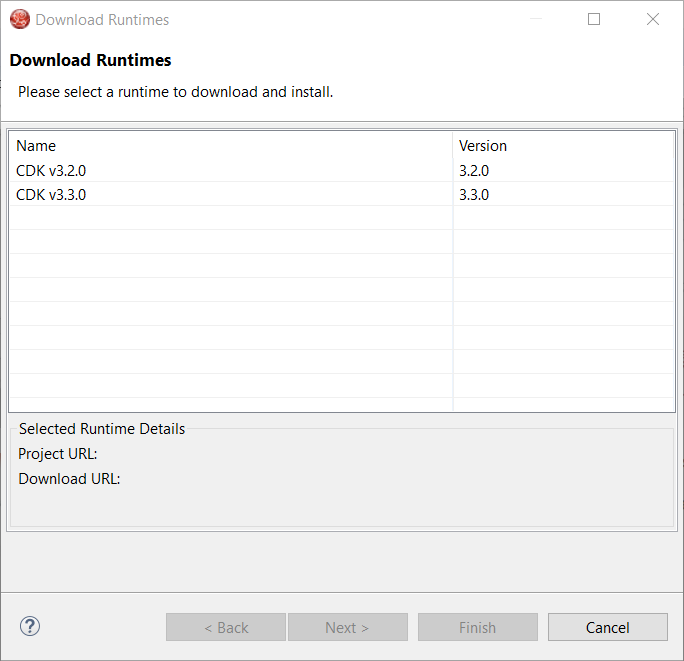
Select the version of the runtime you want to download
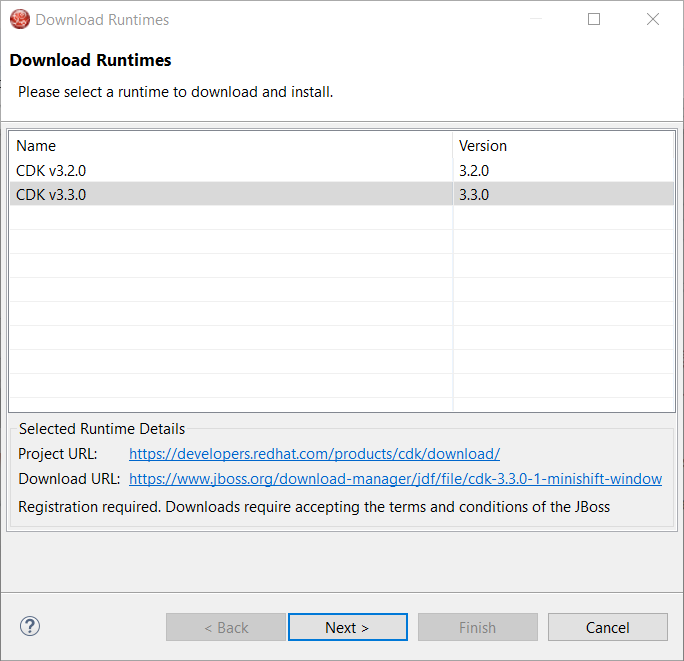
Click the Next button:

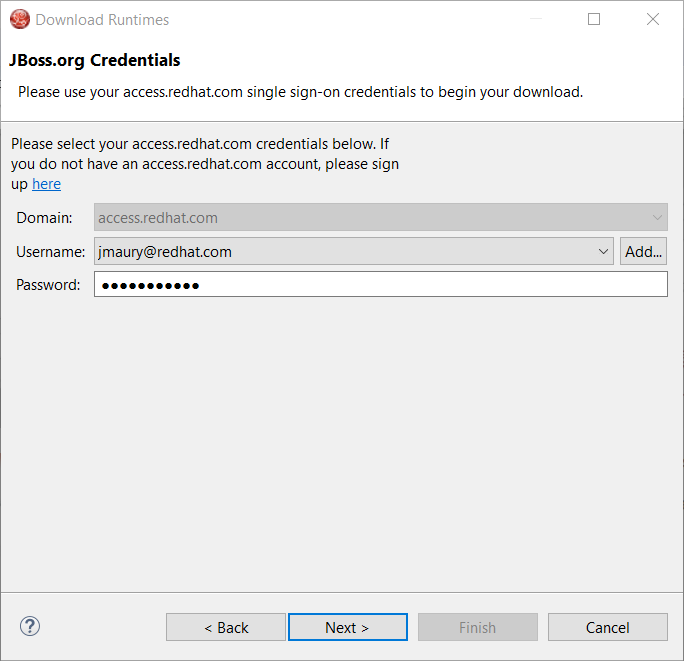
You need an account to download the CDK. If you already had configured credentials, select the one you want to use. If you didn’t, click the Add button to add your credentials.
Click the Next button. Your credentials will be validated, and upon success, you must accept the license agreement:
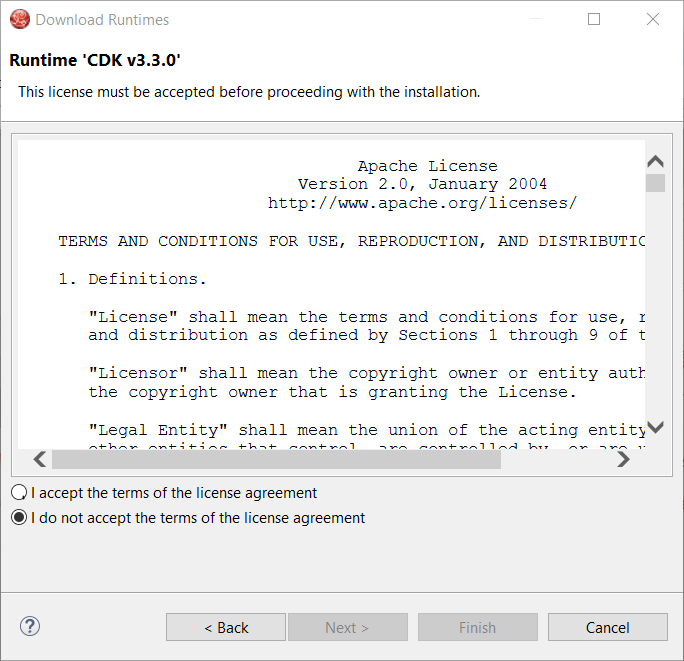
Accept the license agreement and click the Next button:
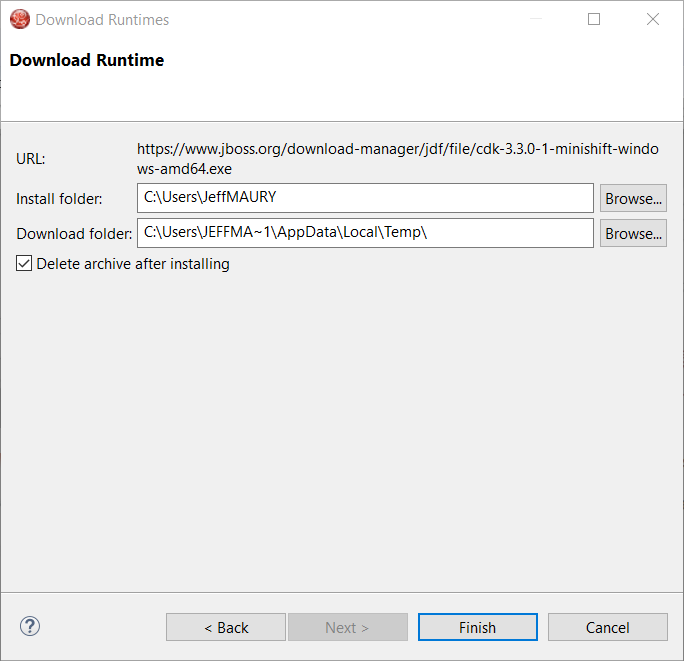
You can choose the folder where you want the runtime to be installed. Once you’ve set it, click the Finish button:
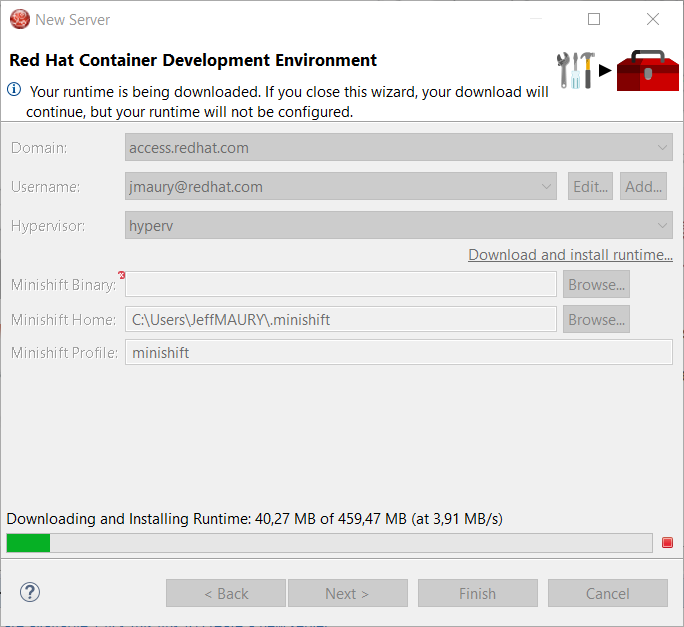
The download of the runtime will be started and you should see the progression on the server adapter wizard:
Once the download is completed, you will notice that the Minishift Binary and Username fields have been filled:
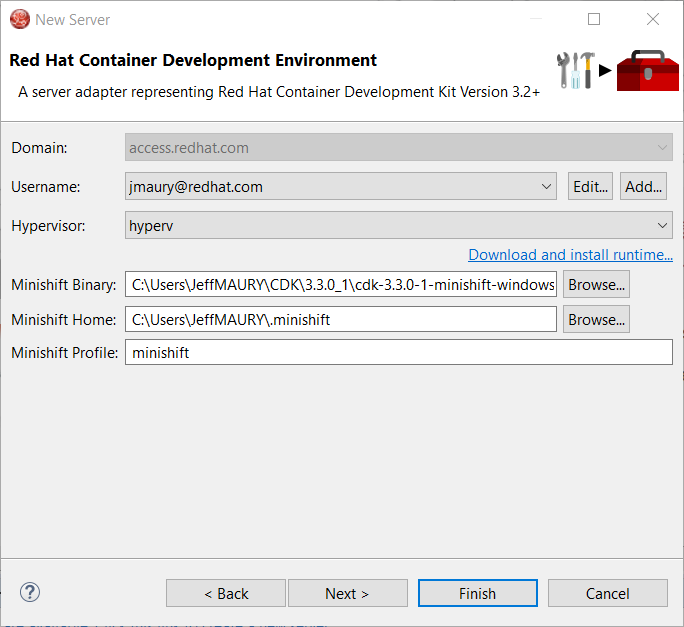
Click the Finish button to create the server adapter.
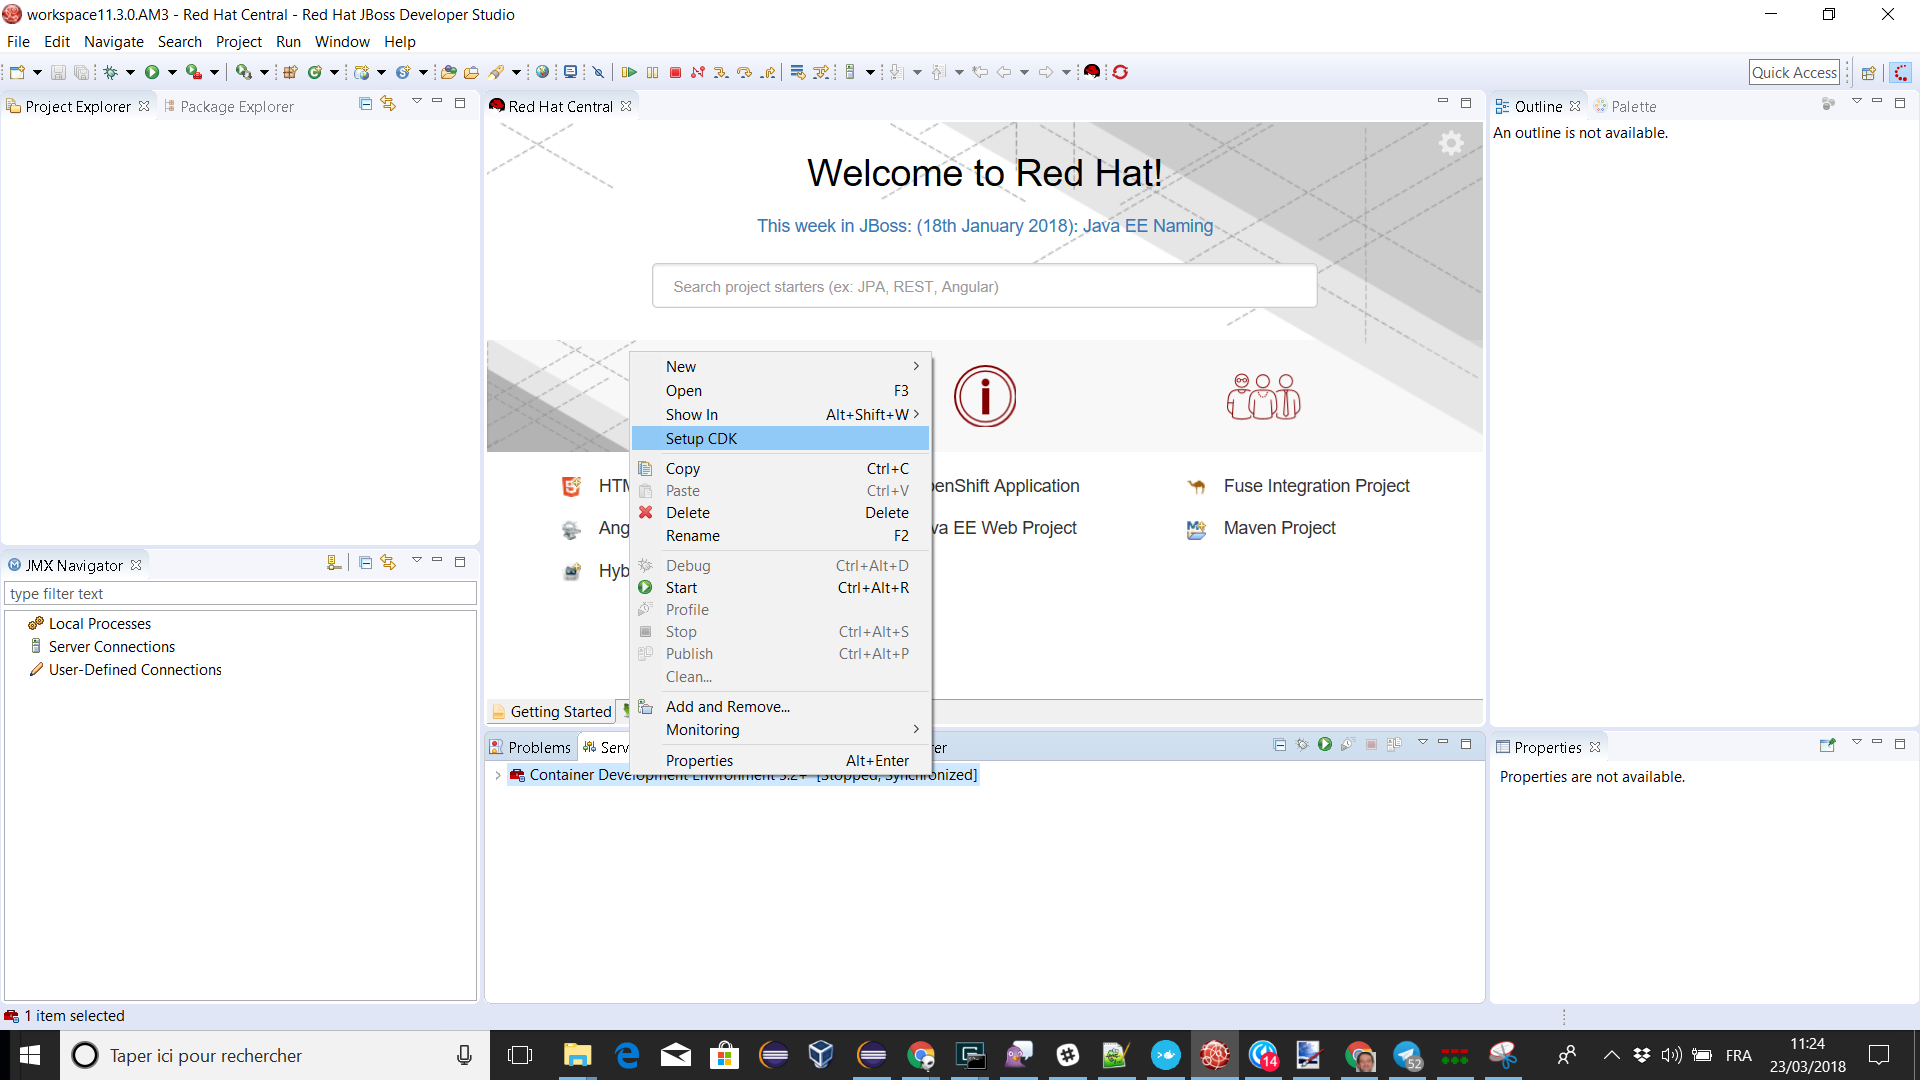
Please note that if it’s the first time you install CDK, you must perform an initialization. In the Servers view, right click the server and select the Setup CDK menu item:
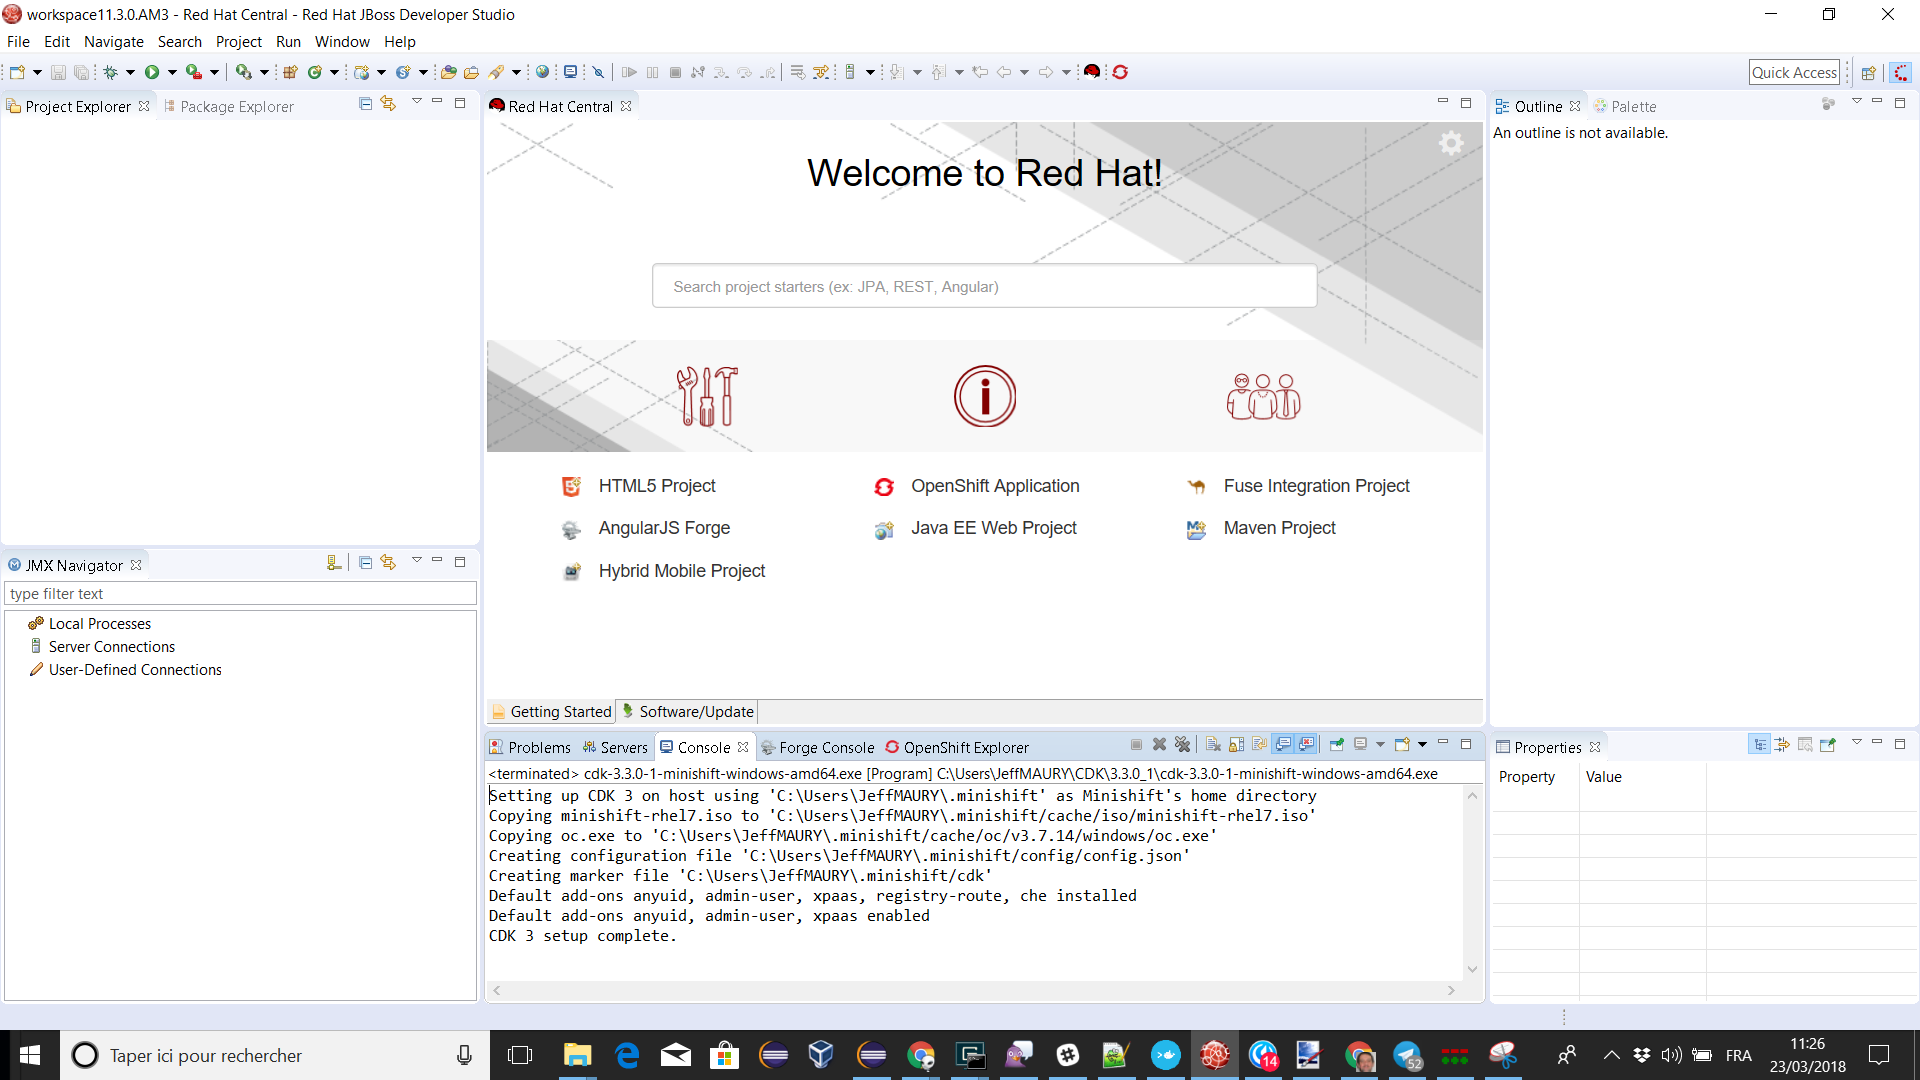
Please note that the setup-cdk command will also be automatically run when you start the CDK server adapter if the MINISHIFT_HOME environment is detected uninitialized after user approval.
A new server adapter has been added to support upstream Minishift. While the server adapter itself has limited functionality, it is able to start and stop the Minishift virtual machine via its minishift binary. From the Servers view, click New and then type minishift, that will bring up a command to setup and/or launch the Minishift server adapter.
All you have to do is set the location of the minishift binary file, the type of virtualization hypervisor and an optional Minishift profile name.
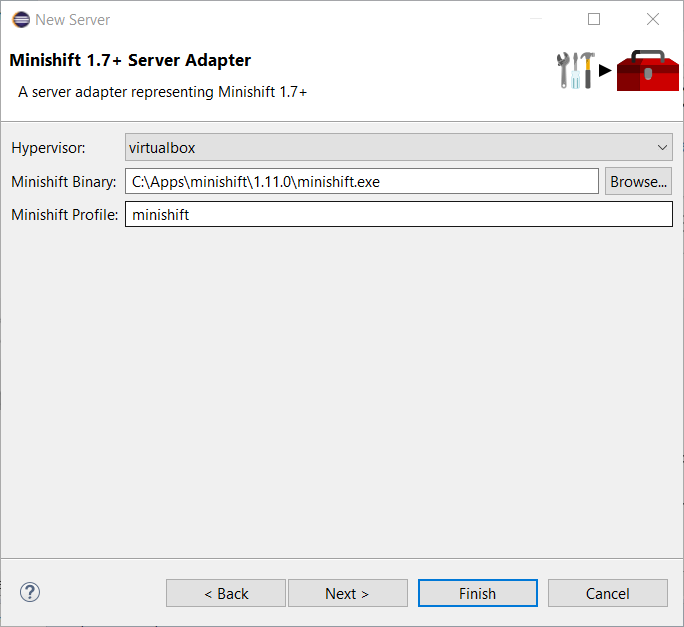
Once you’re finished, a new Minishift Server adapter will then be created and visible in the Servers view.
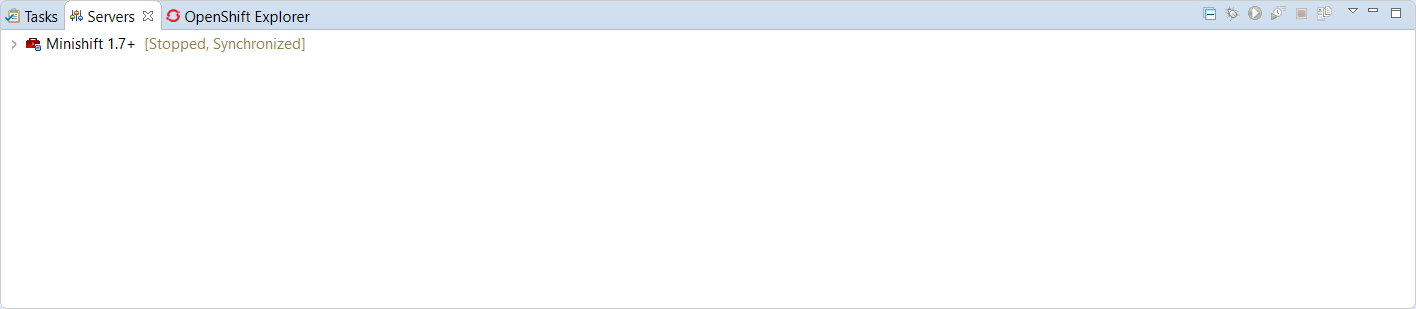
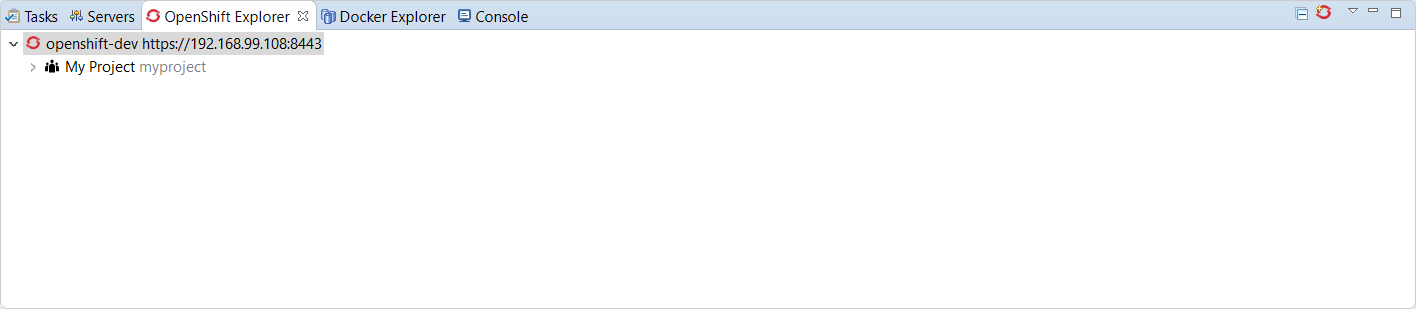
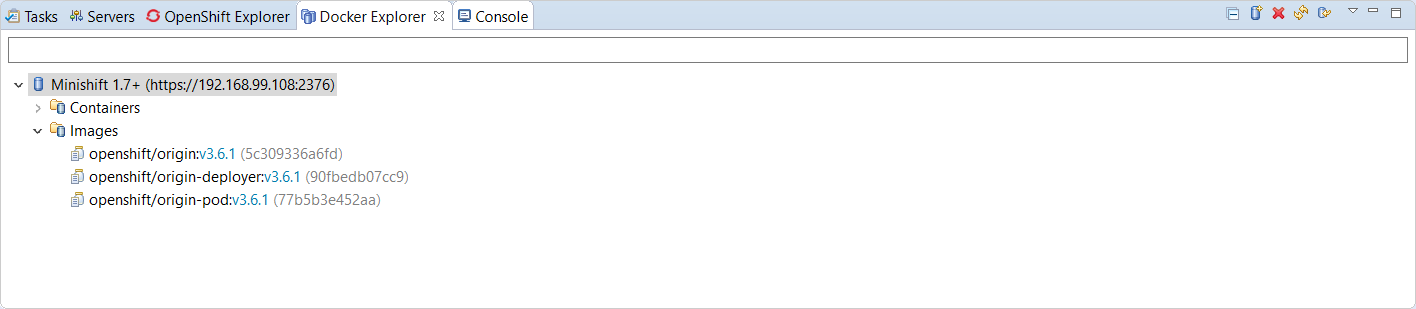
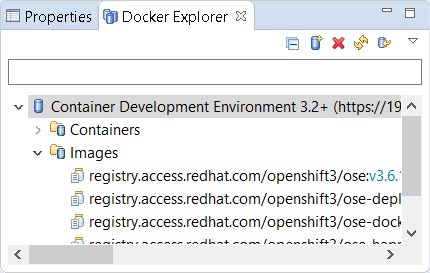
Once the server is started, Docker and OpenShift connections should appear in their respective views, allowing the user to quickly create a new Openshift application and begin developing their AwesomeApp in a highly-replicatable environment.
The credentials framework still supports the JBoss.org credentials in case other services / components require or use this credentials domain.
Shortcuts for the Java, Launch, and Debug perspectives and basic navigation operations are now provided within the Fuse Integration perspective.
The result is a set of buttons in the Toolbar:
All of the associated keyboard shortcuts are also available, such as Ctrl+Shift+T to open a Java Type.
The loading time of the "Advanced" tab in the Properties view for Camel Endpoints is greatly improved.
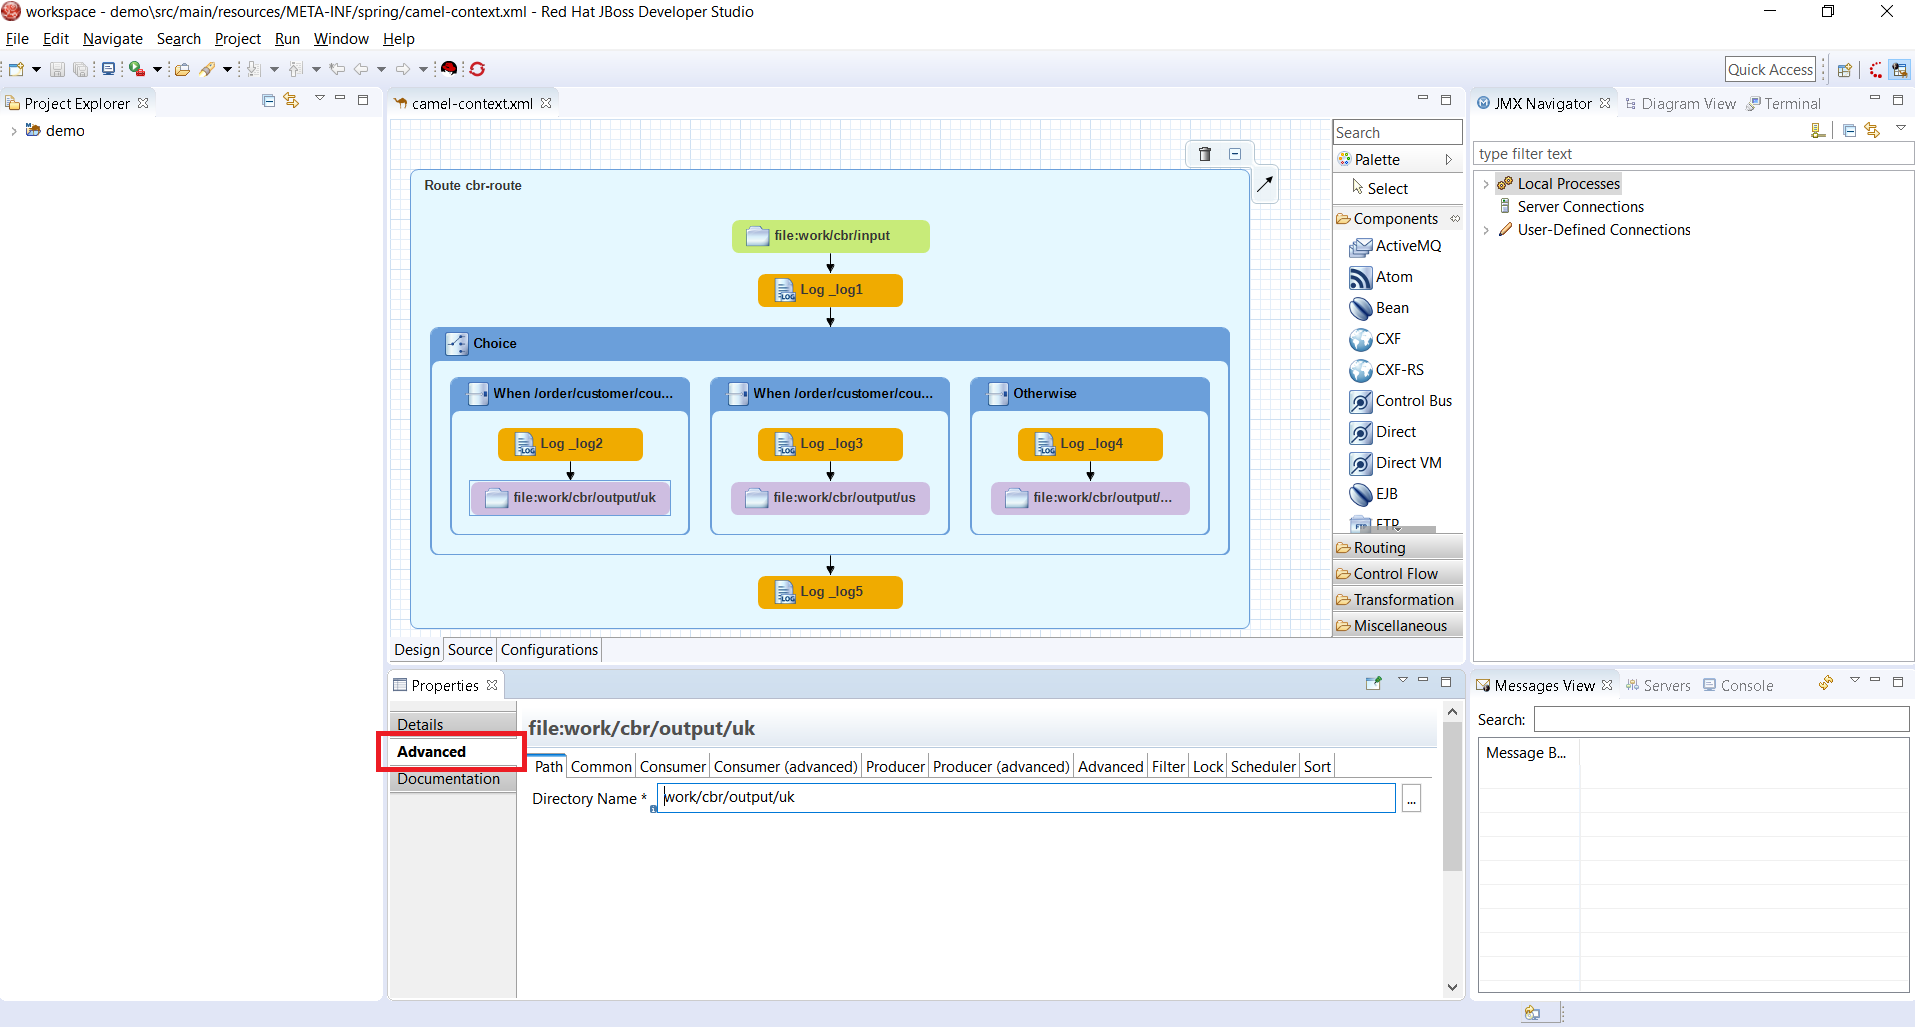
Previously, in the case of Camel Components that have a lot of parameters, it took several seconds to load the Advanced tab. For example, for the File component, it would take ~3.5s. It now takes ~350ms. The load time has been reduced by a factor of 10. (See this interesting article on response time)
If you notice other places showing slow performance, you can file a report by using the Fuse Tooling issue tracker. The Fuse Tooling team really appreciates your help. Your feedback contributes to our development priorities and improves the Fuse Tooling user experience.
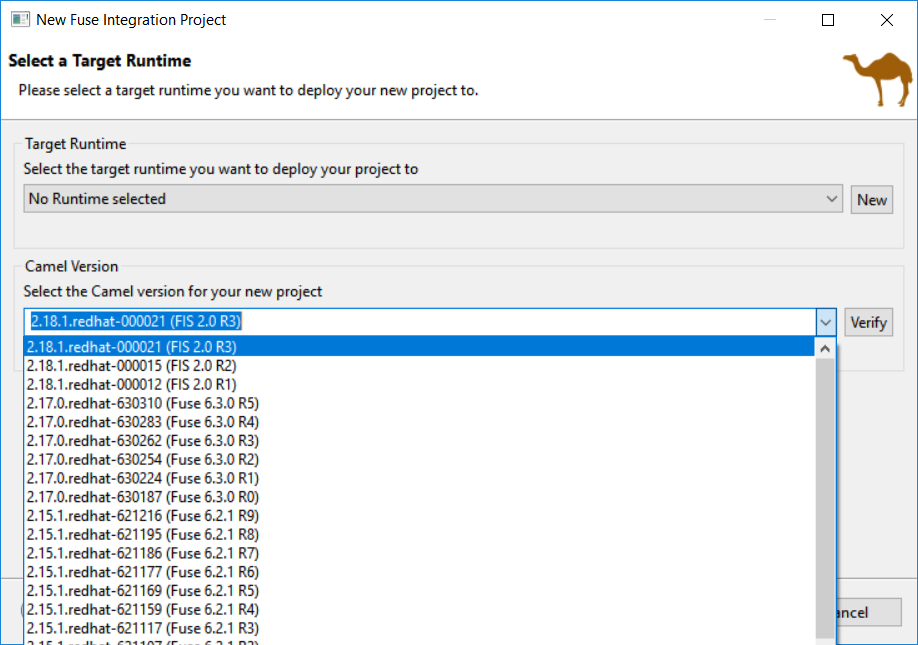
When you create a new project, you select the Camel version from a list. Now, the list of Camel versions includes the Fuse version to help you choose the version that corresponds to your production version.
Starting with Camel 2.20, you can use similar IDs for the component name and its definition unless the specific property "registerEndpointIdsFromRoute" is provided. The validation process checks the Camel version and the value of the "registerEndpointIdsFromRoute" property.
For example:
<from id="timer" uri="timer:timerName"/>When selecting factory method on a Global bean, a lot of possibilities were proposed in the user interface. The list of factory methods for a global bean is now limited to only those methods that match the constraints of the bean’s global definition type (bean or bean factory).
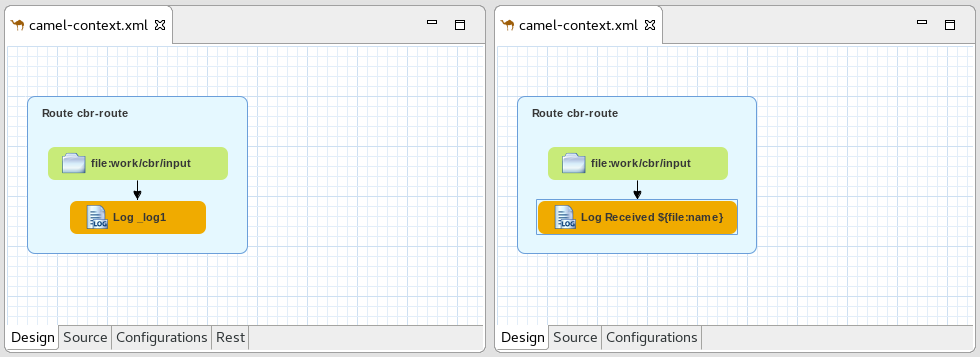
The Fuse Tooling preferences page for the Editor view includes a new "Preferred Labels" option.

Use this option to define the label of EIP components (except endpoints) shown in the Editor’s Design view.
The existing template for "Custom step using a Camel Route" has been updated to work with Fuse 7 Tech Preview 4.
Two new templates have been added: - Custom step using Java Bean - Custom connector
The creation wizard provides better guidance for the targeted deployment environment:

More place is available to choose the templates and they are now filtered based on the targeted environment:
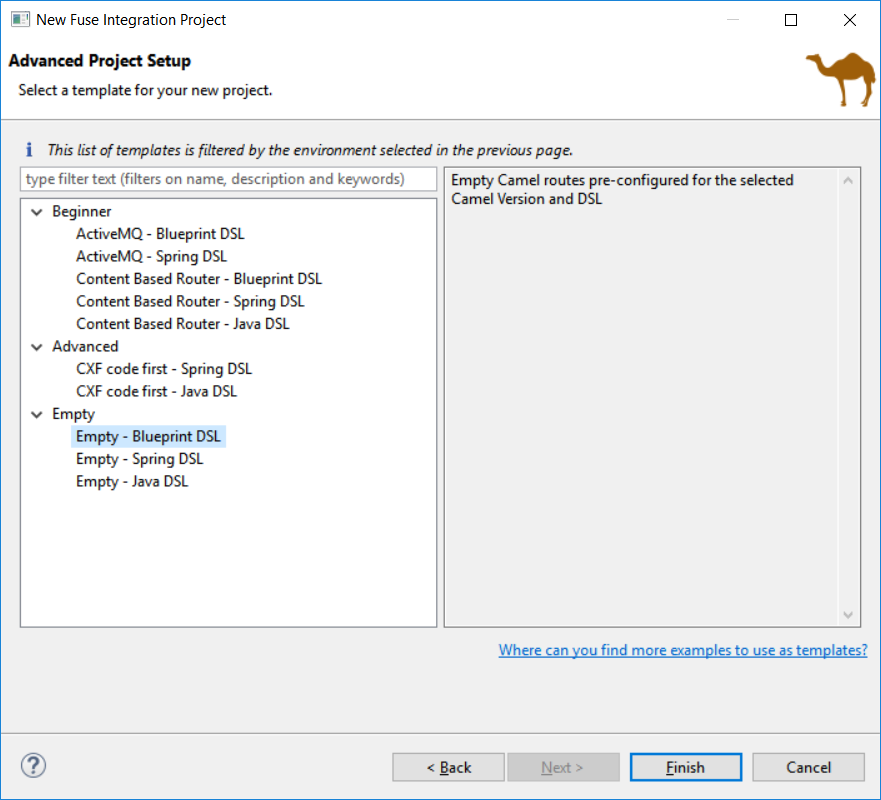
It also points out to other places to find different examples for advanced users (see the link at the bottom of the previous screenshot).
Camel is providing a Rest DSL to help the integration through Rest endpoints. Fuse Tooling is now providing a new tab in read-only mode to visualize the Rest endpoints defined.
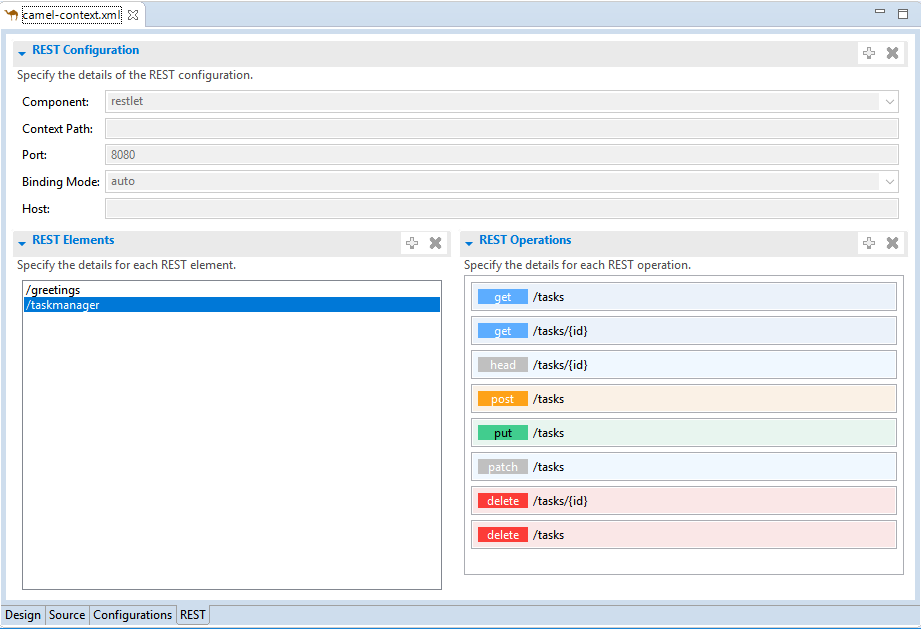
It is currently in Tech Preview and needs to be activated in Window → Preferences → Fuse Tooling → Editor → Enable Read Only Tech preview REST DSL tab.
Work is still ongoing and feedback is very welcome on this new feature, you can comment on this JIRA epic.
When upgrading from Camel < 2.20 to Camel > 2.20, the Dozer dependency has been upgraded to a version not backward-compatible If you open a Data transformation based on Dozer in Fuse Tooling, it will propose to migrate the file used for the transformation (technically changing the namespace). It allow to continue to use the Data Transformation editor and have - in most cases - the Data Transformation working at runtime with Camel > 2.20.
A number of additions and updates have been performed on the available Hibernate runtime providers.
With beta releases available in the Hibernate 5.3 stream, the time was right to make available a corresponding Hibernate 5.3 runtime provider. This runtime provider incorporates Hibernate Core version 5.3.0.Beta2 and Hibernate Tools version 5.3.0.Beta1.
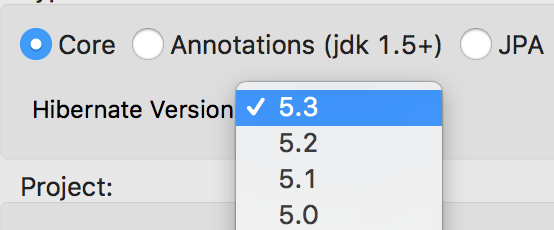
The Hibernate 5.0 runtime provider now incorporates Hibernate Core version 5.0.12.Final and Hibernate Tools version 5.0.6.Final.
The Hibernate 5.1 runtime provider now incorporates Hibernate Core version 5.1.12.Final and Hibernate Tools version 5.1.7.Final.
The Hibernate 5.2 runtime provider now incorporates Hibernate Core version 5.2.15.Final and Hibernate Tools version 5.2.10.Final.
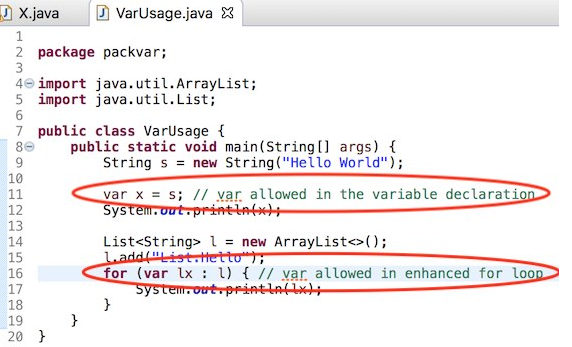
The biggest part is the support for local variable type inference.
Basic necessity of recognizing a Java 10 for launching

And the compiler compliance option of 10

Support for compilation of var as shown below
Flagging of the compiler errors as expected, shown below

Completion at places var is allowed

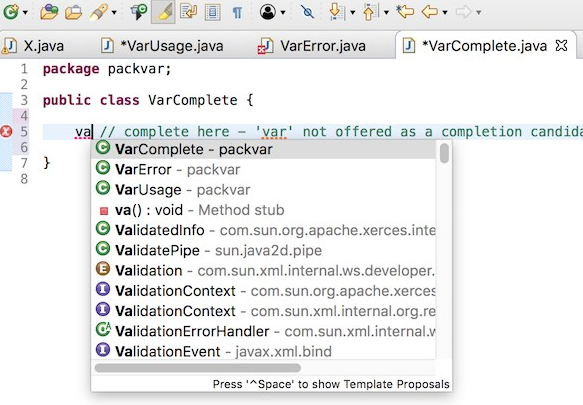
Completion not offered at places var is not allowed
Hover to reveal the javadoc

Convert from var to the appropriate type using quick assist

Convert from type to var using quick assist

You can find more noteworthy updates in on this page.
Happy to announce 4.5.3.AM3 (Developer Milestone 3) build for Eclipse Oxygen.3.
Downloads available at JBoss Tools 4.5.3 AM3.
Full info is at this page. Some highlights are below.
When working with both CDK and upstream Minishift, you needed to have previously downloaded the CDK or Minishift binary. It is now possible to download the runtime to a specific folder when you create the server adapter.
Let’s see an example with the CDK server adapter.
From the Servers view, select the new Server menu item and enter cdk in the filter:
Select Red Hat Container Development Kit 3.2+
Click the Next button:
In order to download the runtime, click the Download and install runtime… link:
Select the version of the runtime you want to download
Click the Next button:
You need an account to download the CDK. If you already had configured credentials, select the one you want to use. If you didn’t, click the Add button to add your credentials.
Click the Next button. Your credentials will be validated, and upon success, you must accept the license agreement:
Accept the license agreement and click the Next button:
You can choose the folder where you want the runtime to be installed. Once you’ve set it, click the Finish button:
The download of the runtime will be started and you should see the progression on the server adapter wizard:
Once the download is completed, you will notice that the Minishift Binary and Username fields have been filled:
Click the Finish button to create the server adapter.
Please note that if it’s the first time you install CDK, you must perform an initialization. In the Servers view, right click the server and select the Setup CDK menu item:
A number of additions and updates have been performed on the available Hibernate runtime providers.
With beta releases available in the Hibernate 5.3 stream, the time was right to make available a corresponding Hibernate 5.3 runtime provider. This runtime provider incorporates Hibernate Core version 5.3.0.Beta2 and Hibernate Tools version 5.3.0.Beta1.
The Hibernate 5.0 runtime provider now incorporates Hibernate Core version 5.0.12.Final and Hibernate Tools version 5.0.6.Final.
The Hibernate 5.1 runtime provider now incorporates Hibernate Core version 5.1.12.Final and Hibernate Tools version 5.1.7.Final.
The Hibernate 5.2 runtime provider now incorporates Hibernate Core version 5.2.15.Final and Hibernate Tools version 5.2.10.Final.
The existing template for "Custom step using a Camel Route" has been updated to work with Fuse 7 Tech Preview 4.
Two new templates have been added: - Custom step using Java Bean - Custom connector
The creation wizard provides better guidance for the targeted deployment environment:
More place is available to choose the templates and they are now filtered based on the targeted environment:
It also points out to other places to find different examples for advanced users (see the link at the bottom of the previous screenshot).
Camel is providing a Rest DSL to help the integration through Rest endpoints. Fuse Tooling is now providing a new tab in read-only mode to visualize the Rest endpoints defined.
It is currently in Tech Preview and needs to be activated in Window → Preferences → Fuse Tooling → Editor → Enable Read Only Tech preview REST DSL tab.
Work is still ongoing and feedback is very welcome on this new feature, you can comment on this JIRA epic.
When upgrading from Camel < 2.20 to Camel > 2.20, the Dozer dependency has been upgraded to a version not backward-compatible If you open a Data transformation based on Dozer in Fuse Tooling, it will propose to migrate the file used for the transformation (technically changing the namespace). It allow to continue to use the Data Transformation editor and have - in most cases - the Data Transformation working at runtime with Camel > 2.20.
Enjoy!
Jeff Maury
Happy to announce 4.5.3.AM2 (Developer Milestone 2) build for Eclipse Oxygen.3.
Downloads available at JBoss Tools 4.5.3 AM2.
Full info is at this page. Some highlights are below.
When working with both CDK and upstream Minishift, it is recommanded to distinguish environments through the MINISHIFT_HOME variable. It was possible before to use this parameter but it requires a two steps process:
first create the server adapter (through the wizard)
then change the MINISHIFT_HOME in the server adapter editor
It is now possible to set this parameter from the server adapter wizard. So now, everything is correctly setup when you create the server adapter.
Let’s see an example with the CDK server adapter.
From the Servers view, select the new Server menu item and enter cdk in the filter:
Select Red Hat Container Development Kit 3.2+
Click the Next button:
The MINISHIFT_HOME parameter can be set here and is defaulted.
When you create a new project, you select the Camel version from a list. Now, the list of Camel versions includes the Fuse version to help you choose the version that corresponds to your production version.
Starting with Camel 2.20, you can use similar IDs for the component name and its definition unless the specific property "registerEndpointIdsFromRoute" is provided. The validation process checks the Camel version and the value of the "registerEndpointIdsFromRoute" property.
For example:
<from id="timer" uri="timer:timerName"/>When selecting factory method on a Global bean, a lot of possibilities were proposed in the user interface. The list of factory methods for a global bean is now limited to only those methods that match the constraints of the bean’s global definition type (bean or bean factory).
Download Runtimes and CDK Server Adapter used the credentials framework to manage credentials. However, the JBoss.org credentials cannot be used any more
as the underlying service used by these components does not support these credentials.
The credentials framework still supports the JBoss.org credentials in case other services / components require or use this credentials domain.
Try our complete Eclipse Oxygen and Red Hat JBoss Developer Studio 11 compatible integration tooling.
JBoss Tools Integration Stack 4.5.2.Final / Developer Studio Integration Stack 11.2.0.GA
| All of the Integration Stack components have been verified to work with the same dependencies as JBoss Tools 4.5 and Developer Studio 11. |
This release provides full Teiid Designer tooling support for JBoss Data Virtualization 6.4 runtime. It provides an updated BPMN2 Modeler and jBPM/Drools for our Business Process Modeling friends. It also provides full synchronization with Devstudio 11.2.0.GA, JBoss Tools 4.5.2.Final and Eclipse Oxygen.2. Please note that SwitchYard is deprecated in this release.
See the BPMN2 1.4.2.Final Known Issues Section of the Integration Stack 11.2.0.GA release notes.
See the Drools 7.5.0.Final Known Issues Section of the Integration Stack 11.2.0.GA release notes.
See the SwitchYard 2.4.1.Final Resolved Issues Section of the Integration Stack 11.2.0.GA release notes.
See the Teiid Designer 11.1.1.Final Resolved Issues Section of the Integration Stack 11.2.0.GA release notes.
Red Hat JBoss Developer Studio Integration Stack is a set of Eclipse-based development tools. It further enhances the IDE functionality provided by JBoss Developer Studio, with plug-ins specifically for use when developing for other Red Hat JBoss products. It’s where DataVirt Tooling, SOA tooling and BRMS tooling are aggregated. The following frameworks are supported:
JBoss Business Process and Rules Development plug-ins provide design, debug and testing tooling for developing business processes for Red Hat JBoss BRMS and Red Hat JBoss BPM Suite.
BPEL Designer - Orchestrating your business processes.
BPMN2 Modeler - A graphical modeling tool which allows creation and editing of Business Process Modeling Notation diagrams using graphiti.
Drools - A Business Logic integration Platform which provides a unified and integrated platform for Rules, Workflow and Event Processing including KIE.
jBPM - A flexible Business Process Management (BPM) suite.
JBoss Data Virtualization Development plug-ins provide a graphical interface to manage various aspects of Red Hat JBoss Data Virtualization instances, including the ability to design virtual databases and interact with associated governance repositories.
Teiid Designer - A visual tool that enables rapid, model-driven definition, integration, management and testing of data services without programming using the Teiid runtime framework.
JBoss Integration and SOA Development plug-ins provide tooling for developing, configuring and deploying BRMS and SwitchYard to Red Hat JBoss Fuse and Fuse Fabric containers.
All of the Business Process and Rules Development plugins plus SwitchYard. Switchyard is deprecated as of this release.
Fuse Tooling has moved out of the Integration Stack to be a core part of JBoss Tools and Developer Studio.
Don’t miss the Features tab for up to date information on your favorite Integration Stack components.
The easiest way to install the Integration Stack components is through the stand-alone installer or through our JBoss Tools Download Site.
For a complete set of Integration Stack installation instructions, see Integration Stack Installation Guide
Let us know how it goes!
Paul Leacu.
Happy to announce 4.5.3.AM1 (Developer Milestone 1) build for Eclipse Oxygen.2.
Downloads available at JBoss Tools 4.5.3 AM1.
Full info is at this page. Some highlights are below.
A new server adapter has been added to support upstream Minishift. While the server adapter itself has limited functionality, it is able to start and stop the Minishift virtual machine via its minishift binary. From the Servers view, click New and then type minishift, that will bring up a command to setup and/or launch the Minishift server adapter.
All you have to do is set the location of the minishift binary file, the type of virtualization hypervisor and an optional Minishift profile name.
Once you’re finished, a new Minishift Server adapter will then be created and visible in the Servers view.
Once the server is started, Docker and OpenShift connections should appear in their respective views, allowing the user to quickly create a new Openshift application and begin developing their AwesomeApp in a highly-replicatable environment.
Shortcuts for the Java, Launch, and Debug perspectives and basic navigation operations are now provided within the Fuse Integration perspective.
The result is a set of buttons in the Toolbar:
All of the associated keyboard shortcuts are also available, such as Ctrl+Shift+T to open a Java Type.
The loading time of the "Advanced" tab in the Properties view for Camel Endpoints is greatly improved.
Previously, in the case of Camel Components that have a lot of parameters, it took several seconds to load the Advanced tab. For example, for the File component, it would take ~3.5s. It now takes ~350ms. The load time has been reduced by a factor of 10. (See this interesting article on response time)
If you notice other places showing slow performance, you can file a report by using the Fuse Tooling issue tracker. The Fuse Tooling team really appreciates your help. Your feedback contributes to our development priorities and improves the Fuse Tooling user experience.
Enjoy!
Jeff Maury
JBoss Tools 4.5.2 and Red Hat JBoss Developer Studio 11.2 for Eclipse Oxygen.2 are here waiting for you. Check it out!
JBoss Developer Studio comes with everything pre-bundled in its installer. Simply download it from our JBoss Products page and run it like this:
java -jar jboss-devstudio-<installername>.jar
JBoss Tools or Bring-Your-Own-Eclipse (BYOE) JBoss Developer Studio require a bit more:
This release requires at least Eclipse 4.7 (Oxygen) but we recommend using the latest Eclipse 4.7.2 Oxygen JEE Bundle since then you get most of the dependencies preinstalled.
Once you have installed Eclipse, you can either find us on the Eclipse Marketplace under "JBoss Tools" or "Red Hat JBoss Developer Studio".
For JBoss Tools, you can also use our update site directly.
http://download.jboss.org/jbosstools/oxygen/stable/updates/
Our main focus for this release was on adoption of Java9, improvements for container based development and bug fixing. Eclipse Oxygen itself has a lot of new cool stuff but let me highlight just a few updates in both Eclipse Oxygen and JBoss Tools plugins that I think are worth mentioning.
The OpenShift server adapter allowed hotdeploy and debugging for JEE and NodeJS based applications. It now supports Spring Boot applications with some limitations: the Spring Boot devtools module must be added to your application as it monitors code changes and as the application must be launched in exploded mode, you must use the upstream image (docker.io/fabric8/s2i-java) rather than the downstream image builder fis-java-openshift.
As an example, we’ve provided an OpenShift template that will create an OpenShift application based on the upstream application and a Git repository that added the Spring Boot devtools to the Fabric8 Spring Boot quickstart.
{
  "apiVersion": "v1",
  "kind": "Template",
  "metadata": {
    "annotations": {
      "description": "Spring-Boot and CXF JAXRS QuickStart. This example demonstrates how you can use Apache CXF JAXRS with Spring Boot on Openshift. The quickstart uses Spring Boot to configure a little application that includes a CXF JAXRS endpoint with Swagger enabled.",
      "tags": "quickstart,java,springboot,fis",
      "iconClass": "icon-jboss",
      "version": "2.0"
    },
    "name": "s2i-spring-boot-cxf-jaxrs"
  },
  "labels": {
    "template": "s2i-spring-boot-cxf-jaxrs"
  },
  "parameters": [
    {
      "name": "APP_NAME",
      "displayName": "Application Name",
      "required": true,
      "value": "s2i-spring-boot-cxf-jaxrs",
      "description": "The name assigned to the application."
    },
    {
      "name": "GIT_REPO",
      "displayName": "Git Repository URL",
      "required": true,
      "value": "https://github.com/jeffmaury/spring-boot-cxf-jaxrs.git",
      "description": "The URL of the repository with your application source code."
    },
    {
      "name": "GIT_REF",
      "displayName": "Git Reference",
      "value": "hotdeploy",
      "description": "Set this to a branch name, tag or other ref of your repository if you are not using the default branch."
    },
    {
      "name": "SERVICE_NAME",
      "displayName": "Service Name",
      "value": "cxf-jaxrs",
      "description": "Exposed service name."
    },
    {
      "name": "BUILDER_VERSION",
      "displayName": "Builder version",
      "value": "2.0",
      "description": "The version of the FIS S2I builder image to use."
    },
    {
      "name": "APP_VERSION",
      "displayName": "Application Version",
      "value": "1.0.0.redhat-000014",
      "description": "The application version."
    },
    {
      "name": "MAVEN_ARGS",
      "displayName": "Maven Arguments",
      "value": "package -DskipTests -Dfabric8.skip -e -B",
      "description": "Arguments passed to mvn in the build."
    },
    {
      "name": "MAVEN_ARGS_APPEND",
      "displayName": "Extra Maven Arguments",
      "description": "Extra arguments passed to mvn, e.g. for multi-module builds."
    },
    {
      "name": "ARTIFACT_DIR",
      "displayName": "Maven build directory",
      "description": "Directory of the artifact to be built, e.g. for multi-module builds."
    },
    {
      "name": "IMAGE_STREAM_NAMESPACE",
      "displayName": "Image Stream Namespace",
      "value": "openshift",
      "required": true,
      "description": "Namespace in which the Fuse ImageStreams are installed. These ImageStreams are normally installed in the openshift namespace. You should only need to modify this if you've installed the ImageStreams in a different namespace/project."
    },
    {
      "name": "BUILD_SECRET",
      "displayName": "Git Build Secret",
      "generate": "expression",
      "description": "The secret needed to trigger a build.",
      "from": "[a-zA-Z0-9]{40}"
    },
    {
      "name": "CPU_REQUEST",
      "displayName": "CPU request",
      "value": "0.2",
      "required": true,
      "description": "The amount of CPU to requests."
    },
    {
      "name": "CPU_LIMIT",
      "displayName": "CPU limit",
      "value": "1.0",
      "required": true,
      "description": "The amount of CPU the container is limited to use."
    }
  ],
  "objects": [
    {
      "apiVersion": "v1",
      "kind": "Route",
      "metadata": {
        "labels": {
          "component": "${APP_NAME}",
          "provider": "s2i",
          "project": "${APP_NAME}",
          "version": "${APP_VERSION}",
          "group": "quickstarts"
        },
        "name": "${SERVICE_NAME}-route"
      },
      "spec": {
        "to": {
          "kind": "Service",
          "name": "${SERVICE_NAME}"
        }
      }
    },
    {
      "apiVersion": "v1",
      "kind": "Service",
      "metadata": {
        "annotations": {
        },
        "labels": {
          "component": "${APP_NAME}",
          "provider": "s2i",
          "project": "${APP_NAME}",
          "version": "${APP_VERSION}",
          "group": "quickstarts"
        },
        "name": "${SERVICE_NAME}"
      },
      "spec": {
        "clusterIP": "None",
        "deprecatedPublicIPs": [],
        "ports": [
          {
            "port": 9413,
            "protocol": "TCP",
            "targetPort": 8080
          }
        ],
        "selector": {
          "project": "${APP_NAME}",
          "component": "${APP_NAME}",
          "provider": "s2i",
          "group": "quickstarts"
        }
      }
    },
    {
      "kind": "ImageStream",
      "apiVersion": "v1",
      "metadata": {
        "name": "${APP_NAME}",
        "creationTimestamp": null,
        "labels": {
          "component": "${APP_NAME}",
          "group": "quickstarts",
          "project": "${APP_NAME}",
          "provider": "s2i",
          "version": "${APP_VERSION}"
        }
      },
      "spec": {},
      "status": {
        "dockerImageRepository": ""
      }
    },
    {
      "kind": "BuildConfig",
      "apiVersion": "v1",
      "metadata": {
        "name": "${APP_NAME}",
        "creationTimestamp": null,
        "labels": {
          "component": "${APP_NAME}",
          "group": "quickstarts",
          "project": "${APP_NAME}",
          "provider": "s2i",
          "version": "${APP_VERSION}"
        }
      },
      "spec": {
        "triggers": [
          {
            "type": "GitHub",
            "github": {
              "secret": "${BUILD_SECRET}"
            }
          },
          {
            "type": "Generic",
            "generic": {
              "secret": "${BUILD_SECRET}"
            }
          },
          {
            "type": "ConfigChange"
          },
          {
            "type": "ImageChange",
            "imageChange": {}
          }
        ],
        "source": {
          "type": "Git",
          "git": {
            "uri": "${GIT_REPO}",
            "ref": "${GIT_REF}"
          }
        },
        "strategy": {
          "type": "Source",
          "sourceStrategy": {
            "from": {
              "kind": "DockerImage",
              "name": "fabric8/s2i-java:${BUILDER_VERSION}"
            },
            "forcePull": true,
            "incremental": true,
            "env": [
              {
                "name": "BUILD_LOGLEVEL",
                "value": "5"
              },
              {
                "name": "ARTIFACT_DIR",
                "value": "${ARTIFACT_DIR}"
              },
              {
                "name": "MAVEN_ARGS",
                "value": "${MAVEN_ARGS}"
              },
              {
                "name": "MAVEN_ARGS_APPEND",
                "value": "${MAVEN_ARGS_APPEND}"
              }
            ]
          }
        },
        "output": {
          "to": {
            "kind": "ImageStreamTag",
            "name": "${APP_NAME}:latest"
          }
        },
        "resources": {}
      },
      "status": {
        "lastVersion": 0
      }
    },
    {
      "kind": "DeploymentConfig",
      "apiVersion": "v1",
      "metadata": {
        "name": "${APP_NAME}",
        "creationTimestamp": null,
        "labels": {
          "component": "${APP_NAME}",
          "group": "quickstarts",
          "project": "${APP_NAME}",
          "provider": "s2i",
          "version": "${APP_VERSION}"
        }
      },
      "spec": {
        "strategy": {
          "resources": {}
        },
        "triggers": [
          {
            "type": "ConfigChange"
          },
          {
            "type": "ImageChange",
            "imageChangeParams": {
              "automatic": true,
              "containerNames": [
                "${APP_NAME}"
              ],
              "from": {
                "kind": "ImageStreamTag",
                "name": "${APP_NAME}:latest"
              }
            }
          }
        ],
        "replicas": 1,
        "selector": {
          "component": "${APP_NAME}",
          "deploymentconfig": "${APP_NAME}",
          "group": "quickstarts",
          "project": "${APP_NAME}",
          "provider": "s2i",
          "version": "${APP_VERSION}"
        },
        "template": {
          "metadata": {
            "creationTimestamp": null,
            "labels": {
              "component": "${APP_NAME}",
              "deploymentconfig": "${APP_NAME}",
              "group": "quickstarts",
              "project": "${APP_NAME}",
              "provider": "s2i",
              "version": "${APP_VERSION}"
            }
          },
          "spec": {
            "containers": [
              {
                "name": "${APP_NAME}",
                "image": "library/${APP_NAME}:latest",
                "readinessProbe" : {
                  "httpGet" : {
                    "path" : "/health",
                    "port" : 8081
                  },
                  "initialDelaySeconds" : 10
                },
                "livenessProbe" : {
                  "httpGet" : {
                    "path" : "/health",
                    "port" : 8081
                  },
                  "initialDelaySeconds" : 180
                },
                "ports": [
                  {
                    "containerPort": 8778,
                    "name": "jolokia"
                  }
                ],
                "env" : [ {
                  "name" : "KUBERNETES_NAMESPACE",
                  "valueFrom" : {
                    "fieldRef" : {
                      "fieldPath" : "metadata.namespace"
                    }
                  }
                } ],
                "resources": {
                  "requests": {
                    "cpu": "${CPU_REQUEST}"
                  },
                  "limits": {
                    "cpu": "${CPU_LIMIT}"
                  }
                }
              }
            ]
          }
        }
      },
      "status": {}
    }
  ]
}
You can see a demo of the OpenShift server adapter for Spring Boot application here:
While debugging your OpenShift deployment, you may face two different issues:
if you launch your test through a Web browser, then it’s likely that you will access your OpenShift deployment through an OpenShift route. The problem is that, by default, OpenShift routes have a 30 seconds timeout for each request. So if you’re stepping through one of your breakpoints, you will get a timeout error message in the browser window even if you can still debug your OpenShift deployment. And you’re now stuck will the navigation of your OpenShift application.
if your OpenShift deployment has a liveness probe configured, depending on your virtual machine capabilities or how your debugger is configured, if your stepping into one of your breakpoints, the liveness probe may fail thus OpenShift so OpenShift will restart your container and your debugging session will be destroyed.
So, from now, when the OpenShift server adapter is started in debug mode, the following action are being performed:
if an OpenShift route is found that is linked to the OpenShift deployment you want to debug, the route timeout will be
set or increased to 1 hour. The original or default value will be restored when the OpenShift server adapter will be restarted
in run mode.
if your OpenShift deployment has a liveness probe configured, the initialDelay field will be increased to 1 hour if the defined
value for this field is lower than 1 hour. If the value of this field is defined to a value greater than 1 hour, it is left intact.
The original value will be restored when the OpenShift server adapter will be restarted
in run mode
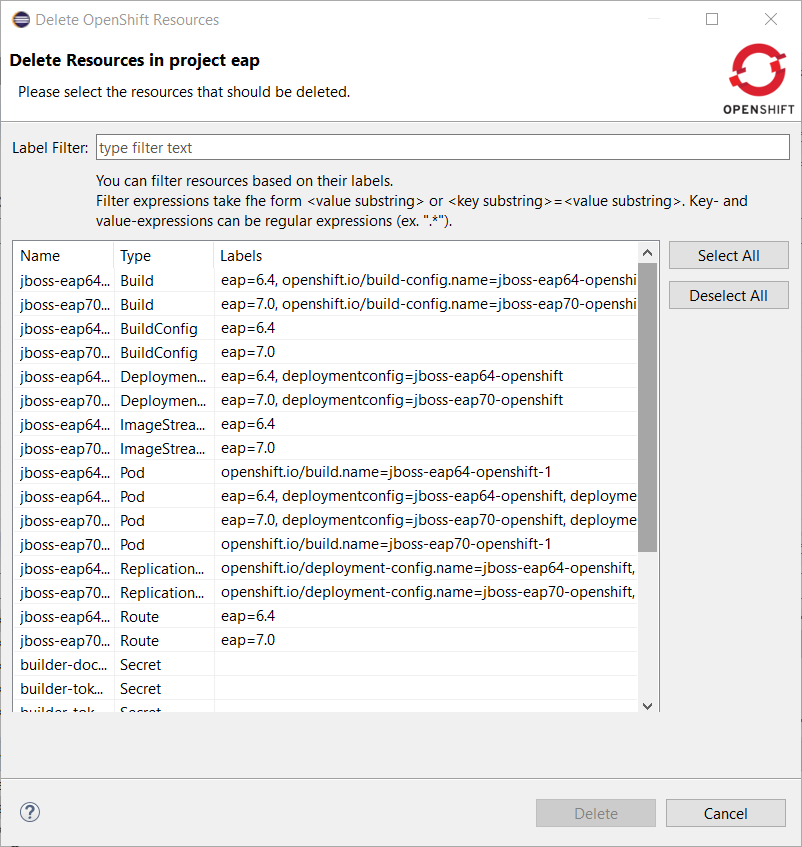
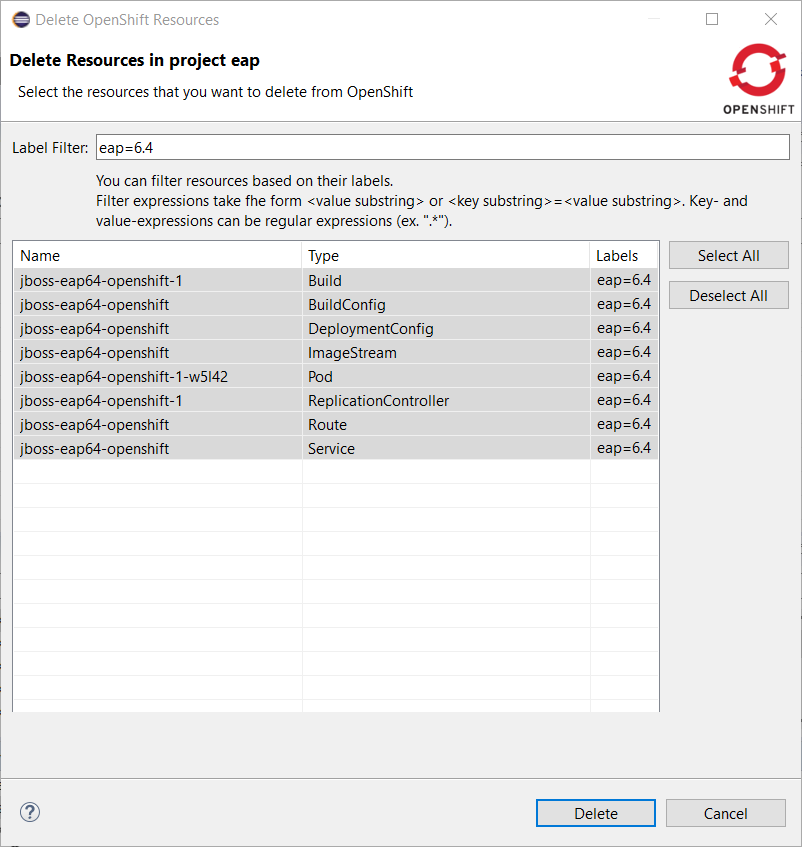
When it comes to delete OpenShift resources, you had two different choices:
individually delete each resource but as some resources are hidden by the OpenShift explorer, it may become troublesome
delete the containing OpenShift project but you are then deleting more resources than required
There is now a new enhanced command to delete resources. It is available at the OpenShift project level and it will first list all the available OpenShift resources for the selected OpenShift project. You can now select the ones you want to delete and you can also filter the list using a filter that will be applied to the labels for each retrieved OpenShift resource.
So if you have two different deployments in a single OpenShift project (if you using OpenShift Online Starter for example) or if you have different kind of resources in a single deployment, you can now distinct them.
Let’s see this in action:
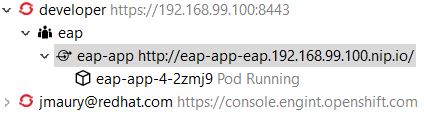
In this example, I have deployed an EAP6.4 based application and an EAP7.0 based one. Here is what you can see from the OpenShift explorer:

Now, let’s invoke the new delete command on the eap OpenShift project: right click the OpenShift project and select Delete Resources…:
Let suppose that we want to delete the EAP6.4 deployement. Enter eap=6.4 in the filter field:
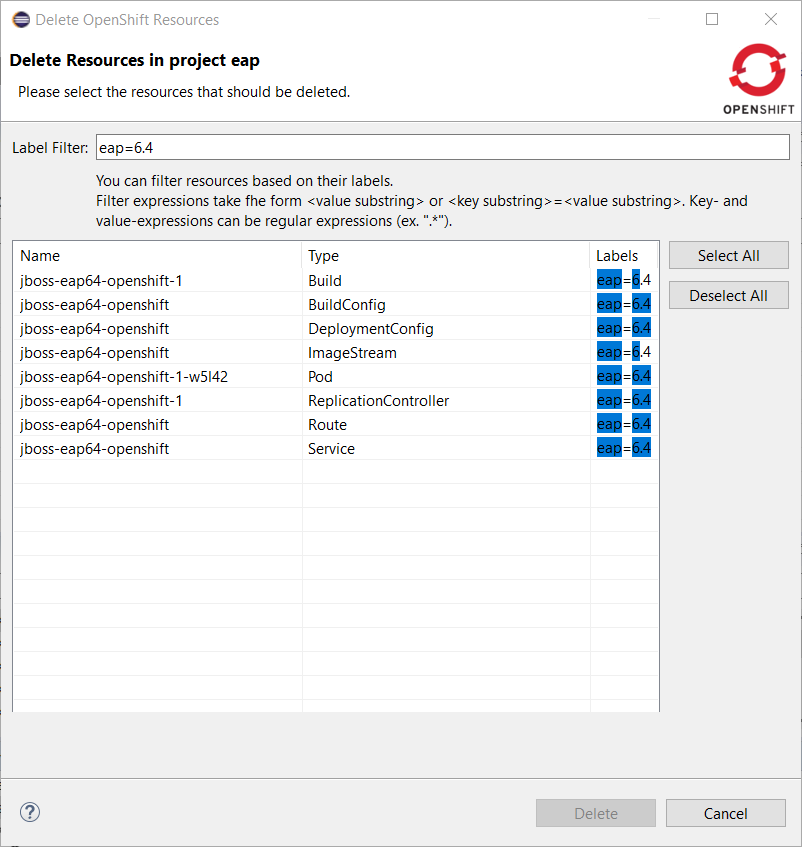
Push the Select All button:
Close this dialog by pushing the OK button. The resources will be deleted and the OpenShift explorer will be updated accordingly:

Fuse 7 is cooking and preliminary versions are already available on early-access repository. Fuse Tooling is ready to leverage them so that you can try the upcoming major Fuse version.
Classical functionalities with server adapters are available: automatic redeploy, Java debug, Graphical Camel debug through created JMX connection. Please note: - you can’t retrieve the Fuse 7 Runtime yet directly from Fuse tooling, it is required to download it on your machine and point to it when creating the Server adapter. - the provided templates requires some modifications to have them working with Fuse 7, mainly adapting the bom. Please see work related to it in this JIRA task and its children.
"routeContext" tag is a special tag used in Camel to provide the ability to reuse routes and to split them across different files. This is very useful on large projects. See Camel documentation for more information. Since this version, the Design of the routes defined in "routeContext" tags are now displayed.
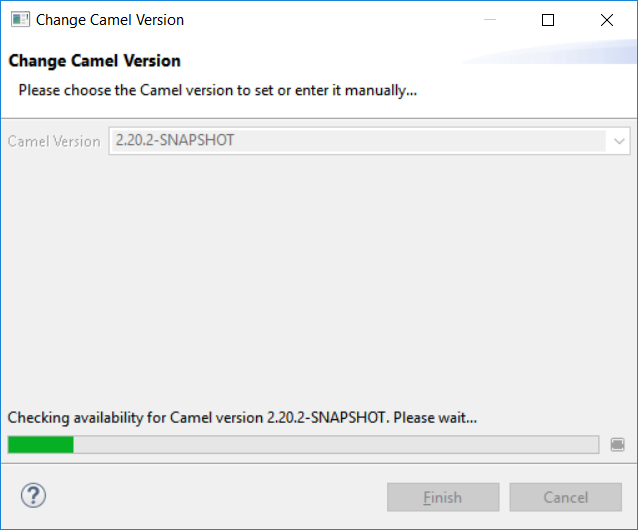
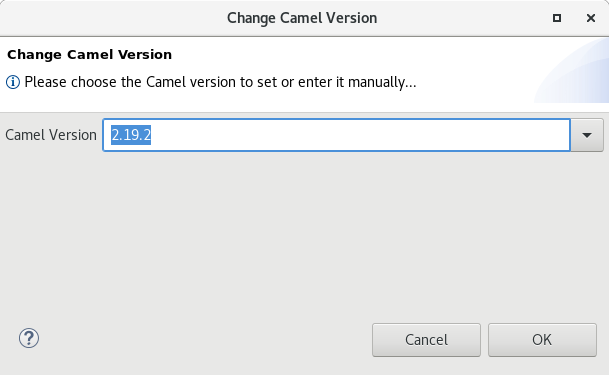
Since Fuse Tooling 10.1.0, it is possible to change the Camel version. In case the Camel version was not cached locally yet and for slow internet connections, this operation can take a while. There is now a progress bar to see the progress.
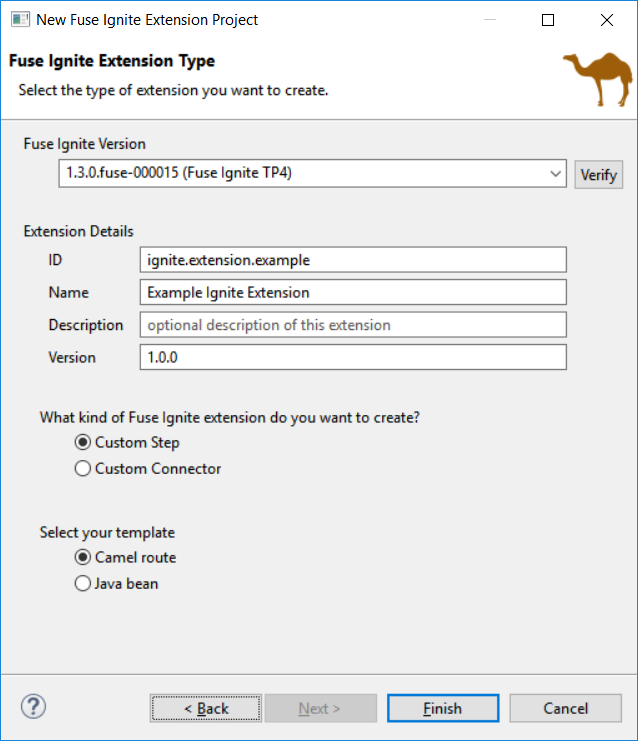
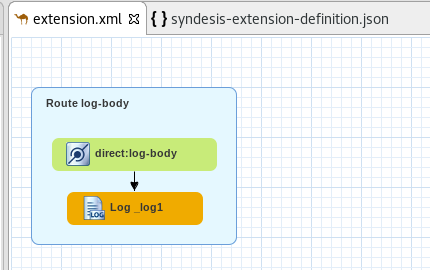
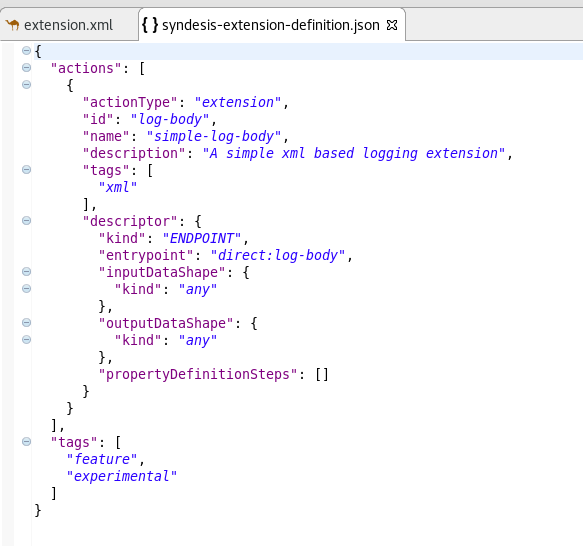
We are happy to announce the addition of support for creating Technical Extension projects for Fuse Ignite*. That includes the creation of the project using the "New Fuse Ignite Extension Project" wizard as well as support for building the deployable artifact directly from inside the Eclipse environment.
*Fuse Ignite is a JBoss Fuse feature that provides a web interface for integrating applications. Without writing code, a business expert can use Ignite to connect to applications and optionally operate on data between connections to different applications. In Ignite, a data operation is referred to as a step in an integration. Ignite provides steps for operations such as filtering and mapping data. To operate on data in ways that are not provided by Ignite built-in steps, you can develop an Ignite extension to define one or more custom steps. Fuse Ignite comes as part of Fuse and Fuse Online. Please refer to the online documentation for more information on how to create and configure technical extensions for Fuse Ignite.
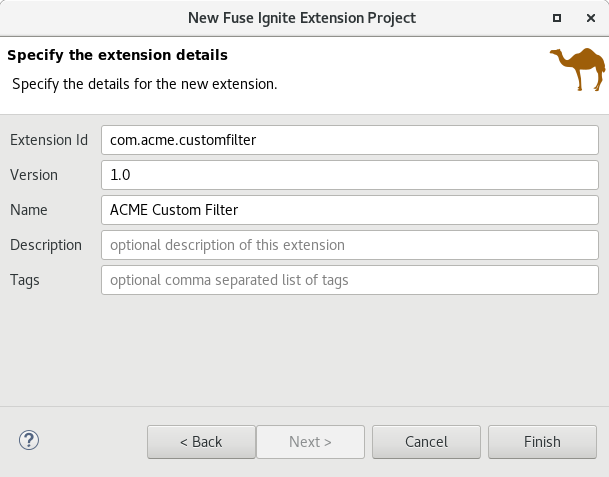
The provided project template allows you to define an Apache Camel route as the base flow of your new technical extension.
To configure your new technical extension you can use the JSON file created with the new project.
The included Forge runtime is now 3.8.1.Final. Read the official announcement here.
You can find more noteworthy updates in on this page.
Happy to announce 4.5.2.AM2 (Developer Milestone 2) build for Eclipse Oxygen.2 (built with RC2).
Downloads available at JBoss Tools 4.5.2 AM2.
Full info is at this page. Some highlights are below.
Fuse 7 is cooking and preliminary versions are already available on early-access repository. Fuse Tooling is ready to leverage them so that you can try the upcoming major Fuse version.
Classical functionalities with server adapters are available: automatic redeploy, Java debug, Graphical Camel debug through created JMX connection. Please note: - you can’t retrieve the Fuse 7 Runtime yet directly from Fuse tooling, it is required to download it on your machine and point to it when creating the Server adapter. - the provided templates requires some modifications to have them working with Fuse 7, mainly adapting the bom. Please see work related to it in this JIRA task and its children.
"routeContext" tag is a special tag used in Camel to provide the ability to reuse routes and to split them across different files. This is very useful on large projects. See Camel documentation for more information. Since this version, the Design of the routes defined in "routeContext" tags are now displayed.
Since Fuse Tooling 10.1.0, it is possible to change the Camel version. In case the Camel version was not cached locally yet and for slow internet connections, this operation can take a while. There is now a progress bar to see the progress.
Enjoy!
Jeff Maury
Happy to announce 4.5.2.AM1 (Developer Milestone 1) build for Eclipse Oxygen.1a.
Downloads available at JBoss Tools 4.5.2 AM1.
Full info is at this page. Some highlights are below.
While debugging your OpenShift deployment, you may face two different issues:
if you launch your test through a Web browser, then it’s likely that you will access your OpenShift deployment through an OpenShift route. The problem is that, by default, OpenShift routes have a 30 seconds timeout for each request. So if you’re stepping through one of your breakpoints, you will get a timeout error message in the browser window even if you can still debug your OpenShift deployment. And you’re now stuck will the navigation of your OpenShift application.
if your OpenShift deployment has a liveness probe configured, depending on your virtual machine capabilities or how your debugger is configured, if your stepping into one of your breakpoints, the liveness probe may fail thus OpenShift so OpenShift will restart your container and your debugging session will be destroyed.
So, from now, when the OpenShift server adapter is started in debug mode, the following action are being performed:
if an OpenShift route is found that is linked to the OpenShift deployment you want to debug, the route timeout will be
set or increased to 1 hour. The original or default value will be restored when the OpenShift server adapter will be restarted
in run mode.
if your OpenShift deployment has a liveness probe configured, the initialDelay field will be increased to 1 hour if the defined
value for this field is lower than 1 hour. If the value of this field is defined to a value greater than 1 hour, it is left intact.
The original value will be restored when the OpenShift server adapter will be restarted
in run mode
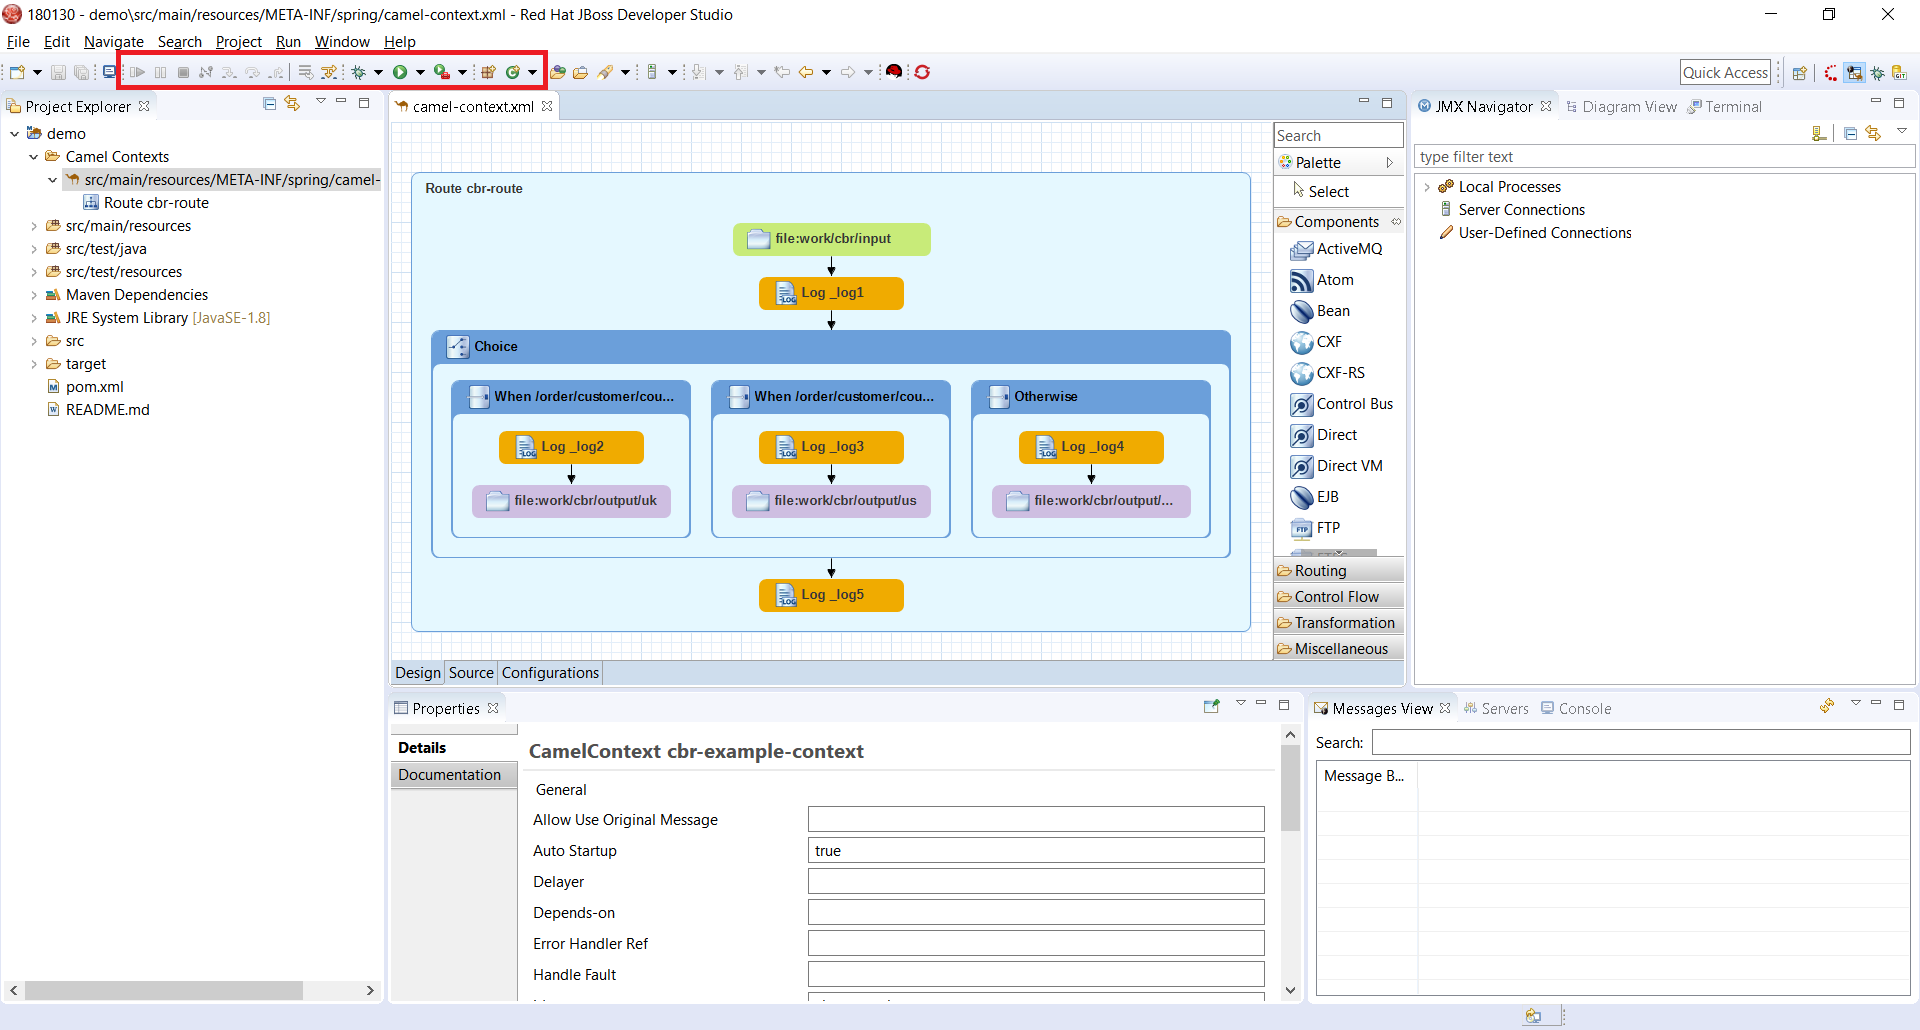
Before Camel 2.18, the Camel catalog is missing information about Camel Context. Fuse Tooling is now providing this missing piece of information and thus allow to edit Camel Context parameters in Properties view like for any other component. It is activated when there is no element selected on the diagram.
Since Fuse Tooling 10.1.0, it is possible to change the Camel version. In case the Camel version was not cached locally yet and for slow internet connections, this operation can take a while. There is now a progress bar to see the progress.
Enjoy!
Jeff Maury
JBoss Tools 4.5.1 and Red Hat JBoss Developer Studio 11.1 for Eclipse Oxygen.1a are here waiting for you. Check it out!
JBoss Developer Studio comes with everything pre-bundled in its installer. Simply download it from our JBoss Products page and run it like this:
java -jar jboss-devstudio-<installername>.jar
JBoss Tools or Bring-Your-Own-Eclipse (BYOE) JBoss Developer Studio require a bit more:
This release requires at least Eclipse 4.7 (Oxygen) but we recommend using the latest Eclipse 4.7.1a Oxygen JEE Bundle since then you get most of the dependencies preinstalled.
Once you have installed Eclipse, you can either find us on the Eclipse Marketplace under "JBoss Tools" or "Red Hat JBoss Developer Studio".
For JBoss Tools, you can also use our update site directly.
http://download.jboss.org/jbosstools/oxygen/stable/updates/
Our main focus for this release was on adoption of Java9, improvements for container based development and bug fixing. Eclipse Oxygen itself has a lot of new cool stuff but let me highlight just a few updates in both Eclipse Oxygen and JBoss Tools plugins that I think are worth mentioning.
A new server adapter has been added to support the next generation of CDK 3.2. While the server adapter itself has limited functionality, it is able to start and stop the CDK virtual machine via its minishift binary. Simply hit Ctrl+3 (Cmd+3 on OSX) and type CDK, that will bring up a command to setup and/or launch the CDK server adapter. You should see the old CDK 2 server adapter along with the new CDK 3 one (labeled Red Hat Container Development Kit 3.2+ ).
All you have to do is set the credentials for your Red Hat account, the location of the CDK’s minishift binary file, the type of virtualization hypervisor and an optional CDK profile name.

Once you’re finished, a new CDK Server adapter will then be created and visible in the Servers view.
Once the server is started, Docker and OpenShift connections should appear in their respective views, allowing the user to quickly create a new Openshift application and begin developing their AwesomeApp in a highly-replicatable environment.
A new command has been added to tune resource limits (CPU, memory) on an OpenShift deployment. It’s available for a Service, a DeploymentConfig, a ReplicationController or a Pod.
To activate it, go the the OpenShift explorer, select the OpenShift resource, right click and select Edit resource limits.
The following dialog will show up:
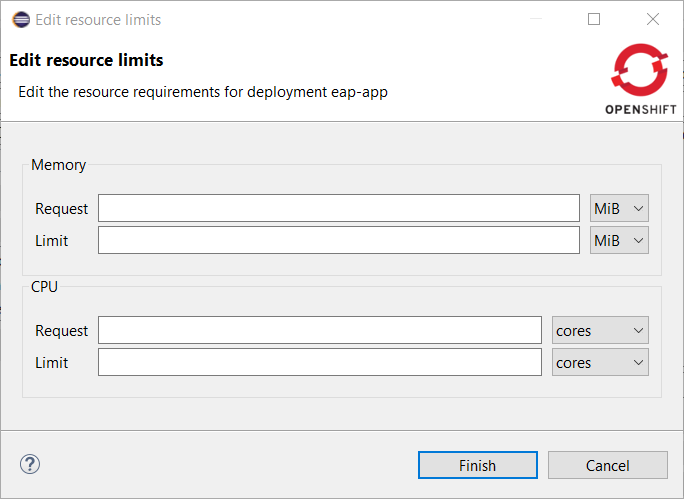
After you changed the resource limits for this deployment, it will be updated and new pods will be spawned (not for ReplicationController)
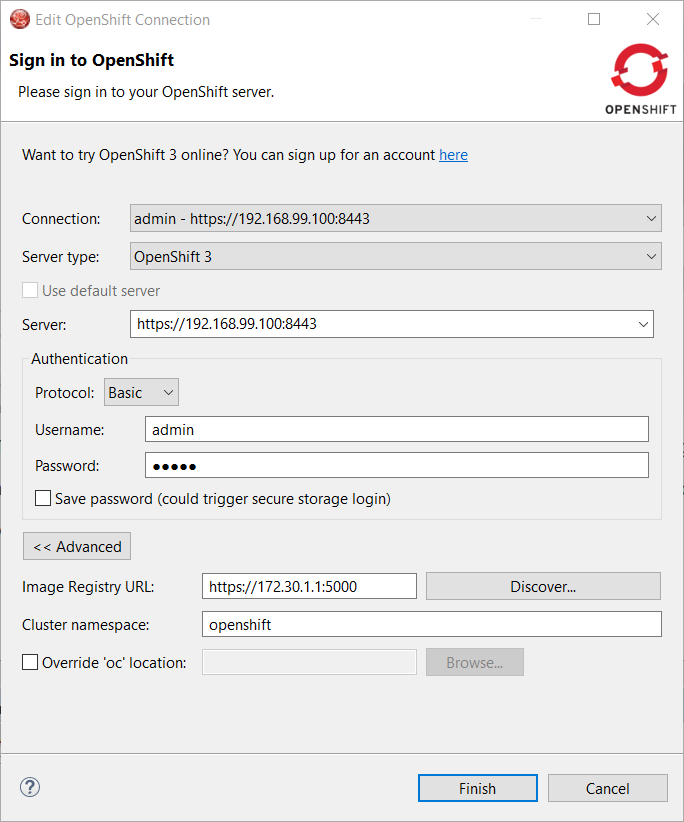
When an OpenShift connection is created, the Docker registry URL is empty. When the CDK is started through the CDK server adapter, an OpenShift connection is created or updated if a matching OpenShift connection is found. But what if you have several OpenShift connections, the remaining ones will be left with the empty URL.
You can find the matching Docker registry URL when editing the OpenShift connection through the Discover button:
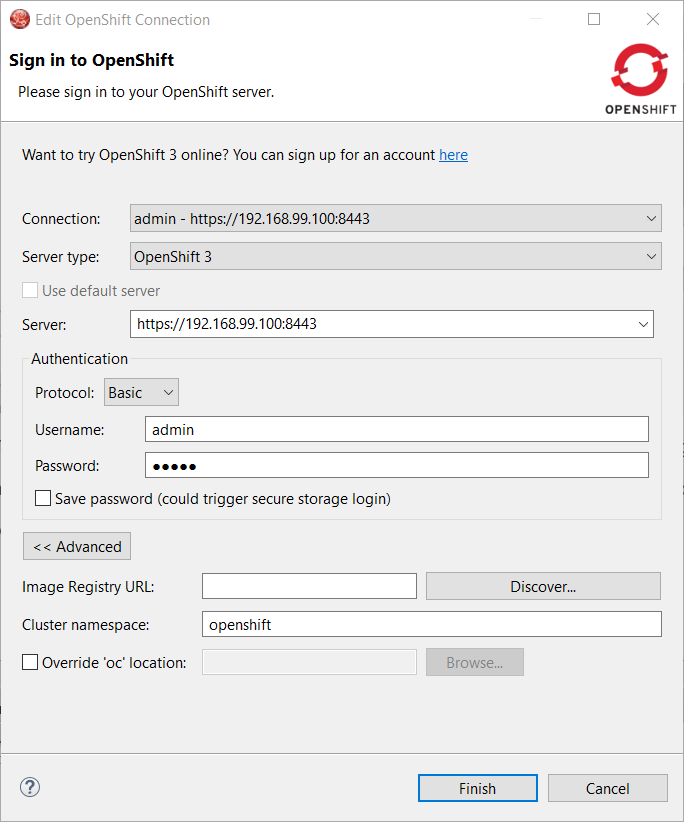
Click on the Discover button and the Docker registry URL will be filled if a matching started CDK server adapter is found:
It is possible to login from JBoss Tools to OpenShift.io. A single account will be maintained per workspace. Once you initially logged onto OpenShift.io, all needed account information (tokens,…) will be stored securely.
There are two ways to login onto OpenShift.io:
through the UI
via a third party service that will invoke the proper extension point
In the toobar, you should see a new icon  . Click on it and it will launch the login.
If this is the first time you login to OpenShift.io or if you OpenShift.io account tokens are not valid anymore, you should see a browser launched with the following content:
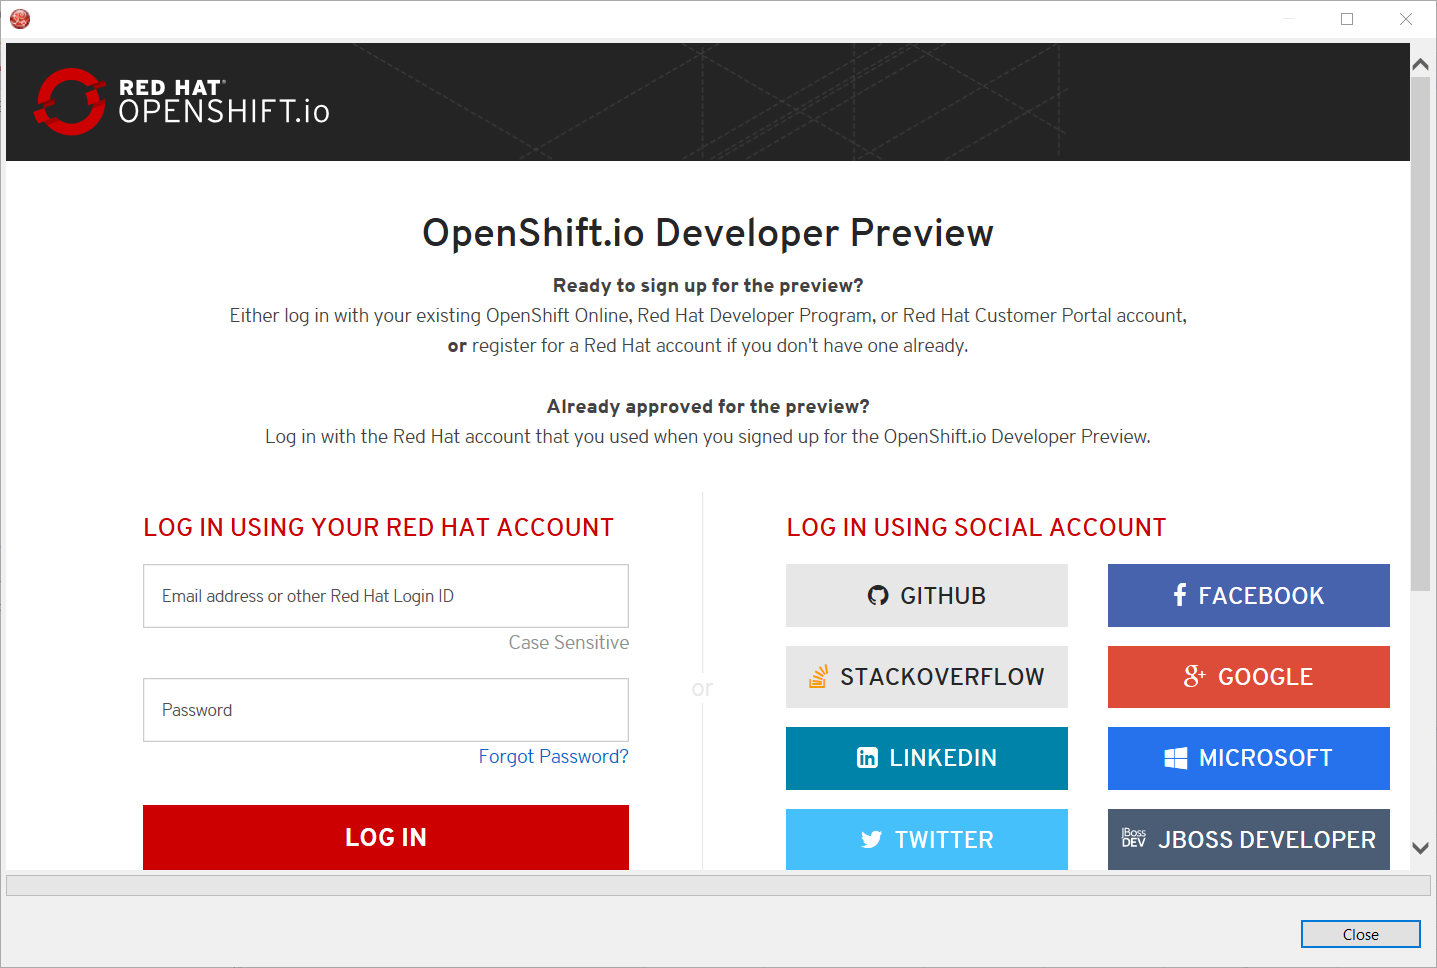
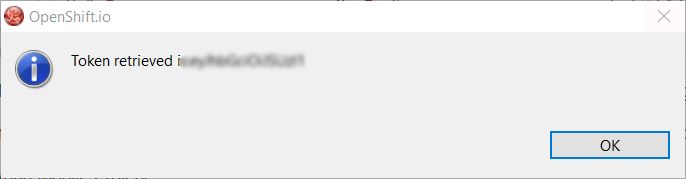
Enter your RHDP login and the browser will then auto-close and an extract (for security reasons) of the OpenShift.io token will be displayed:
This dialog will be also shown if an OpenShift.io account was configured in the workspace and the account information is valid.
The OpenShift.io integration can be invoked by a third party service through the org.jboss.tools.openshift.io.code.tokenProvider extension point.
This extension point will perform the same actions as the UI but basically will return an access token for OpenShift.io to the third party service.
A detailed explanation of how to use this extension point is described here: Wiki page
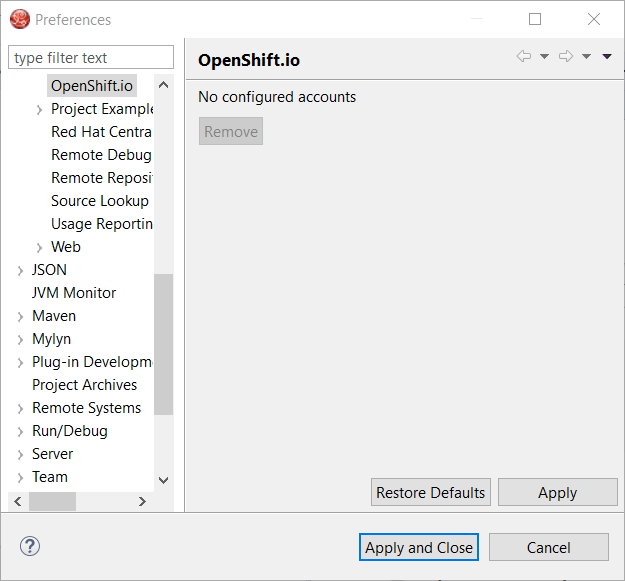
You can display the account information using the Eclipse Jboss Tools → OpenShift.io preference node. If you workspace does not contain an OpenShift.io account yet, you should see the following:
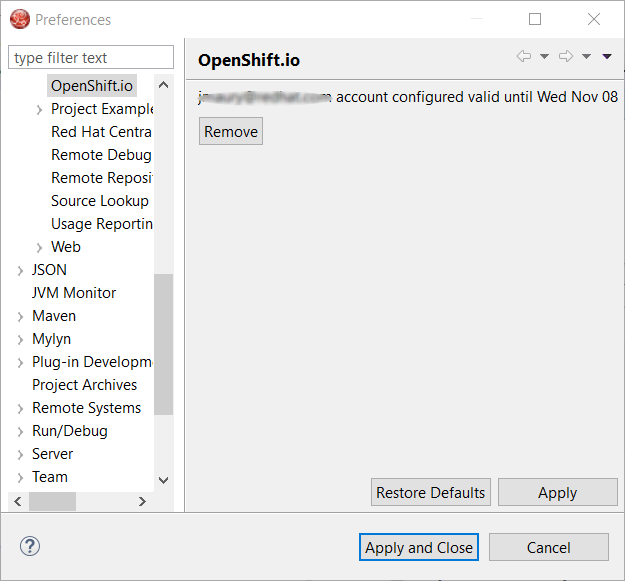
If you have a configured OpenShift.io account, you should see this:
It is now possible to set Bean references from User Interface when creating a new Bean:
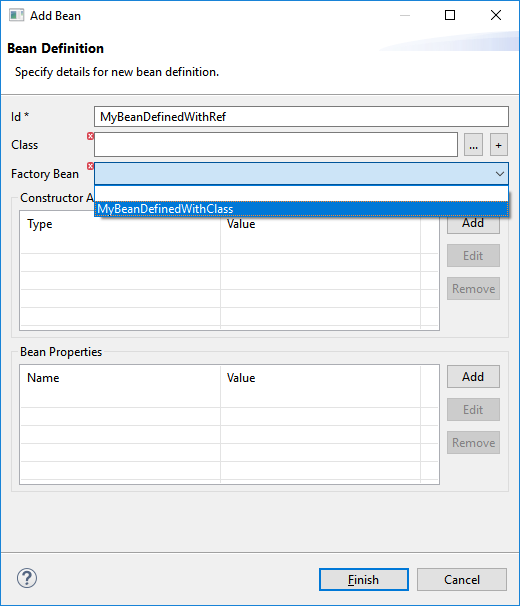
Editing Bean references is also now available on the properties view when editing an existing Bean:
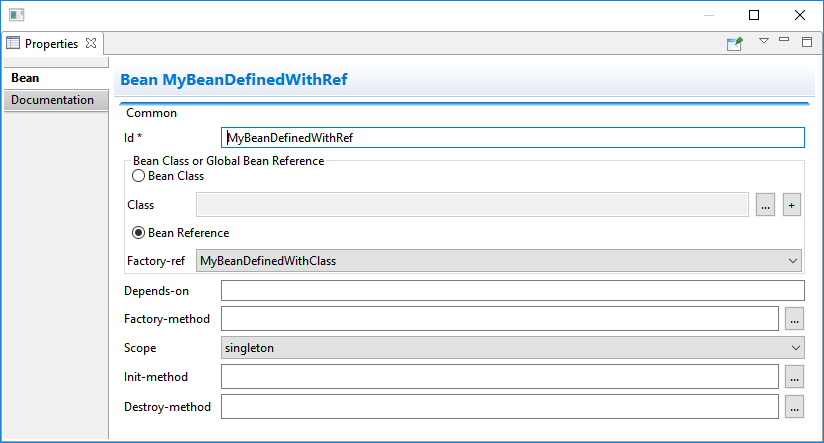
Additional validation has been added to help users avoid mixing Beans defined with class names and Beans defined referencing other beans.
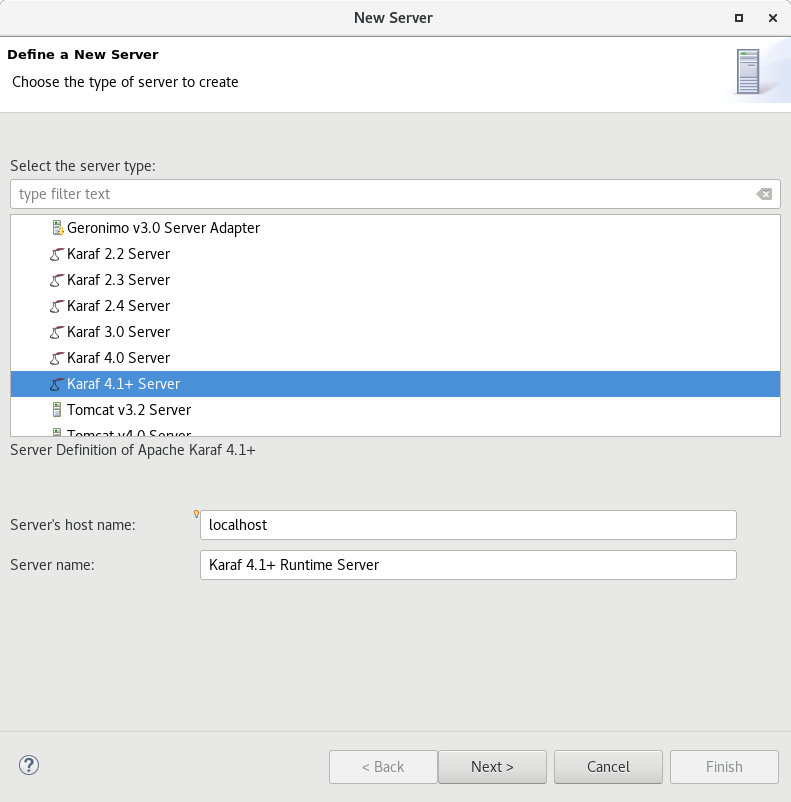
We are happy to announce the addition of new Apache Karaf server adapters. You can now download and install Apache Karaf 4.0 and 4.1 from within your development environment.
You can now change the Apache Camel version used in your project. To do that you invoke the context menu of the project in the project explorer and navigate into the Configure menu. There you will find the menu entry called Change Camel Version which
will guide you through this process.
Java™ 9 is here, and JDT fully supports it:
The Eclipse compiler for Java (ECJ) implements all the new Java 9 language enhancements
Updated significant features to support Java Modules, such as compiler, search and many editor features.
|
It is not mandatory to run Eclipse with Java Runtime 9 to get the Java 9 support. However, a Java runtime 9 is required to be on a project’s build path to compile a modular project against the system modules. |
When a Java Runtime 9 is added to a project’s build path, the system modules are listed under the System library in the package explorer
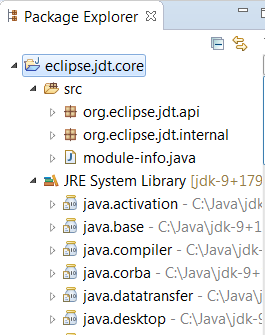
An existing non-modular Java project can be quickly converted to a module by creating a module-info.java for that project. This feature can be availed once the project has been moved to compliance 9

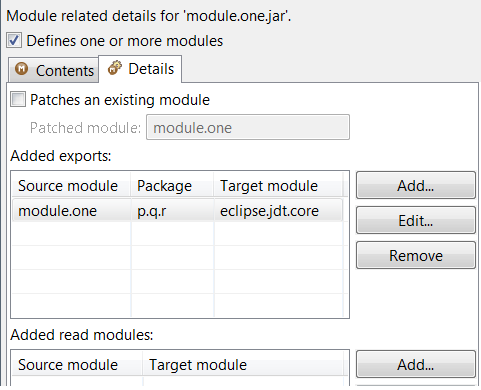
With Java 9 support, a library or a container can now be added to the module path as opposed to the classpath
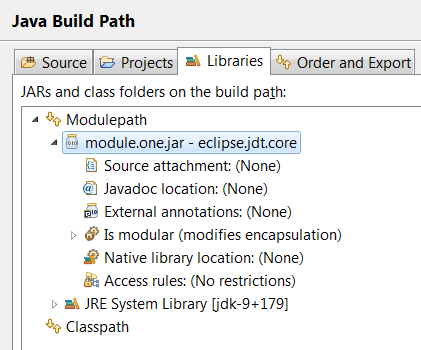
Once a module has been added to a project’s module path, its encapsulation properties can further be modified by clicking on the Is Modular option and editing the Module properties. The following example shows how module module.one can can be made to export its packages in the context of the current Java project
Java search now includes a new search scope - Module

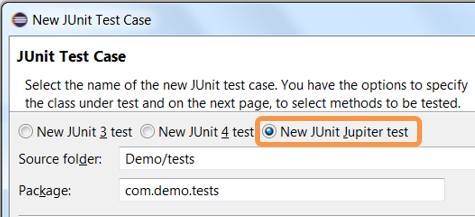
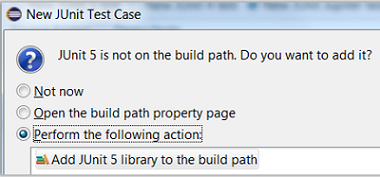
JUnit 5 support is now available in Eclipse.
Create a new JUnit Jupiter test via *New JUnit Test Case wizard:
Add JUnit 5 library to the build path
New JUnit Test Case wizard offers to add it while creating a new JUnit Jupiter test
Quick Fix (Ctrl+1) proposal on @Test, @TestFactory, @ParameterizedTest and @RepeatedTest annotations
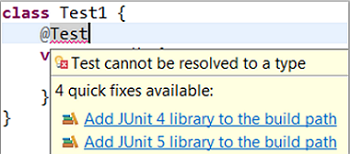
Add JUnit library in Java Build Path dialog

Create a JUnit Jupiter test method with the new test_jupiter template

Create a @TestFactory method with the new test_factory template

JUnit Jupiter’s Assertions, Assumptions, DynamicContainer and DynamicTest classes are now added to Eclipse Favorites by default

This allows you to quickly import the static methods from these classes in your code via Content Assist (Ctrl + Space) and Quick Fix (Ctrl + 1).
View all the failures from grouped assertions in the same Result Comparison dialog opened from JUnit view

View the number of disabled tests and tests with assumption failures on hover in JUnit view
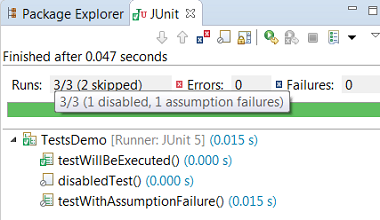
Use Go to File action or just double-click to navigate to the test from JUnit view even when the test is displayed with a custom name

(Re-)Run a single @Nested test class by using the Run action in JUnit view or Outline view. You can even right-click on a nested test class name in the editor and use the Run As action

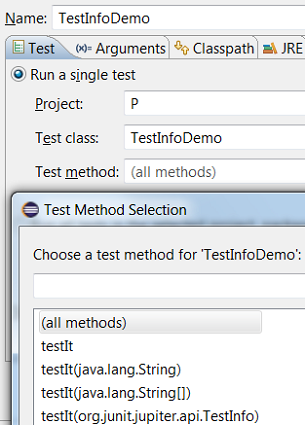
The Test Method Selection dialog in JUnit launch configuration now shows the method parameter types also
You can provide tags to be included in or excluded from a test run in the Configure Tags dialog of JUnit launch configuration

|

We do not support running tests in a setup where an old Eclipse build (not having JUnit 5 support) is using a new Eclipse build (having JUnit 5 support) as target. Also, developers who have the JDT JUnit runtime bundles (org.eclipse.jdt.junit.runtime, org.eclipse.jdt.junit4.runtime) checked out and pull the latest changes will run into the above issue. You are expected to use a new Eclipse build for the development.
You can find more noteworthy updates in on this page.