You’ve probably heard about Quarkus, the Supersonic Subatomic Java framework tailored for Kubernetes and containers.
We wrote an article on how to create your first Quarkus project in an Eclipse based IDE (like Red Hat CodeReady Studio).
You’ve probably heard about Quarkus, the Supersonic Subatomic Java framework tailored for Kubernetes and containers.
We wrote an article on how to create your first Quarkus project in an Eclipse based IDE (like Red Hat CodeReady Studio).
JBoss Tools 4.11.0 and Red Hat CodeReady Studio 12.11 for Eclipse 2019-03 are here waiting for you. Check it out!
Red Hat CodeReady Studio comes with everything pre-bundled in its installer. Simply download it from our Red Hat CodeReady product page and run it like this:
java -jar devstudio-<installername>.jar
JBoss Tools or Bring-Your-Own-Eclipse (BYOE) CodeReady Studio require a bit more:
This release requires at least Eclipse 4.11 (2019-03) but we recommend using the latest Eclipse 4.11 2019-03 JEE Bundle since then you get most of the dependencies preinstalled.
Once you have installed Eclipse, you can either find us on the Eclipse Marketplace under "JBoss Tools" or "Red Hat CodeReady Studio".
For JBoss Tools, you can also use our update site directly.
http://download.jboss.org/jbosstools/photon/stable/updates/
Our main focus for this release was improvements for container based development and bug fixing. Eclipse 2019-03 itself has a lot of new cool stuff but let me highlight just a few updates in both Eclipse 2019-03 and JBoss Tools plugins that I think are worth mentioning.
When you need to defined a new OpenShift connection, you need to provide the following information:
cluster URL
username and password or token
If you’ve already logged in your cluster through the OpenShift Web Console, you can copy an oc command
in the clipboard that contains both the cluster URL and your token.
So, from now, there is a new option that allows you to initialize the wizard fields from the copied oc
command:
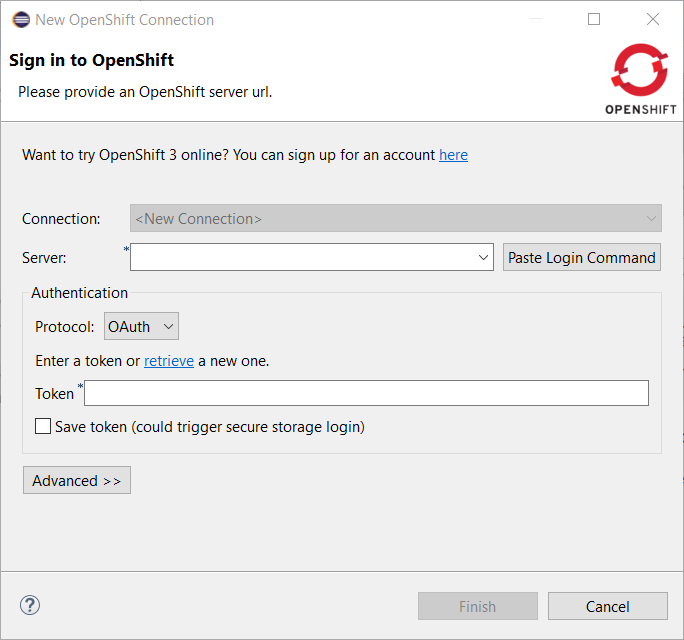
Click on the Paste Login Command button and the fields will be initialized:

A server adapter has been added to work with Wildfly 15. It adds support for Java EE 8.
Related JIRA: JBIDE-26502
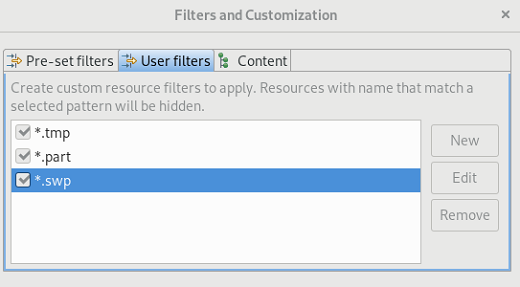
The Filters and Customization… menu in Project Explorer now shows an additional User filters tab which can be used to exclude some resources from Project Explorer based on their name.
Full name and regular expressions are supported.
The Error Log view has been moved from the PDE project to the Platform project. See bug 50517 for details.
A copy to clipboard action has been added to all tabs of the Installation Details dialog.

The Environment tab in a Launch configuration dialog supports copy & paste actions now. The environment variables are transferred as text data, so it is not only possible to copy & paste between two different launch configurations, but also between the launch configuration and e.g. some text editor or the command line.
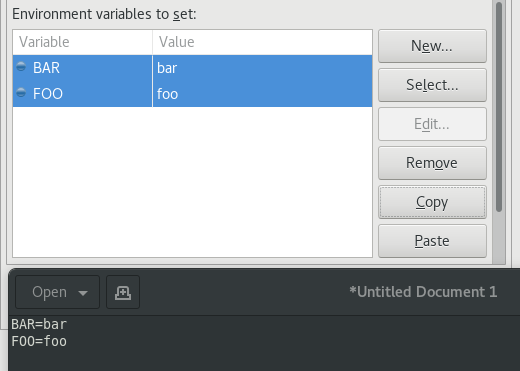
This feature is available in all launch configurations which use the common Environment tab.
When Eclipse IDE is started for the first time or with a new workspace, it may not be intuitive for new users on how to proceed. To help the users in getting started, the following useful links have been provided to add a project to the workspace:
Perspective specific project creation wizard
Generic New Project wizard
Import projects wizard

The Dark theme for Mac has been improved to use the colors from the macOS system dark appearance. Some of the notable changes in Eclipse IDE are the dark window title bar, menus, file dialogs, combos and buttons.
Note: This change is available on macOS Mojave and later.
Before:
After:
Java 12 is out and Eclipse JDT supports Java 12 for 4.11 via Marketplace. The release notably includes the following Java 12 feature: JEP 325: Switch Expressions (Preview). Please note that this is a preview language feature and hence enable preview option should be on. For an informal introduction of the support, please refer to Java 12 Examples wiki.
JUnit 5.4 is here and Eclipse JDT has been updated to use this version.
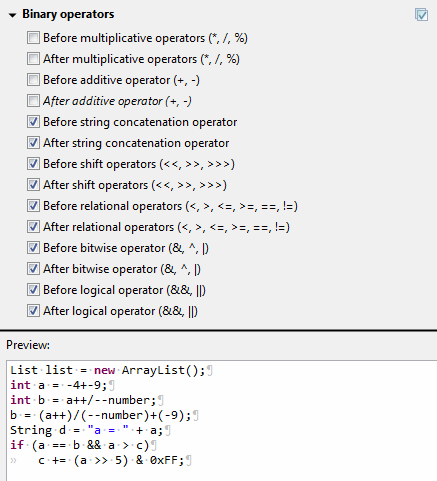
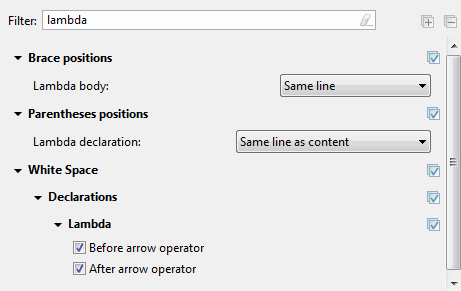
Instead of a single line wrapping setting for binary expressions, there’s now a whole section of settings for various kinds of binary operators (multiplicative, additive, logical, etc.). There are settings for relational (including equality) and shift operators, which were not covered by the old setting. Also, string concatenation can now be treated differently from arithmetic sum.
The settings can be found in the Profile Editor (Preferences > Java > Code Style > Formatter > Edit…) under the Line Wrapping > Wrapping settings > Binary expressions subsection.

The white space around operators in binary expressions can now be controlled separately for different groups of operators, consistent with the line wrapping settings.
The new Binary operators sub-section has been added under White Space > Expressions in the Formatter profile editor.
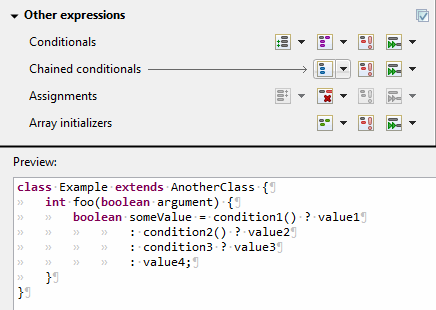
A chain of nested conditional expressions (using ternary operator) can be now wrapped as a single group, with all of them indented at the same level. It’s only possible for right-sided nesting.
Find the Chained conditionals setting in the Profile Editor under the Line Wrapping > Wrapping settings > Other expressions subsection.
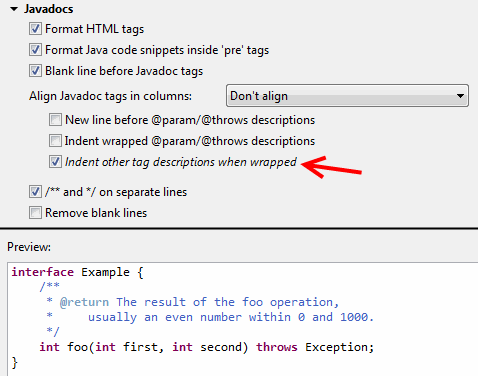
The Formatter Profile has a new setting that indents wrapped Javadoc tag descriptions.
It’s called Indent other tag descriptions when wrapped, in contrast to the preexisting Indent wrapped
@param/@throws descriptions setting. It affects tags like @return@deprecated
The settings can be found in the Profile Editor (Preferences > Java > Code Style > Formatter > Edit…) under the Comments > Javadocs section.
The Variables view now stores a history of the expressions used in the Detail pane. You can choose a previously entered expression for a variable from the new drop-down menu. The expression will be copied to the Detail pane where you can select it to perform various actions present in the context menu.

You can find more noteworthy updates in on this page.
We are extremely pleased to announce that the preview release of the Red Hat OpenShift Connector for JetBrains products (IntelliJ IDEA, WebStorm,….) is now available. You can download the OpenShift Connector plugin from the JetBrains marketplace or install it directly from the plugins gallery in JetBrains products.
This article provides describes the features and benefits of the plugin and provides installation details. It also provides a demo of how using the plugin improves the end-to-end experience of developing and deploying Spring Boot applications to your OpenShift cluster.
Red Hat OpenShift is a container application platform that brings the power of Kubernetes and containers to the enterprise. Regardless of the applications architecture, OpenShift lets you easily and quickly build, develop, and deploy in nearly any infrastructure, public or private.
Therefore, whether it’s on-premises, in a public cloud, or hosted, you have an award-winning platform to get your next big idea to market ahead of your competition.
Using OpenShift Connector, you can interact with any Red Hat OpenShift including a local instance of OpenShift clusters such as minishift/Red Hat Container Development Kit. Leveraging the OpenShift Application Explorer view, you can improve the end-to-end experience of developing applications.
The plugin enables you to perform all this directly using JetBrains products (IntelliJ IDEA, WebStorm,….) on Windows, Linux and macOS platforms and removes the complexity of memorizing some fairly complicated CLI commands.
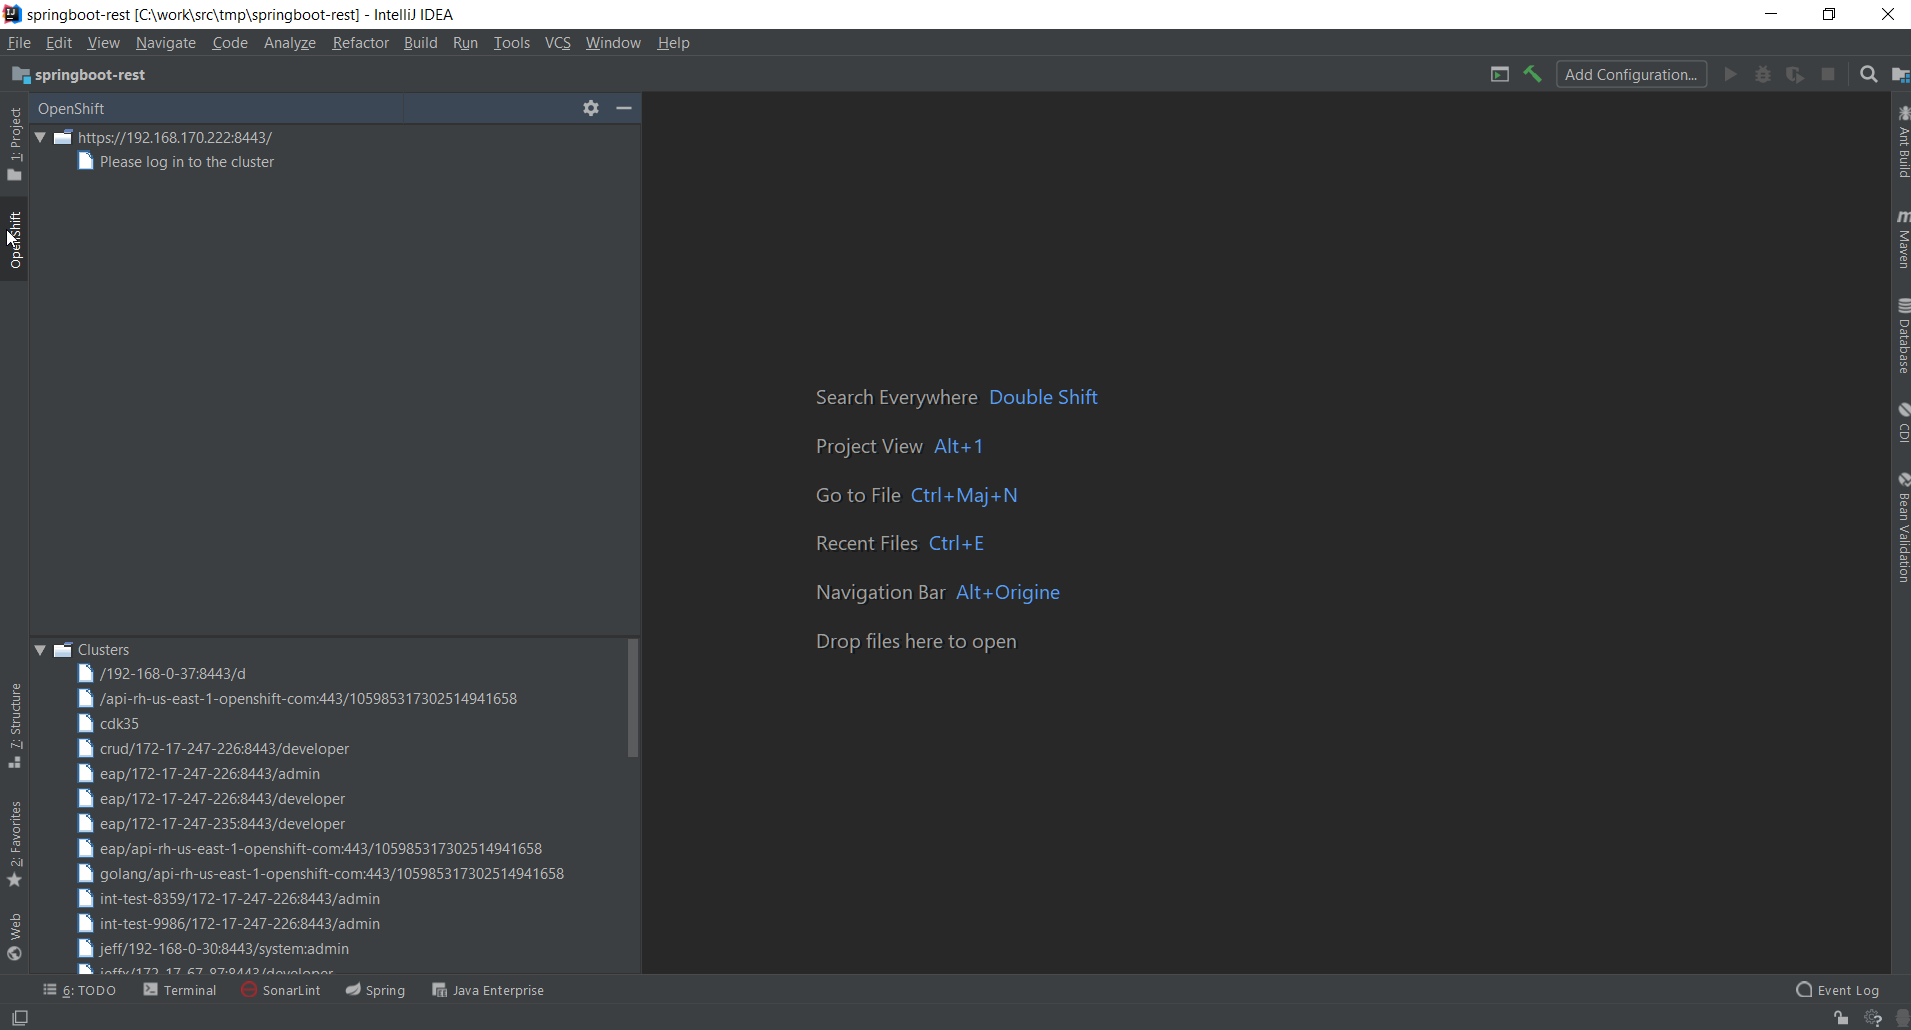
Once the OpenShift Connector is installed, a new panel, the OpenShift view, is enabled in the Explorer panel. Then, you can access the view and connect to a running OpenShift cluster to perform the required operations.
You can see a live demo of the plugin here:
Below are the steps to run the demonstration by yourself
First, you will need to install any JetBrains product (IntelliJ IDEA, WebStorm,….) 2018.1 or later.
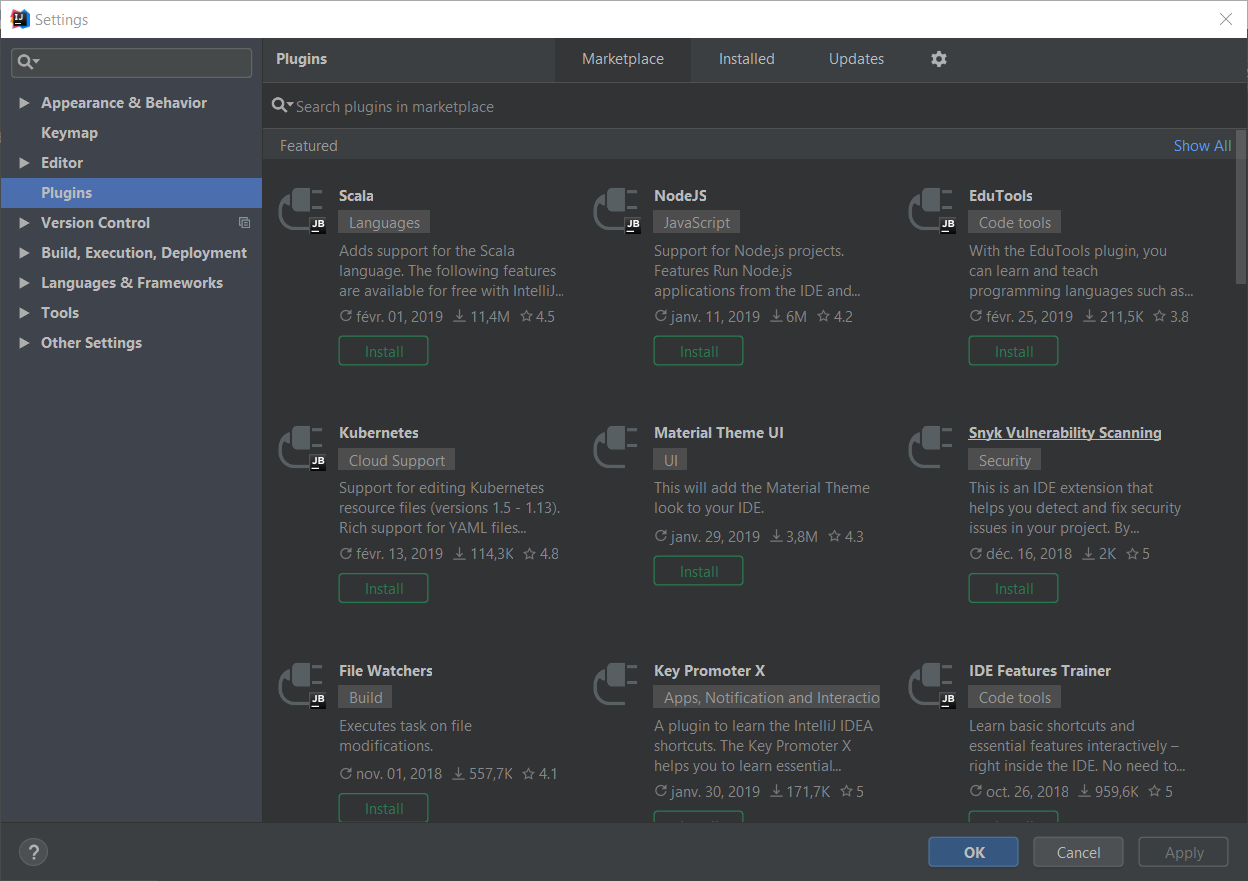
To install the plugin, bring up the plugins configuration dialog: File → Settings → Plugins:
In the search bar, enter OpenShift and click on the OpenShift Connector by Red Hat item:
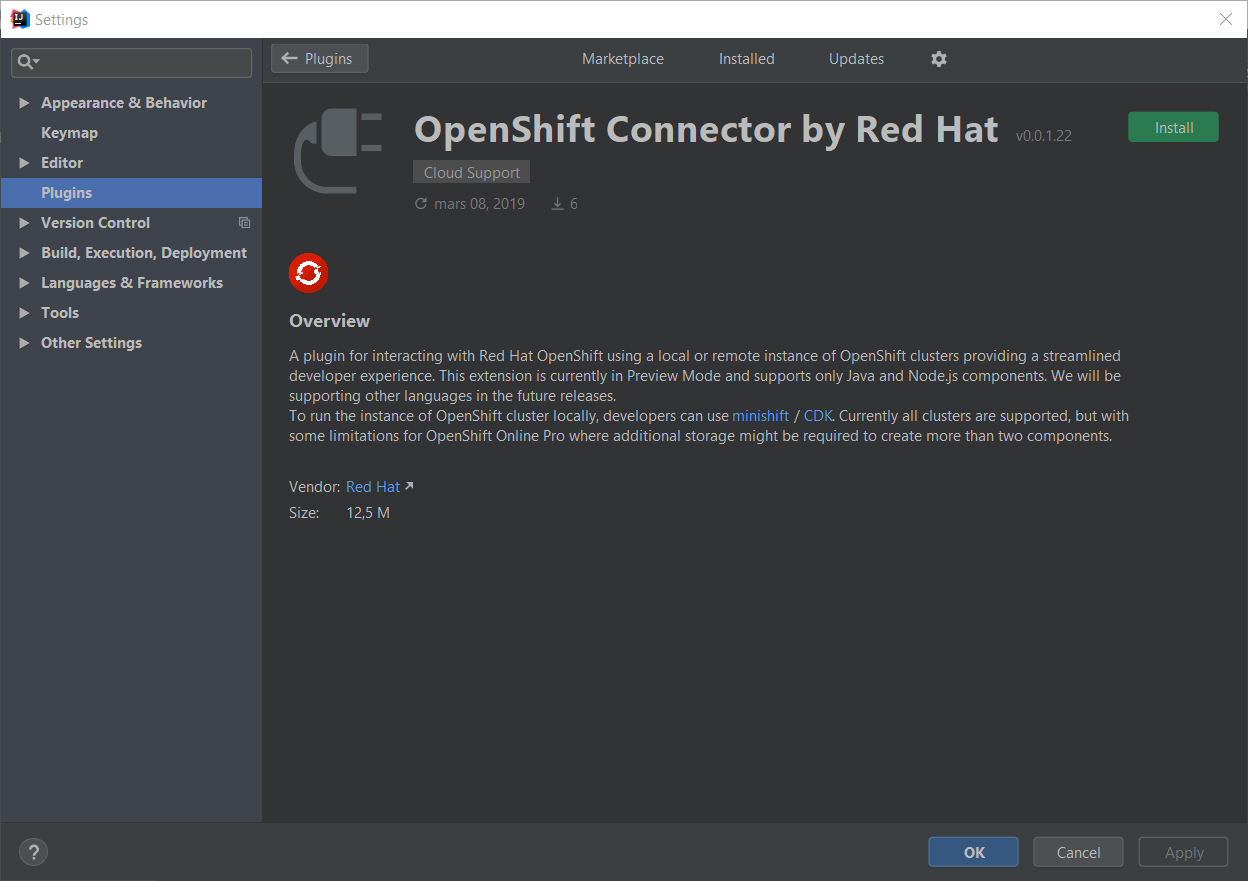
Click the Install button:
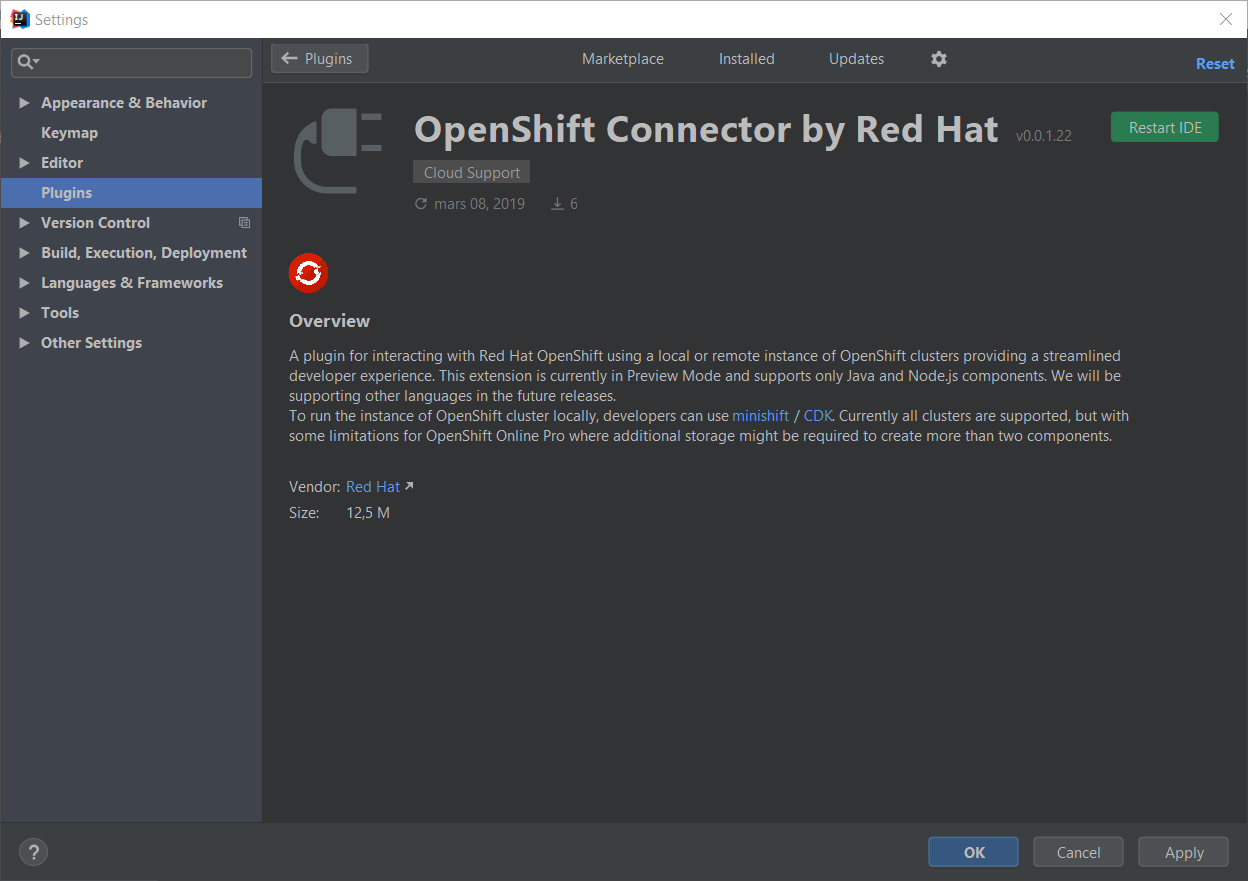
Once the plugin has been downloaded, click the Restart IDE button.
Once the IDE has been restarted, mouse over the Views icon in the bottom left area:

Select the OpenShift item:
If you’re working locally, start the local OpenShift instance using minishift/Red Hat Container Development Kit
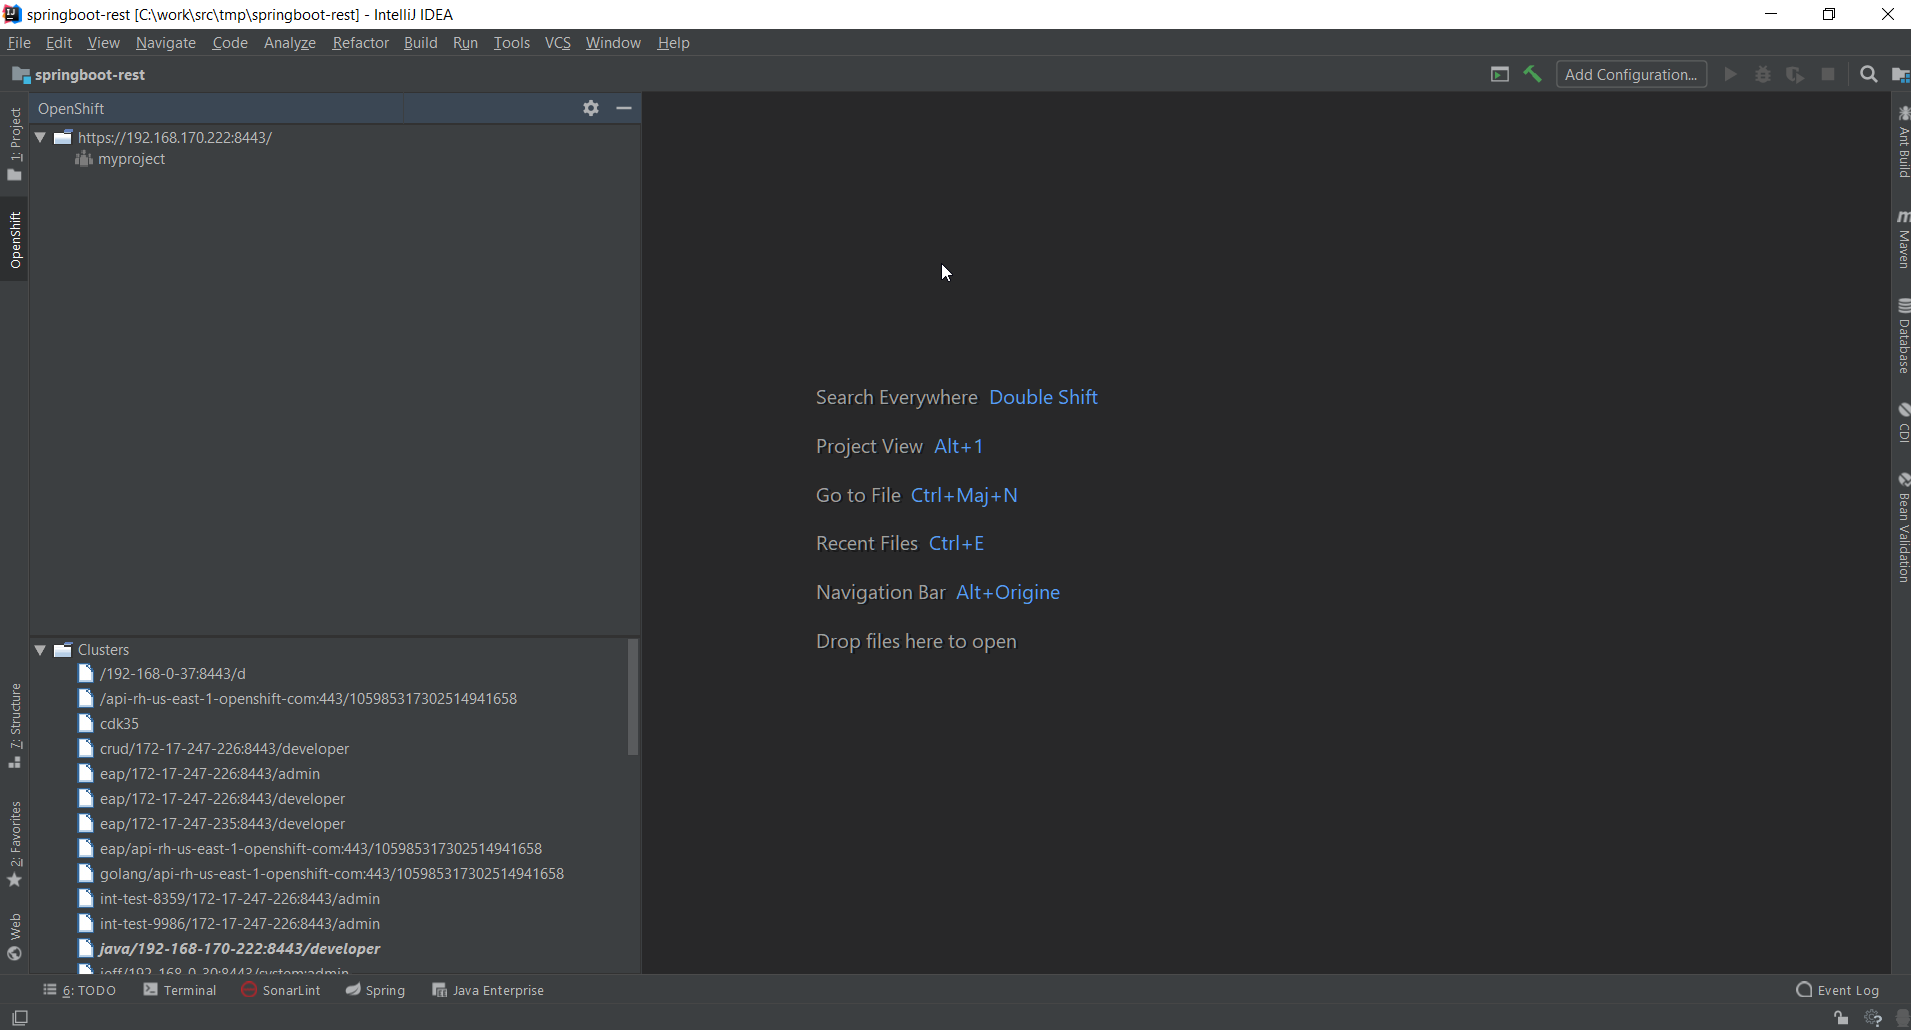
You then need to log in to the running OpenShift cluster: right click on the cluster URL tree node and select Log in to cluster.
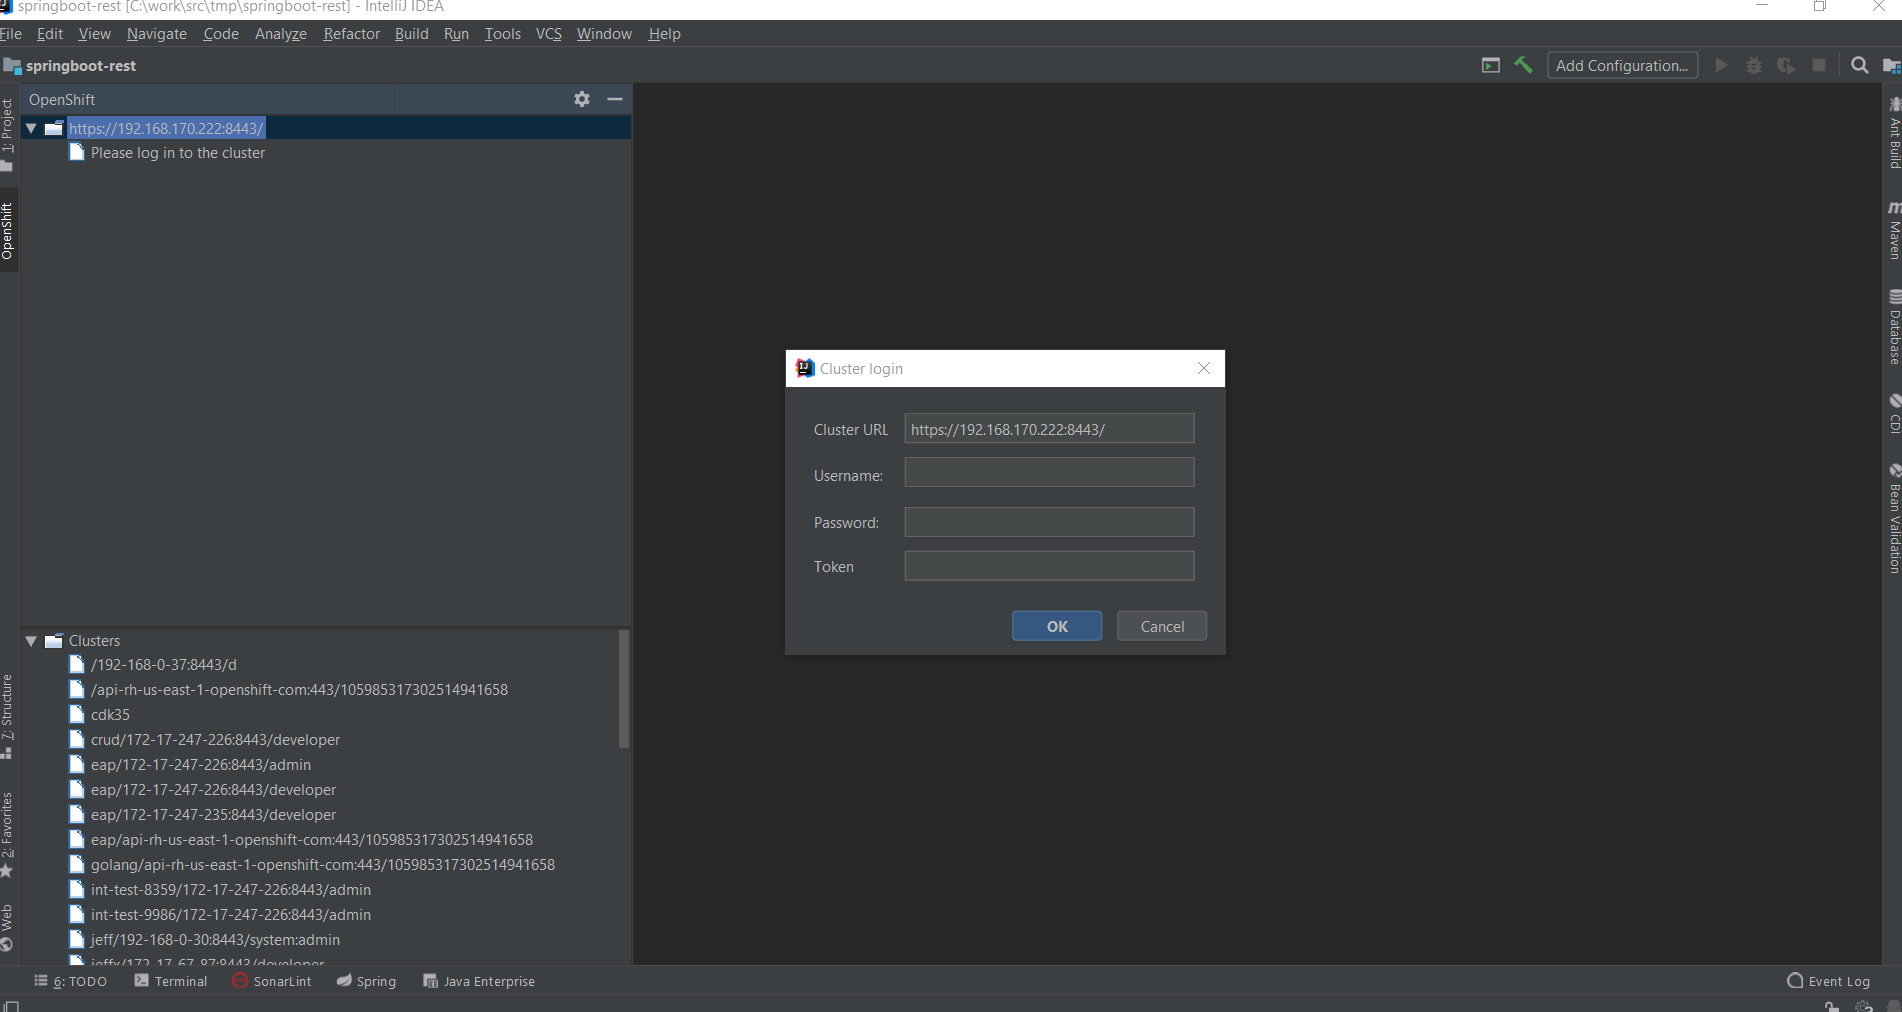
Enter developer in the Username field and any value in the Password field and press the OK button:
Before we work with our local cluster, first import our application source code. We will use a simple
Spring Boot application whose source code is located at https://github.com/openshift-evangelists/Wild-West-Backend.
In order to import the application, use the File → New → Project from Version Control → Git:
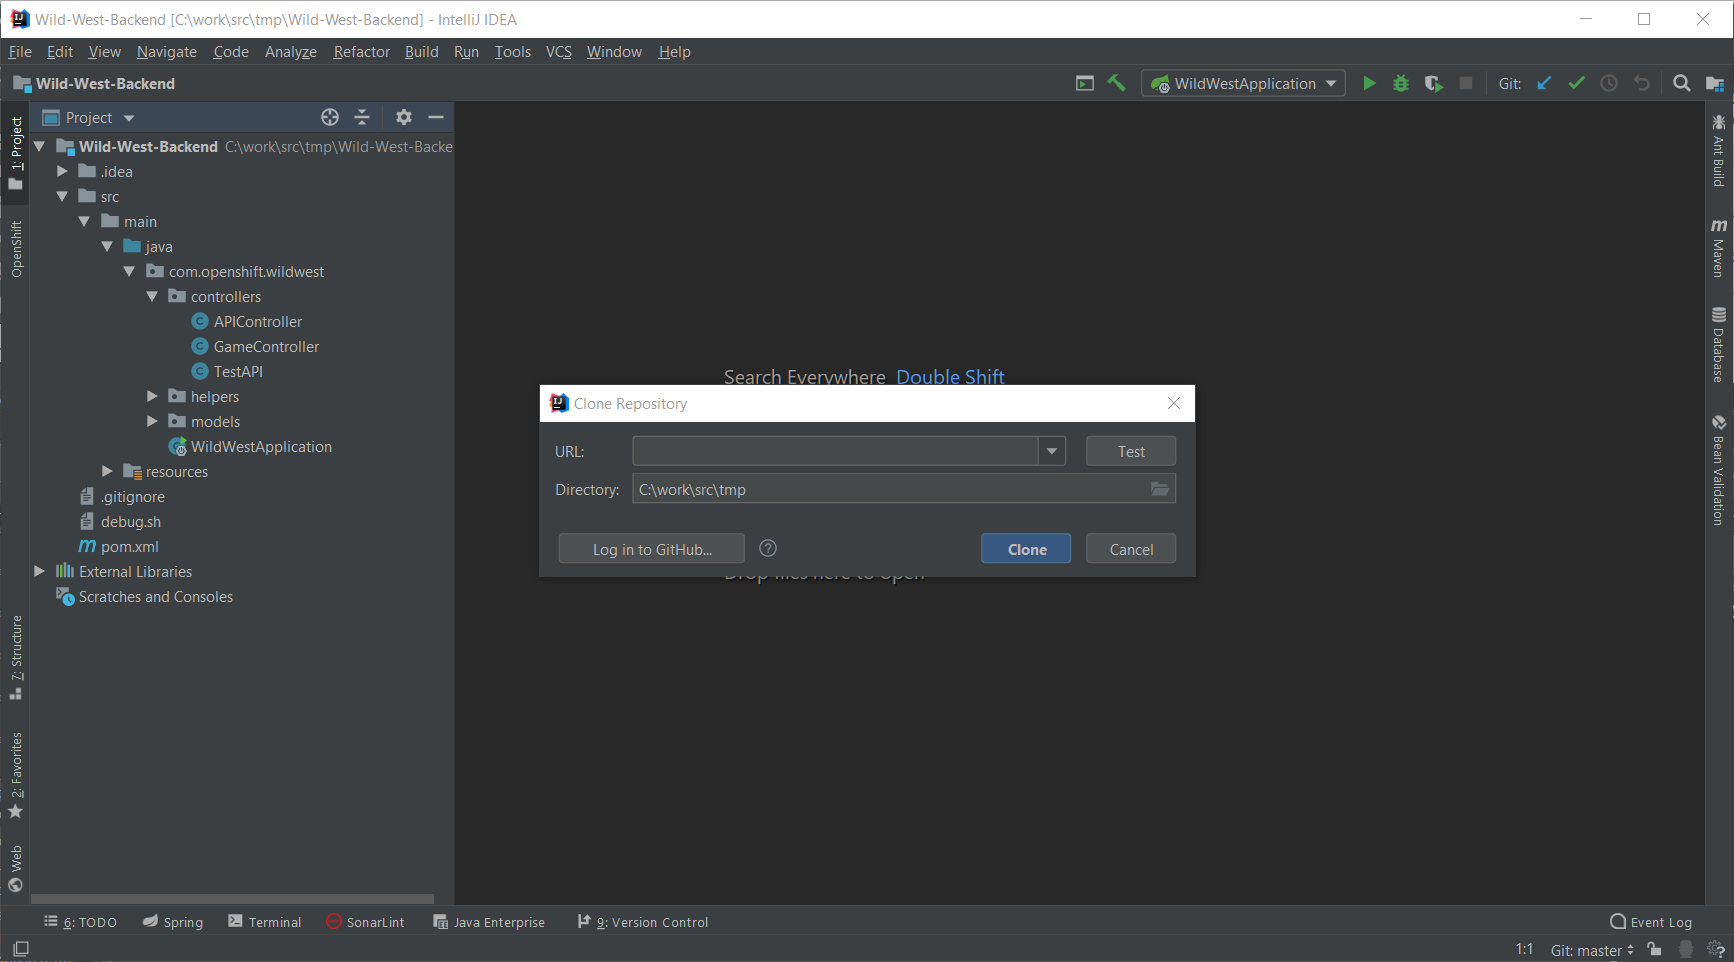
Enter https://github.com/openshift-evangelists/Wild-West-Backend in the URL field and press
the Clone button.
The application will be hosted in an OpenShift project (similar to Kubernetes namespaces). For more information about OpenShift projects, see the official documentation
In the OpenShift view, right click on the cluster node (the one with the URL) and select New Project:
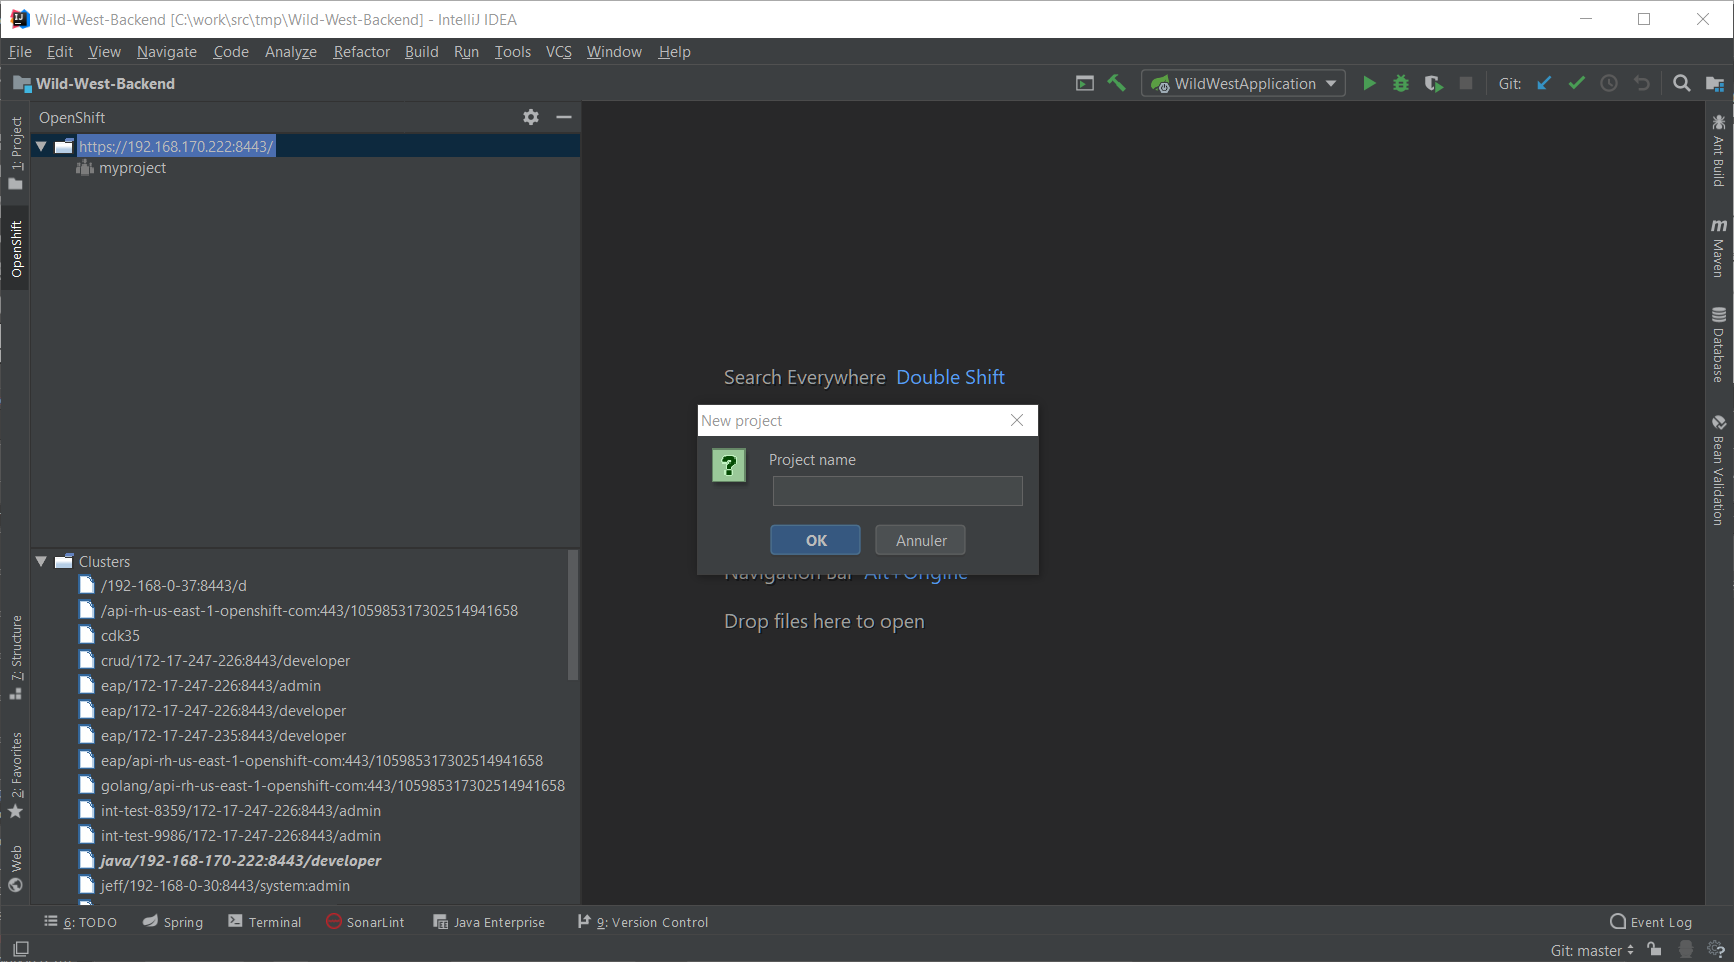
Enter spring-boot in the Project name and press the OK button:
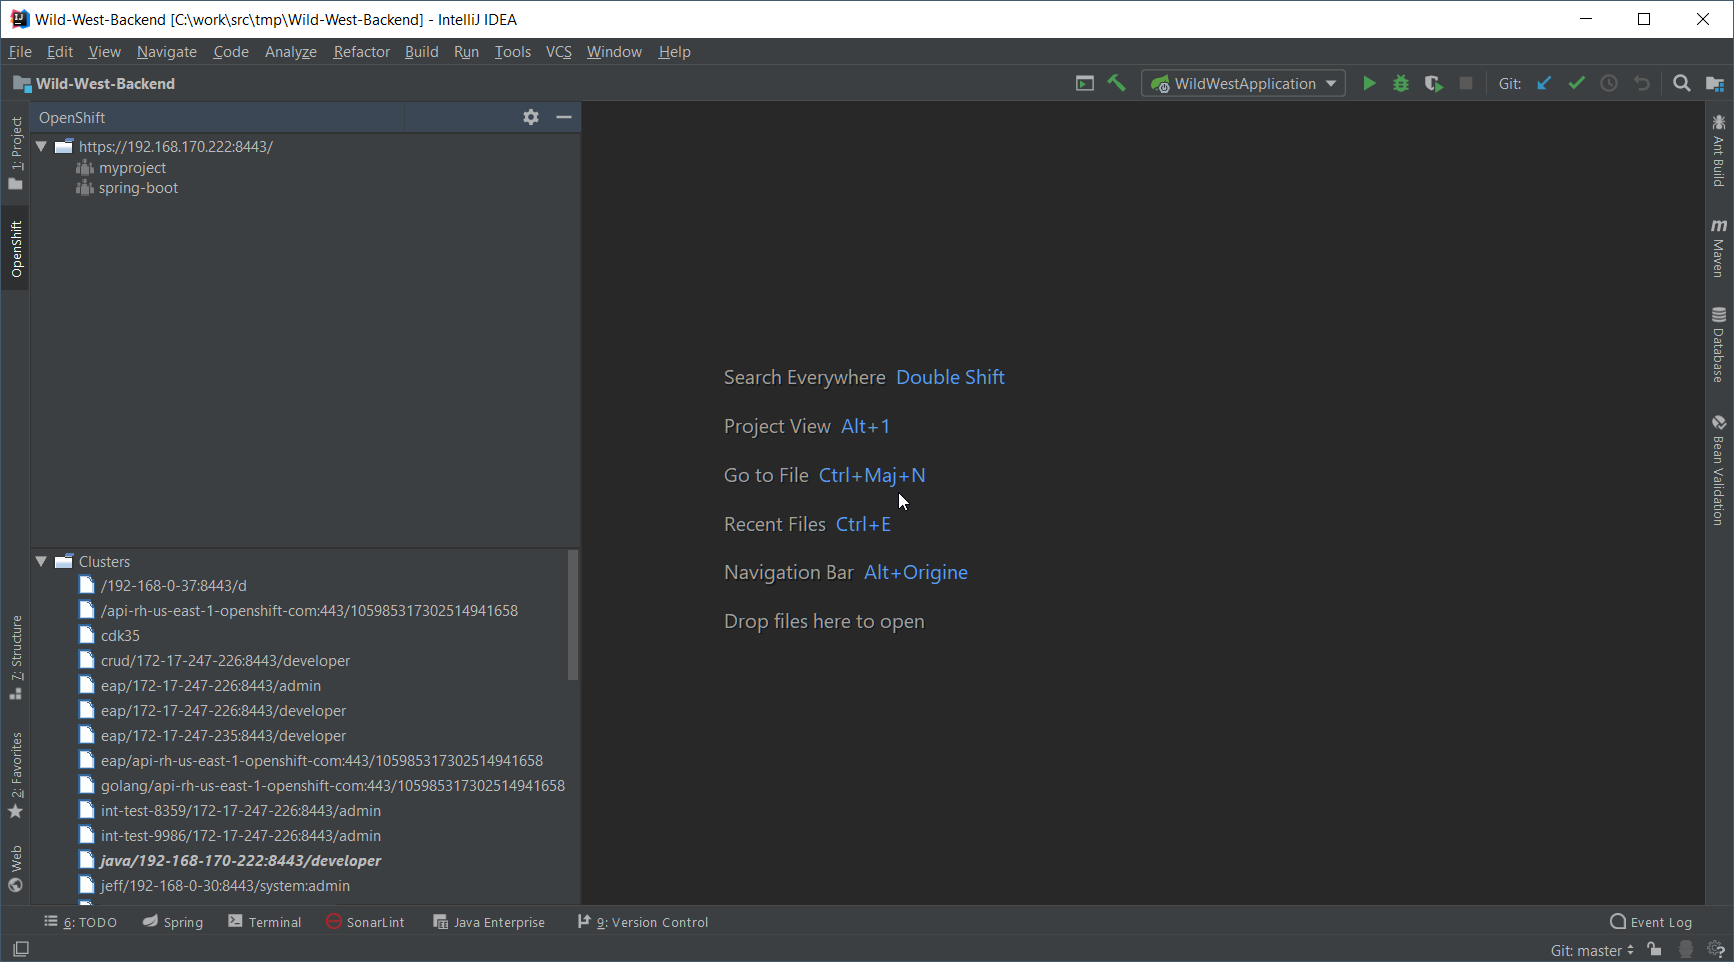
In the spring-boot node, right click and select New Application:
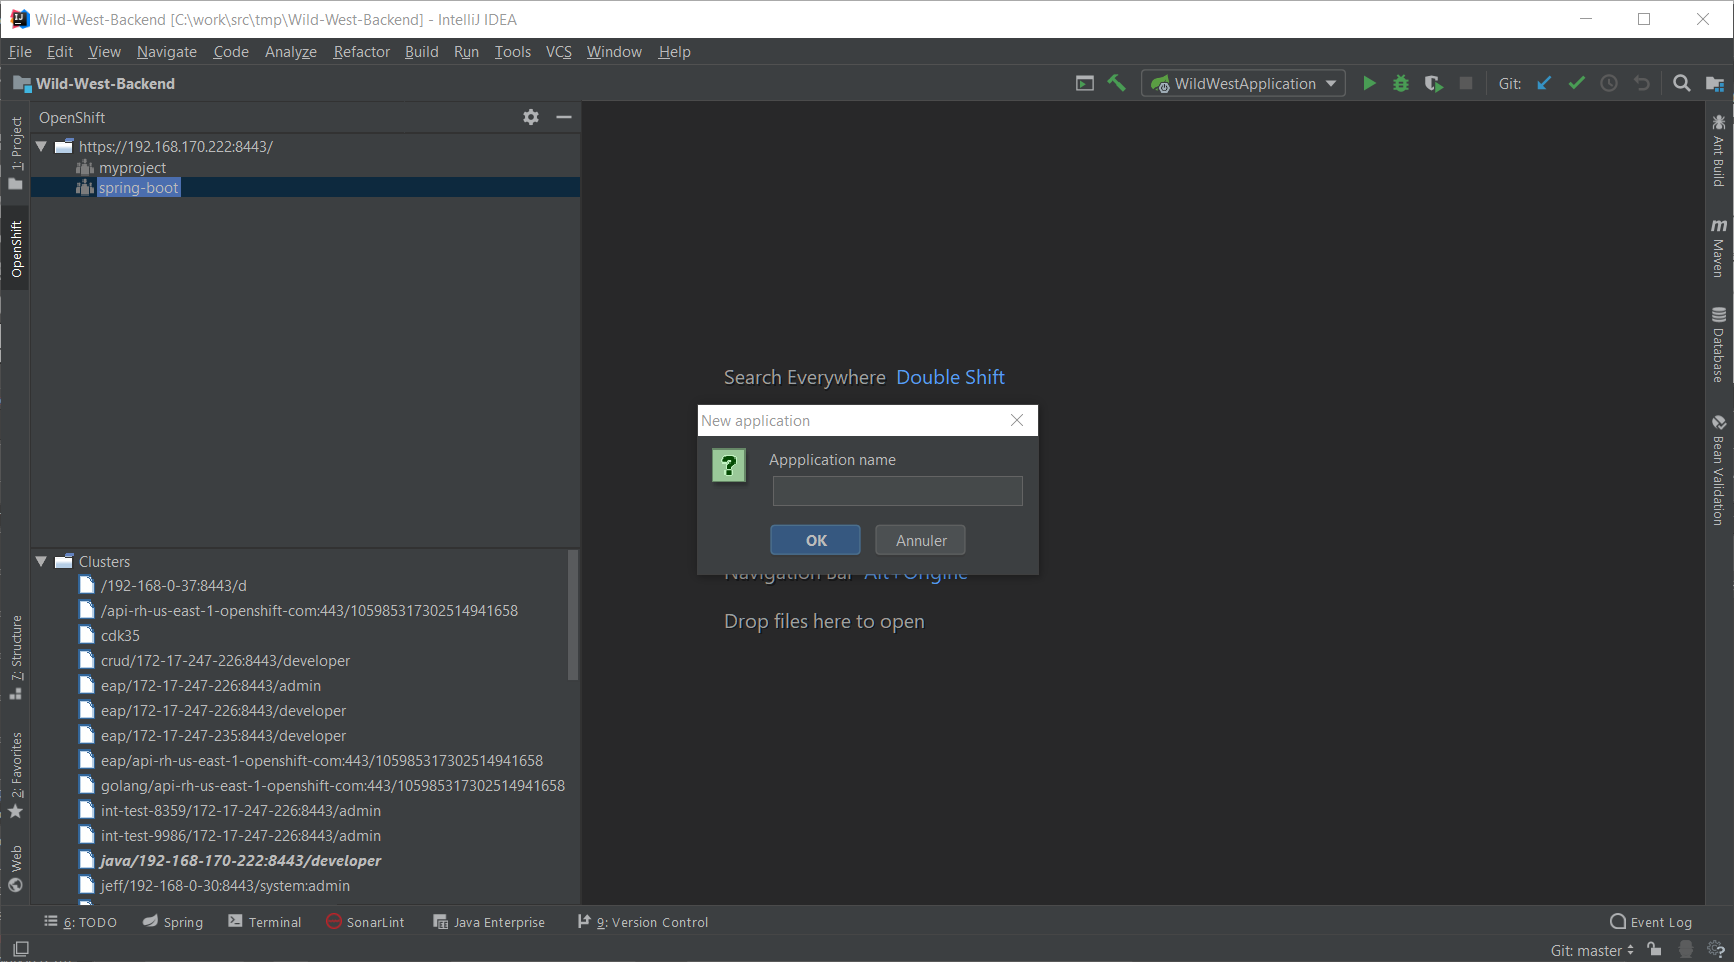
Enter springbootapp in the Application name field and press the OK button:
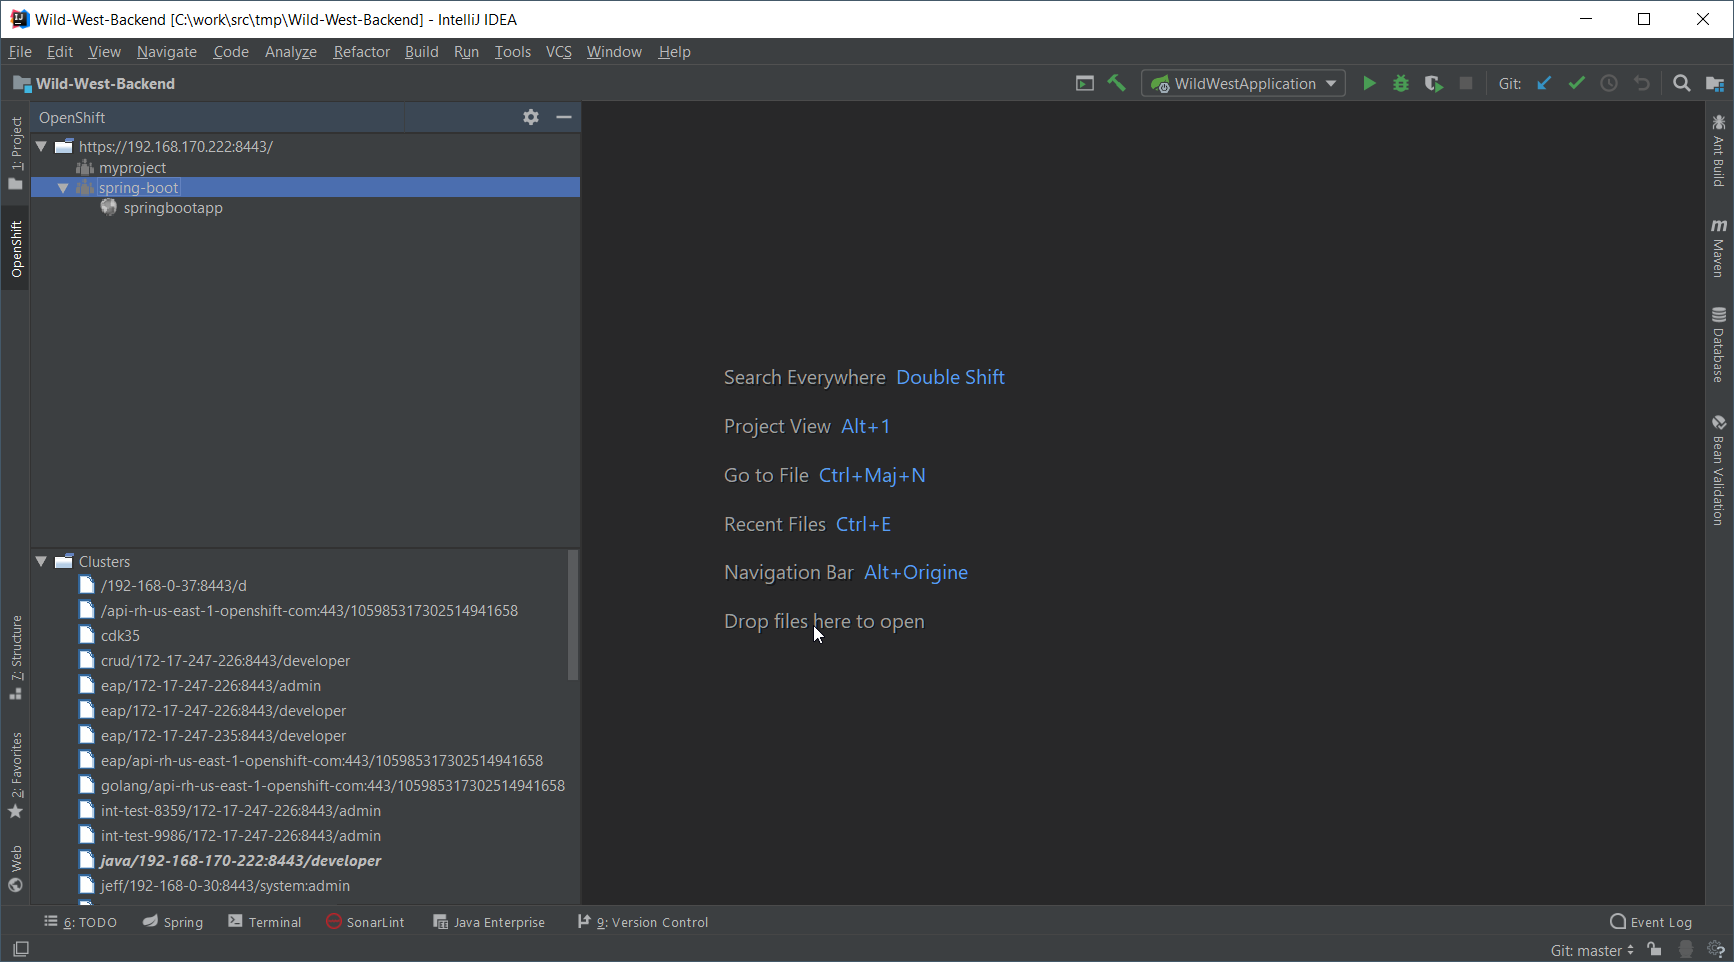
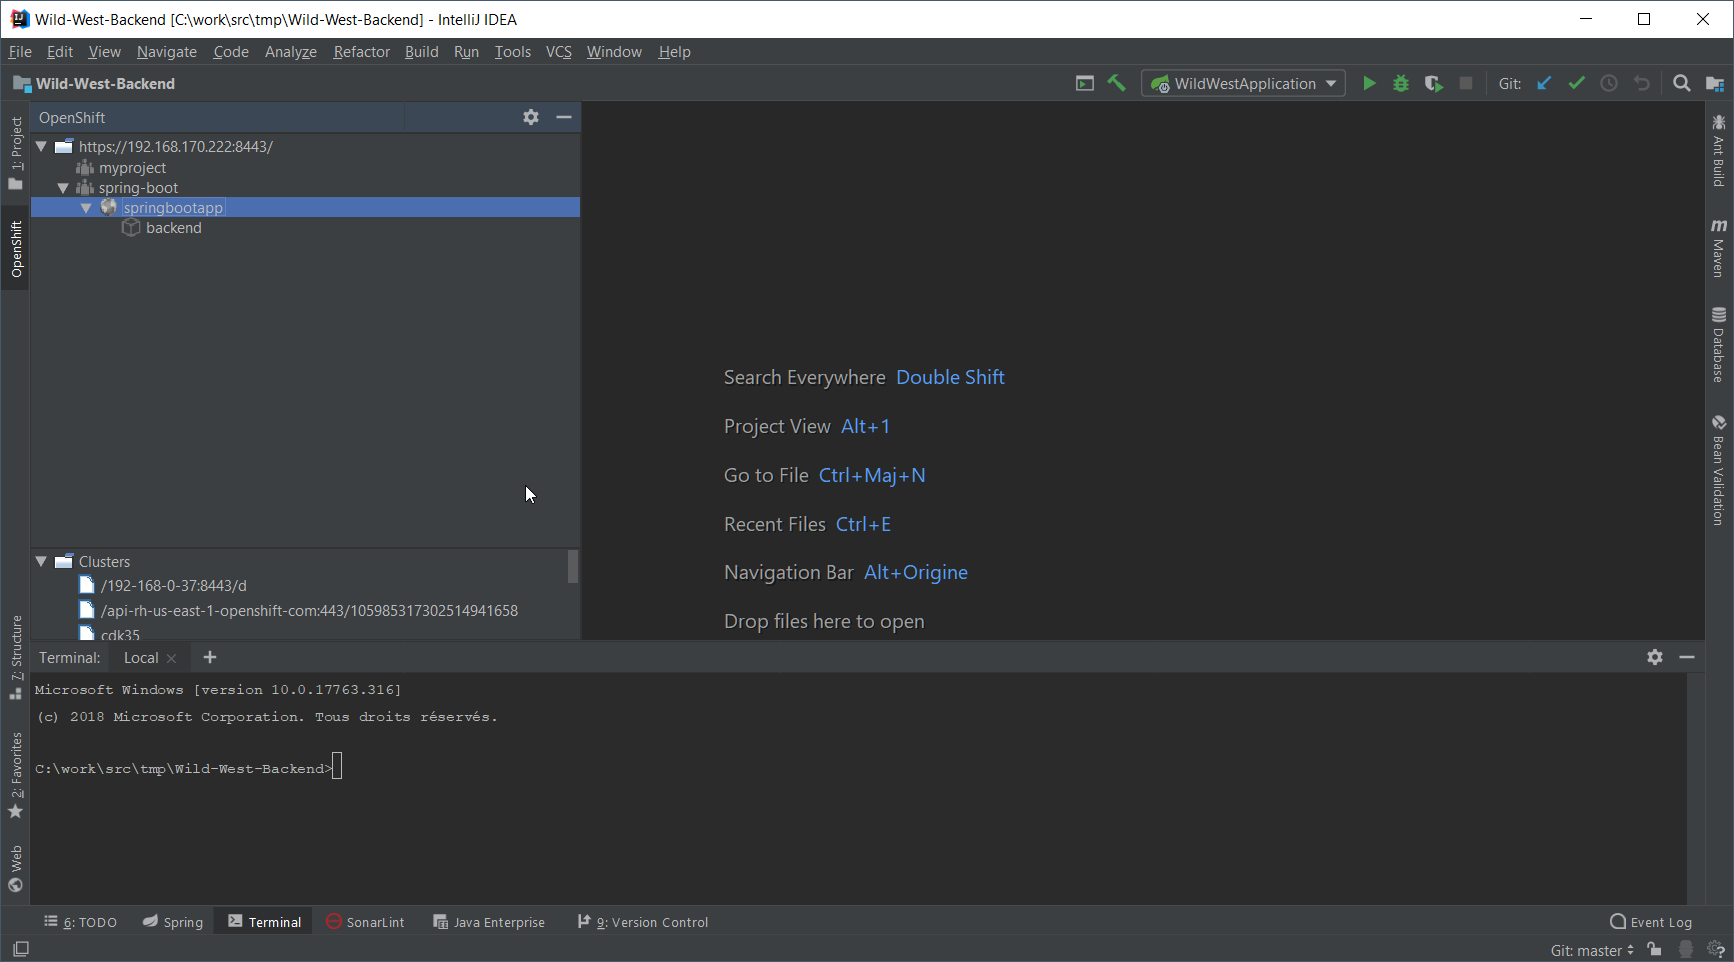
In the springbootapp node, right click and select New Component:

Enter backend in the Name field:
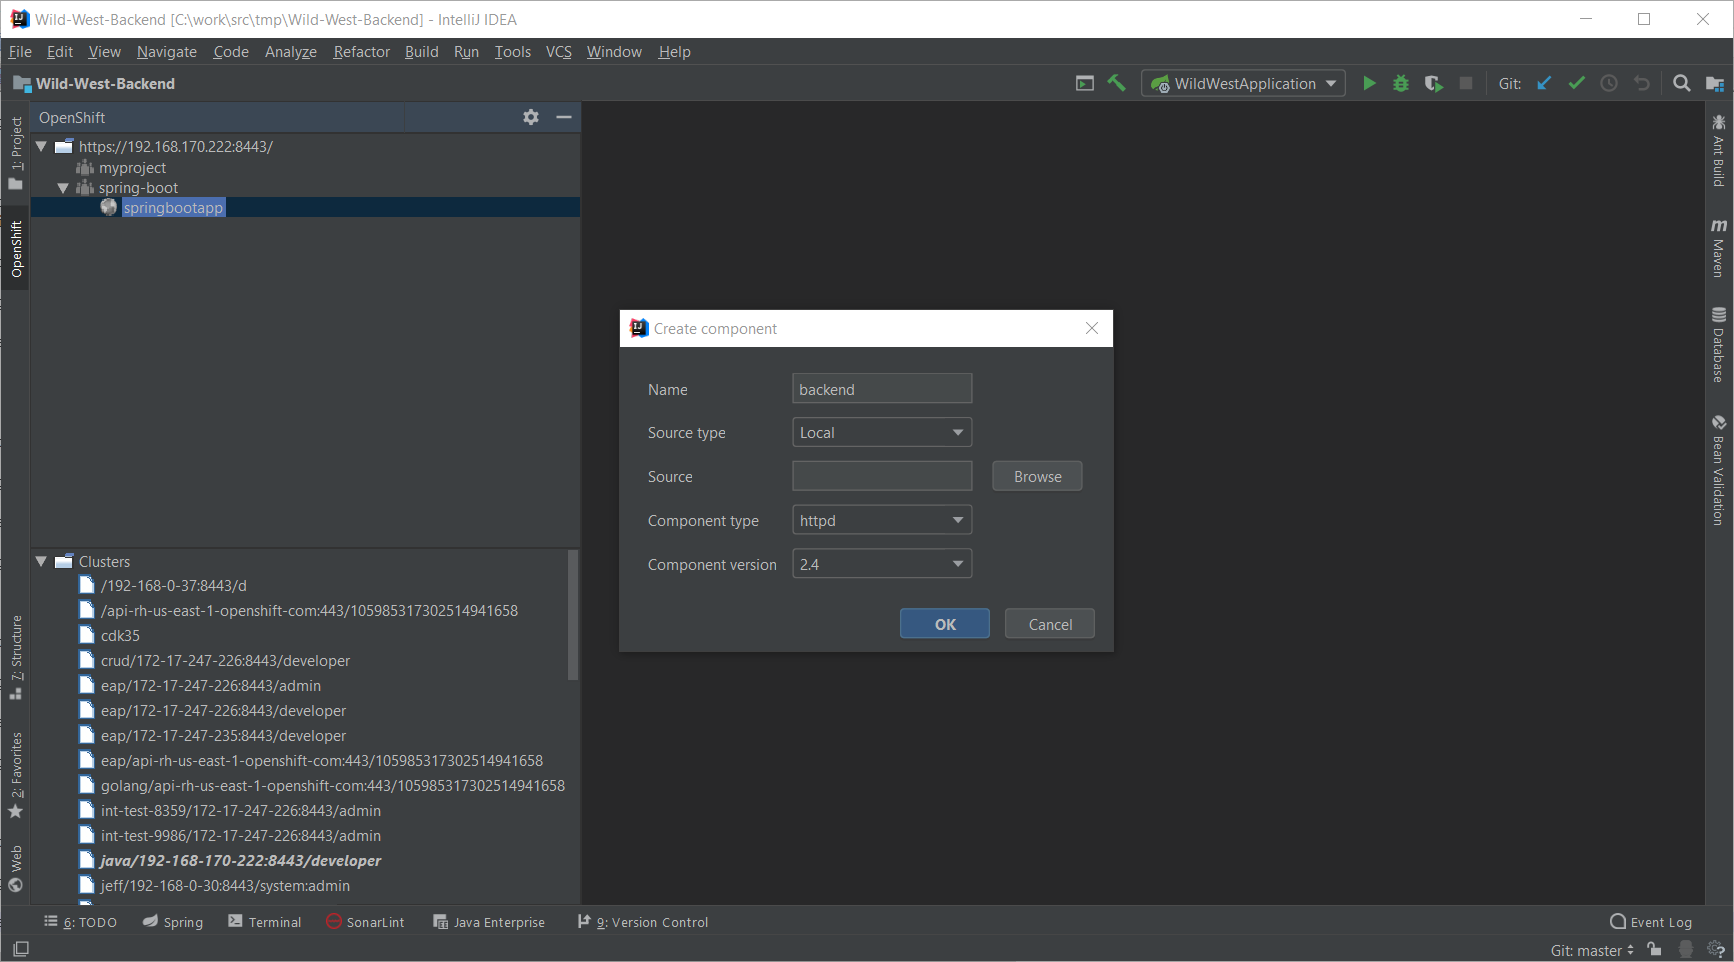
Press the Browse button:
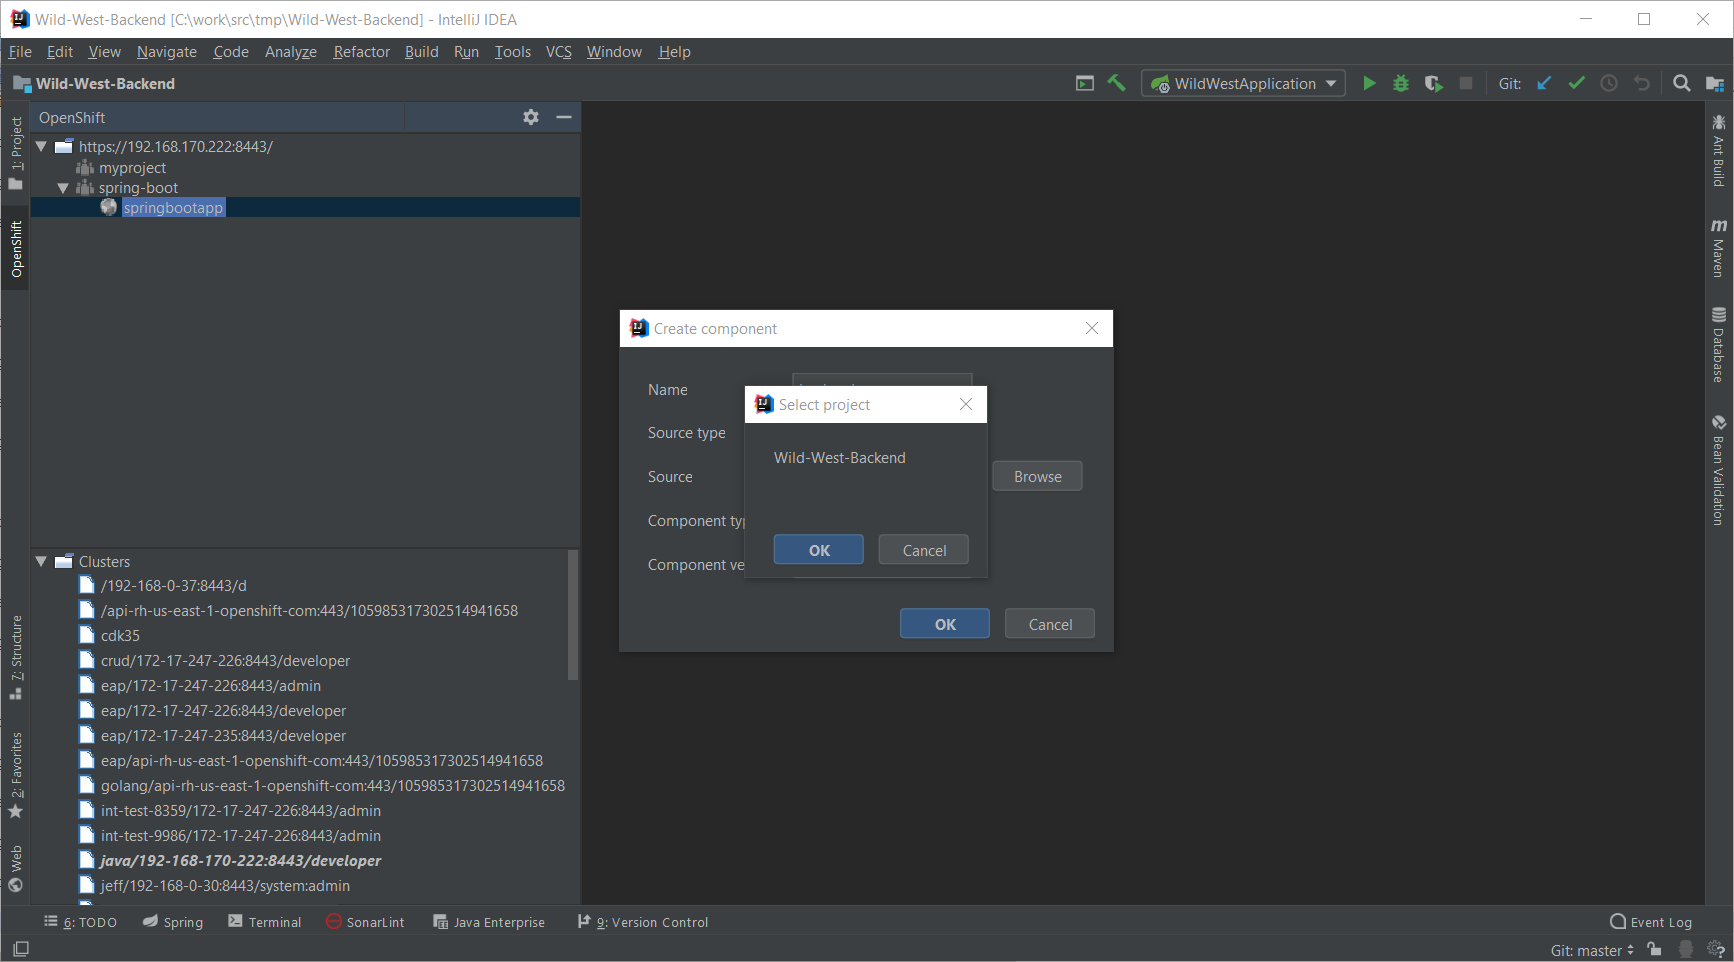
Select the Wild-West-Backend project and press the OK button:

In the Component type field, select the java item:
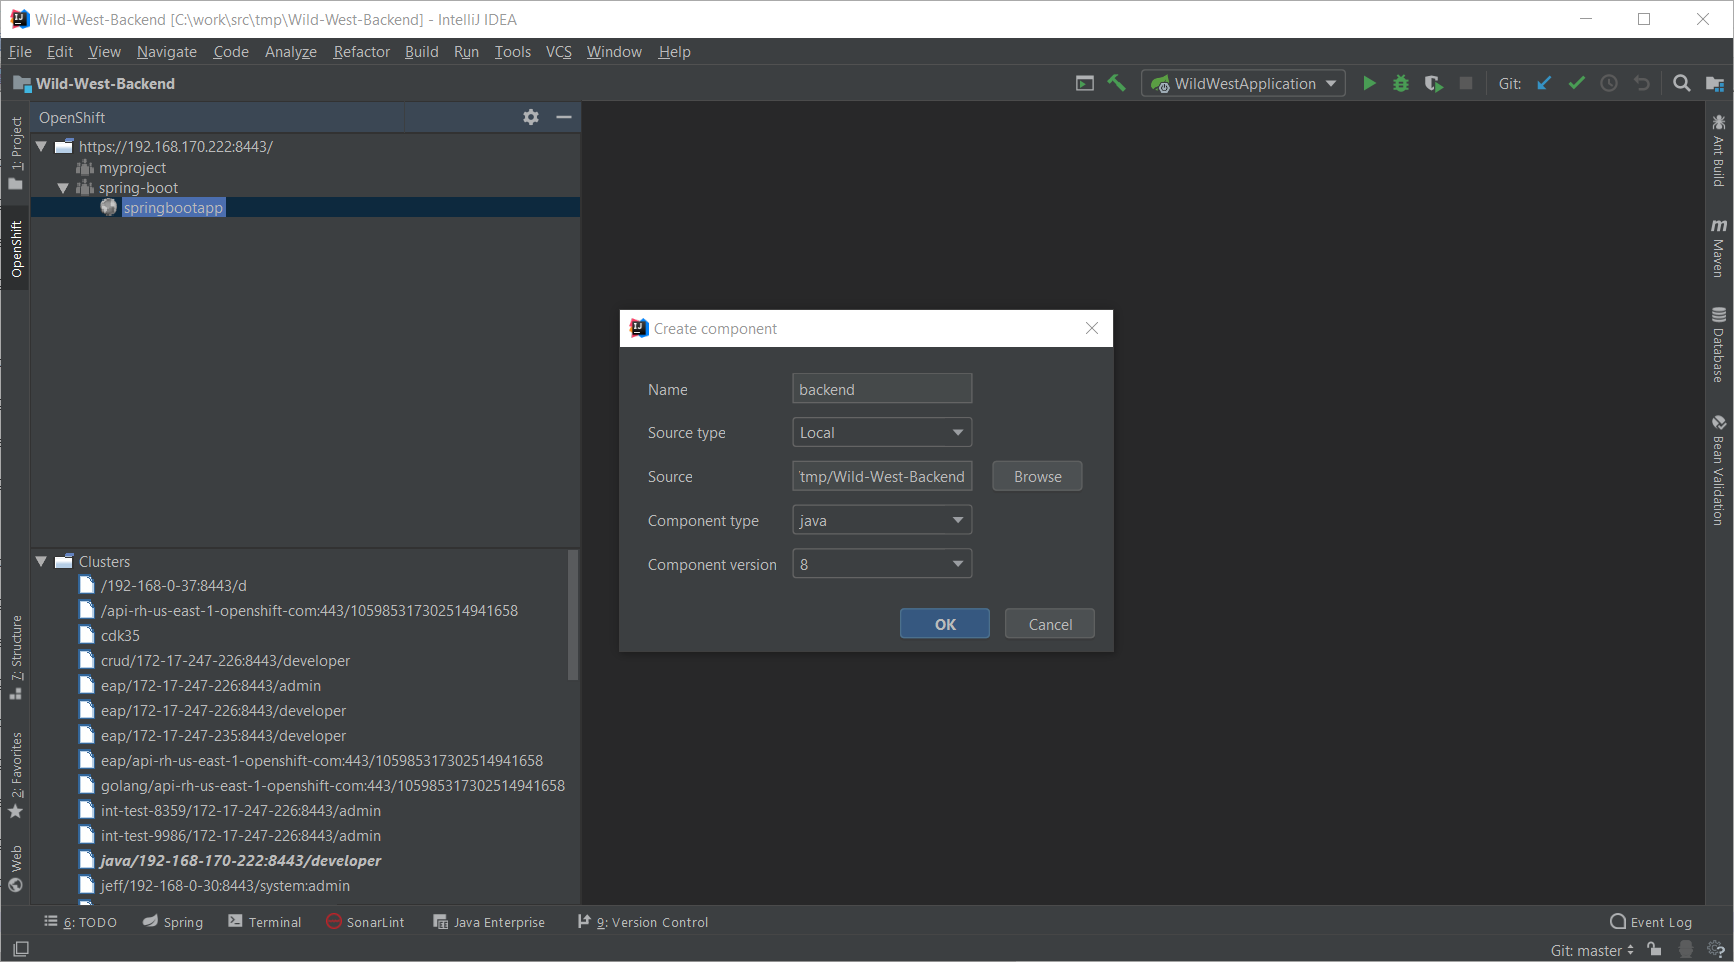
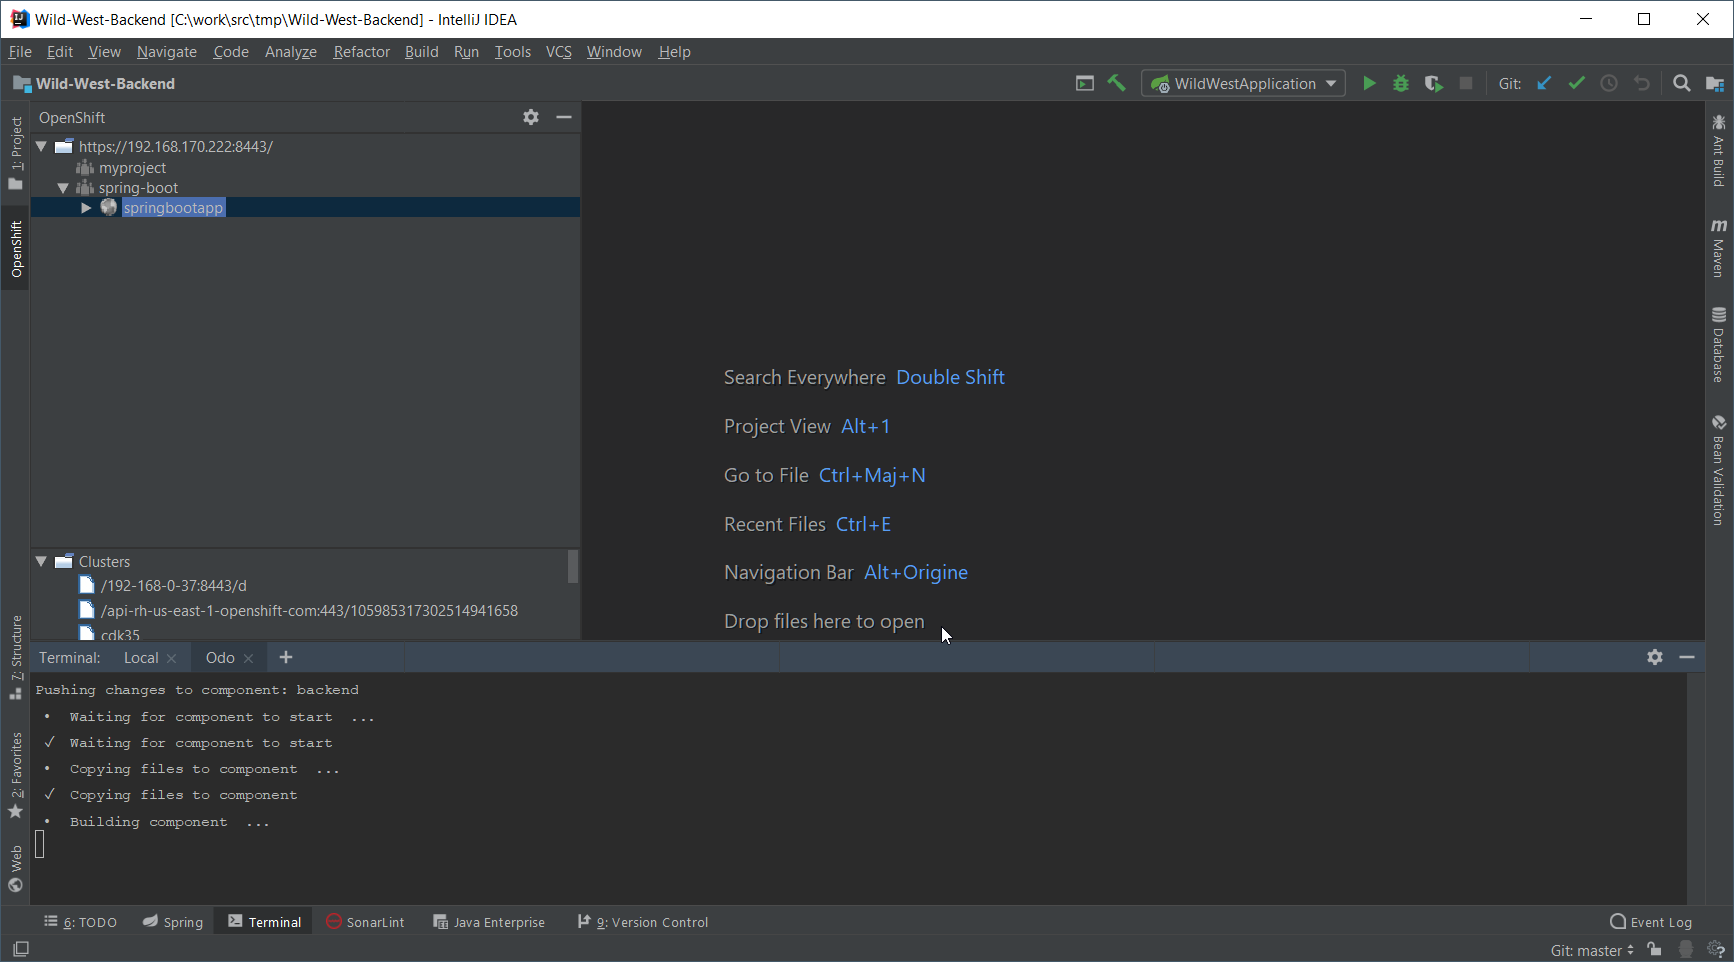
Press the OK button. A new terminal window will be displayed and the component
will be deployed to your local cluster.
| On IntelliJ IDEA 2018.3 or 2018.3 based JetBrains products, the terminal window will be automatically closed when the underlying command process is terminated. We are working for a workaround but we recommend to use previous versions until the plugin will be updated. See the issue for more information |
Once deployed, the component will appear in the OpenShift view:
Let’s try to test the deployed application in a browser. In the OpenShift view, right click
the backend node and select Open in Browser:
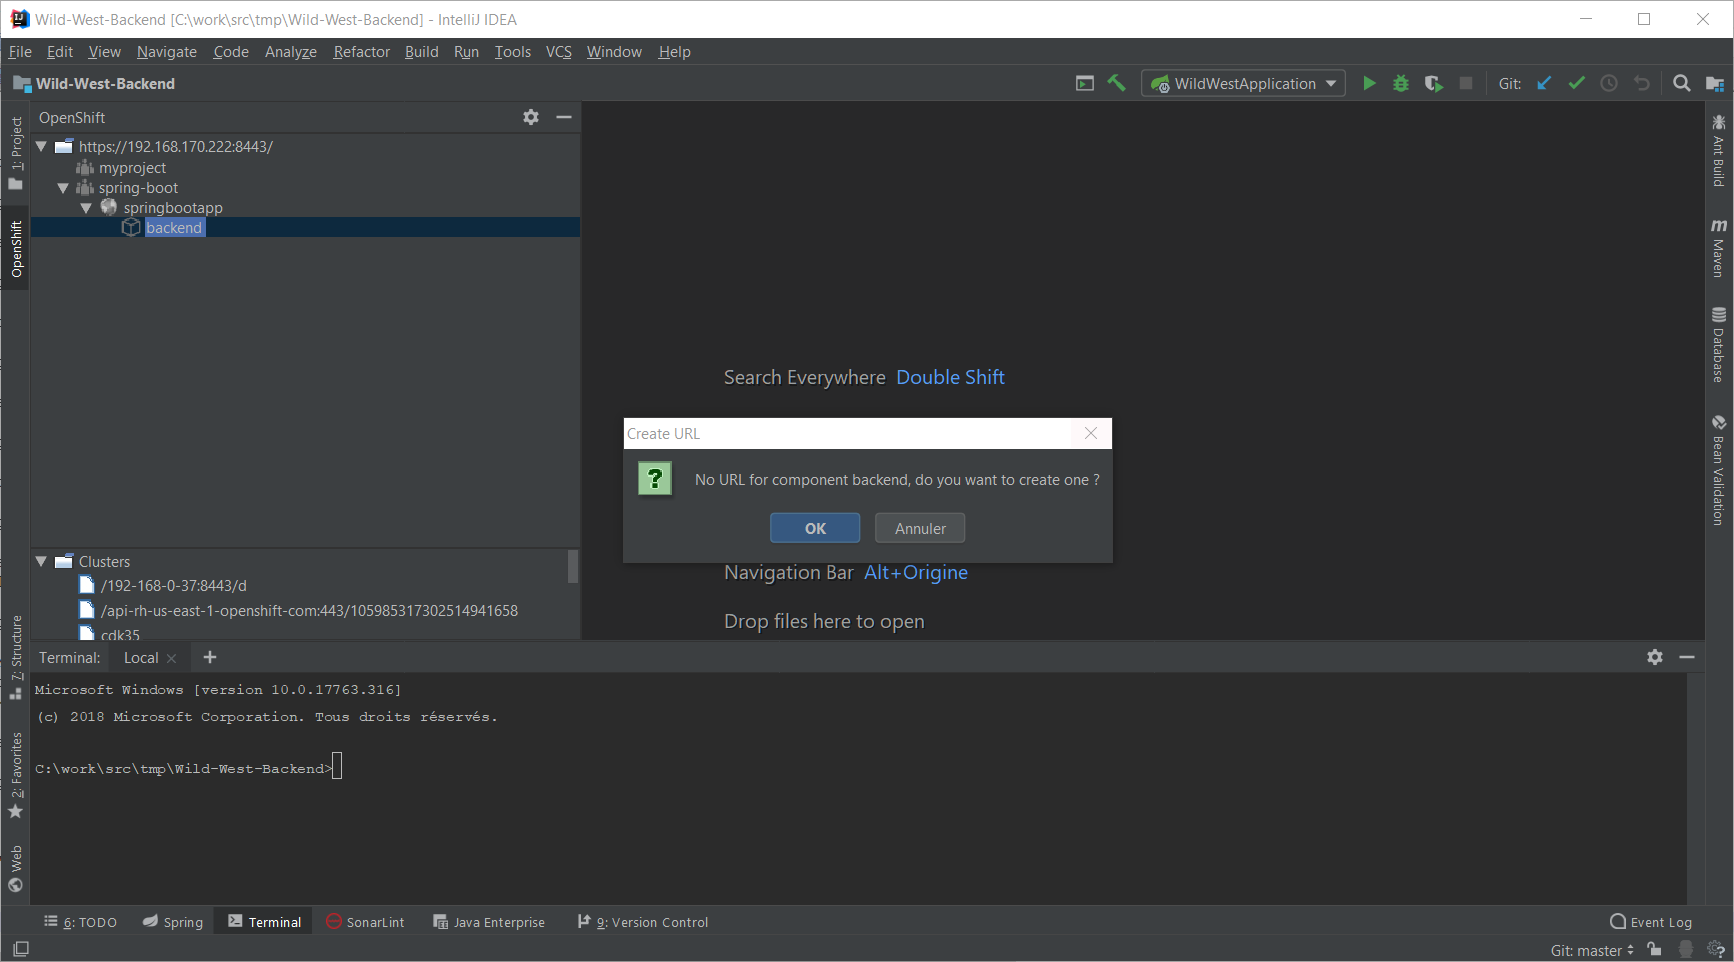
As no URL has been set up for our component (to allow external access to our application),
press the OK button:
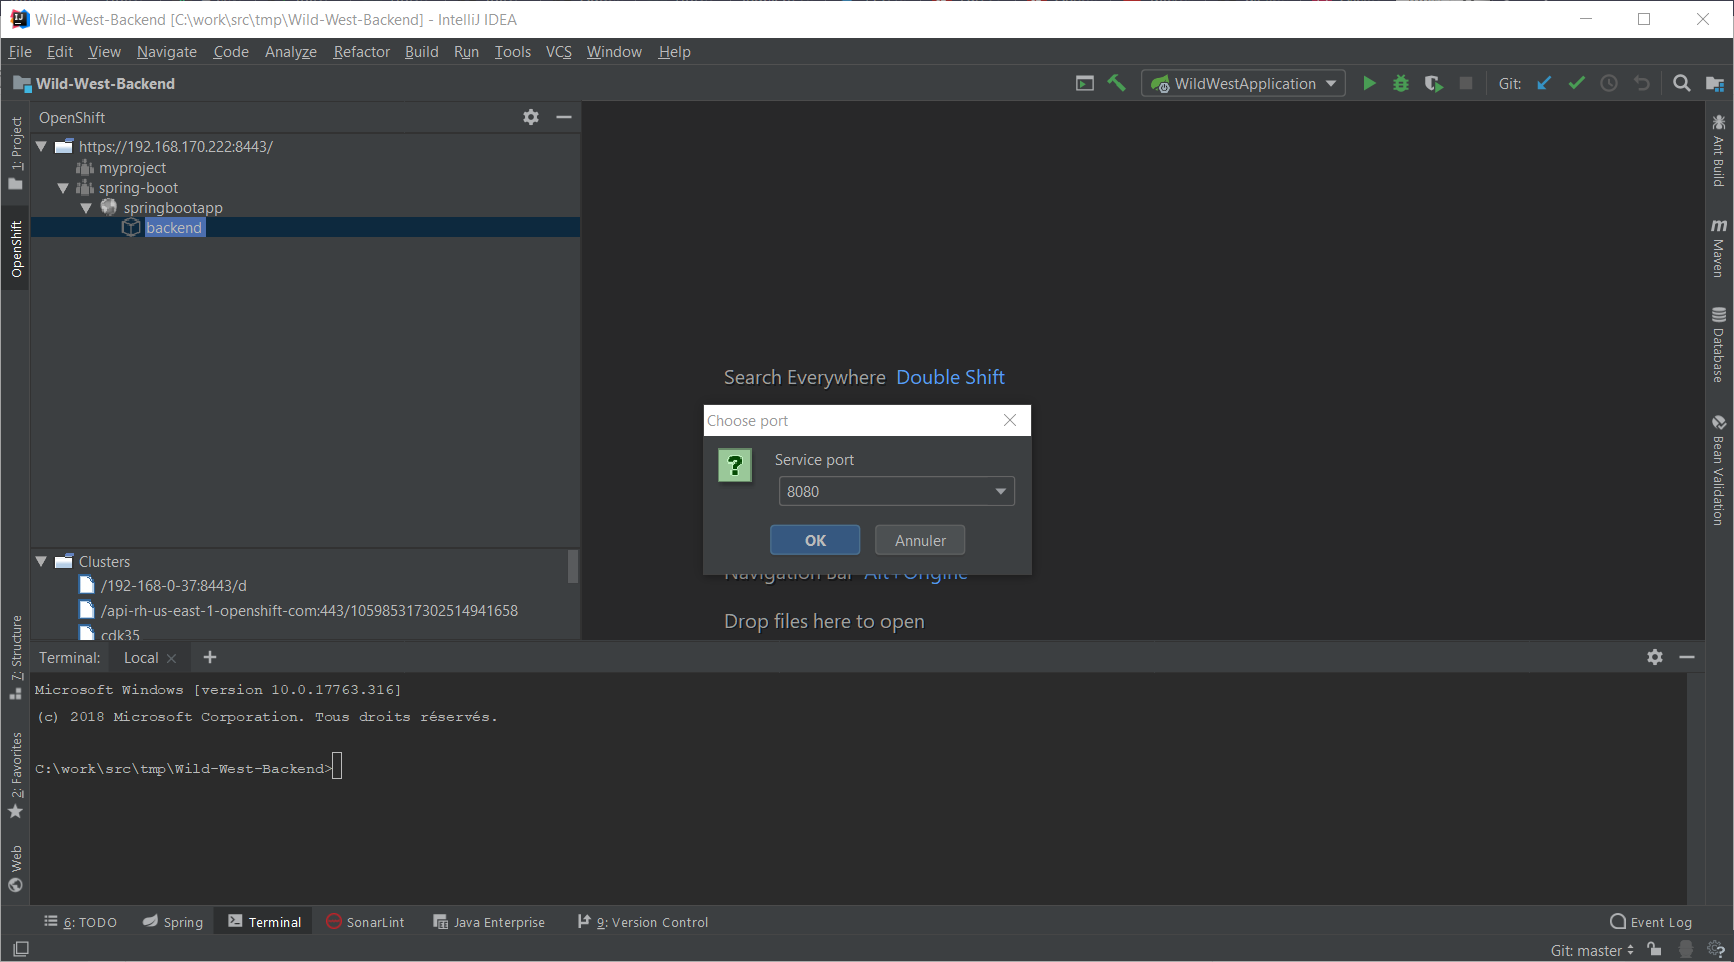
As our application is exposing several ports, we need to select one: choose the 8080 one
and press the OK button. The following brower window should be displayed:
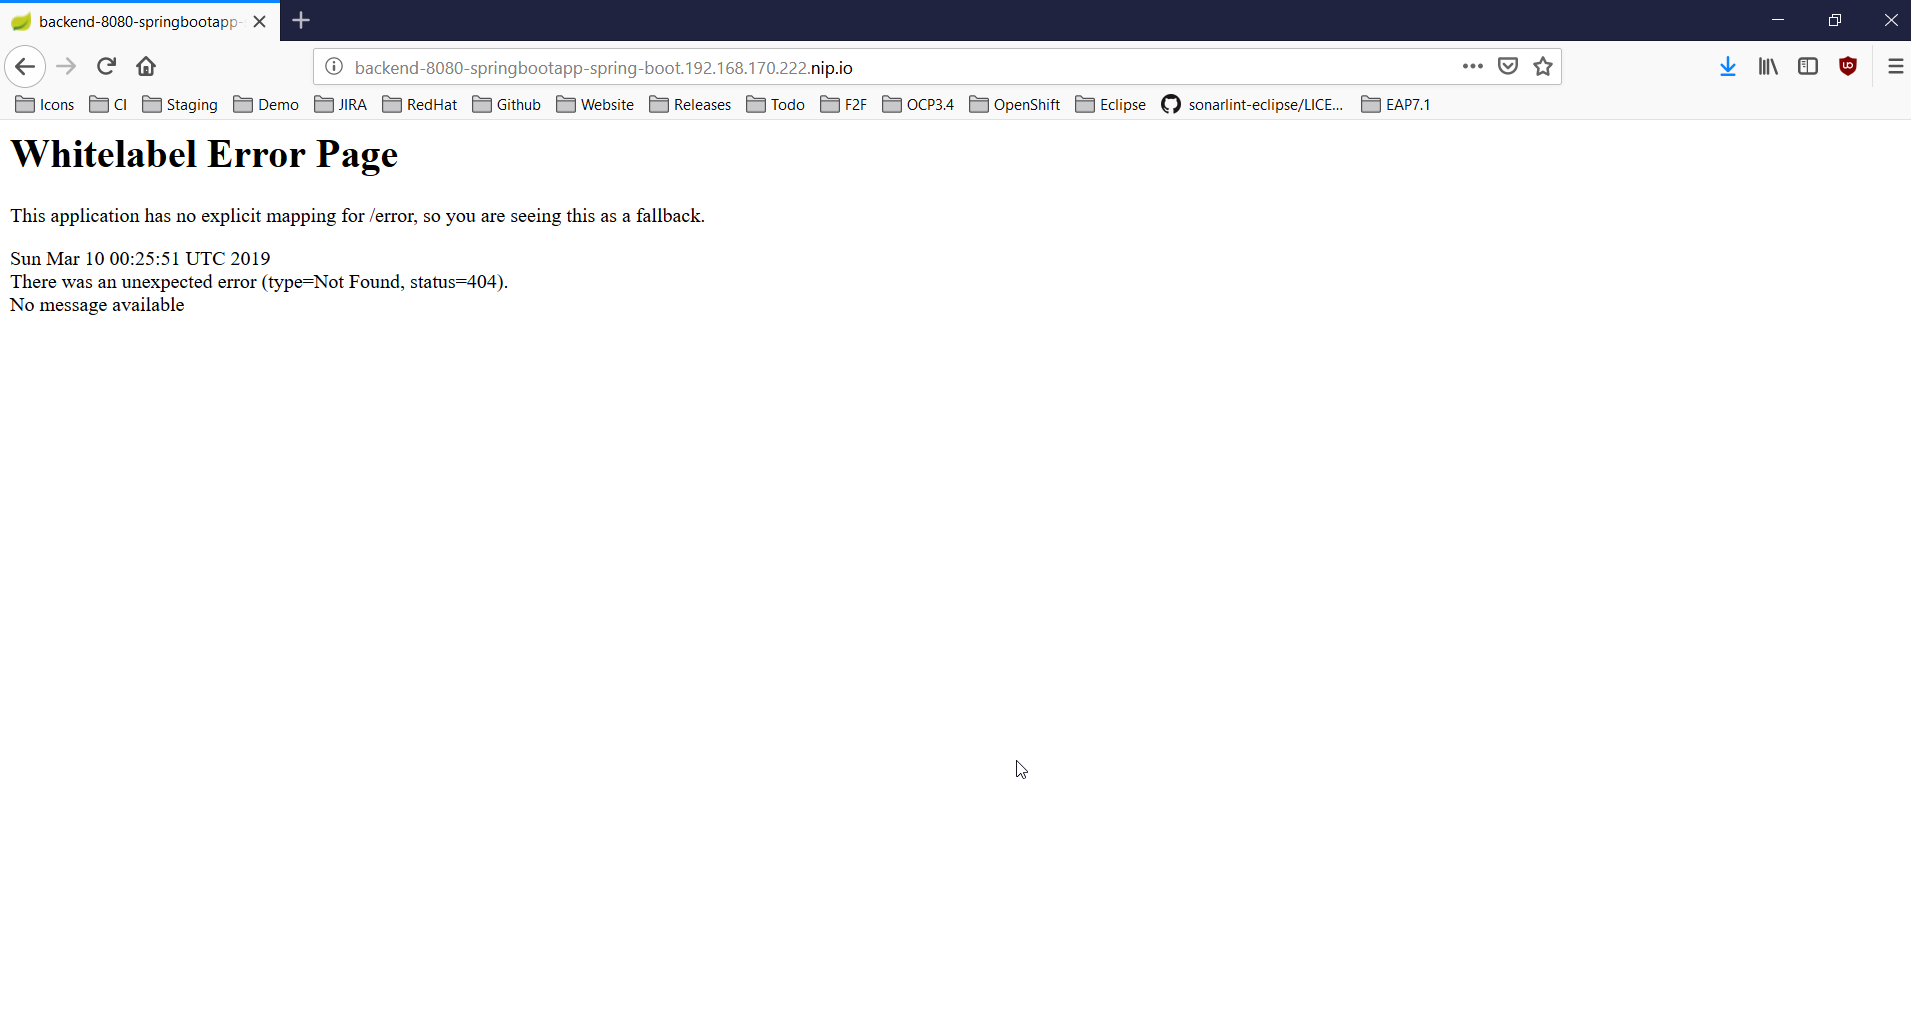
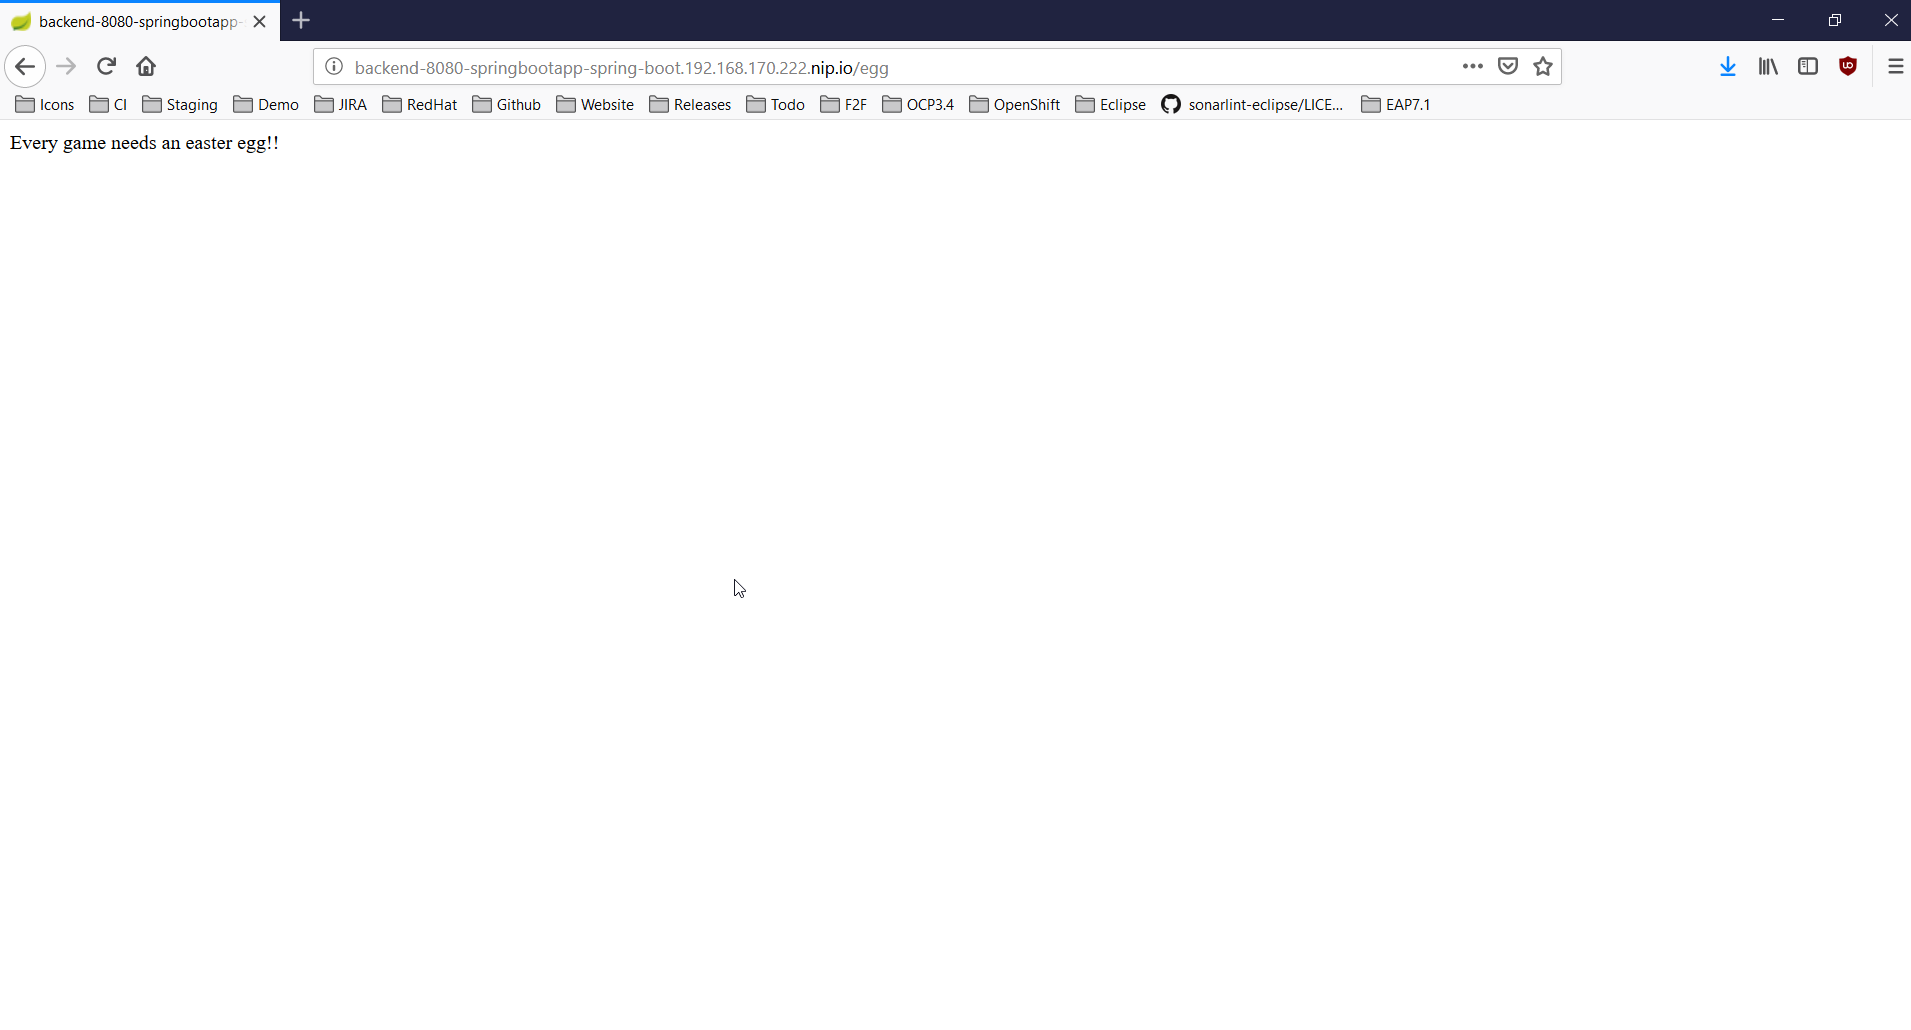
Don’t worry, the error message is displayed because our application has no mapping
for the root. Append /egg in the URL bar in the browser window and press the
ENTER key:
In the following scenario, we will modify locally the application source code and
verify that the modification is broadcasted immediatly to the cluster.
Let’s switch our application in watch mode so that every local modification is sent
to the cluster:
In the OpenShift view, right click the backend node and select Watch:
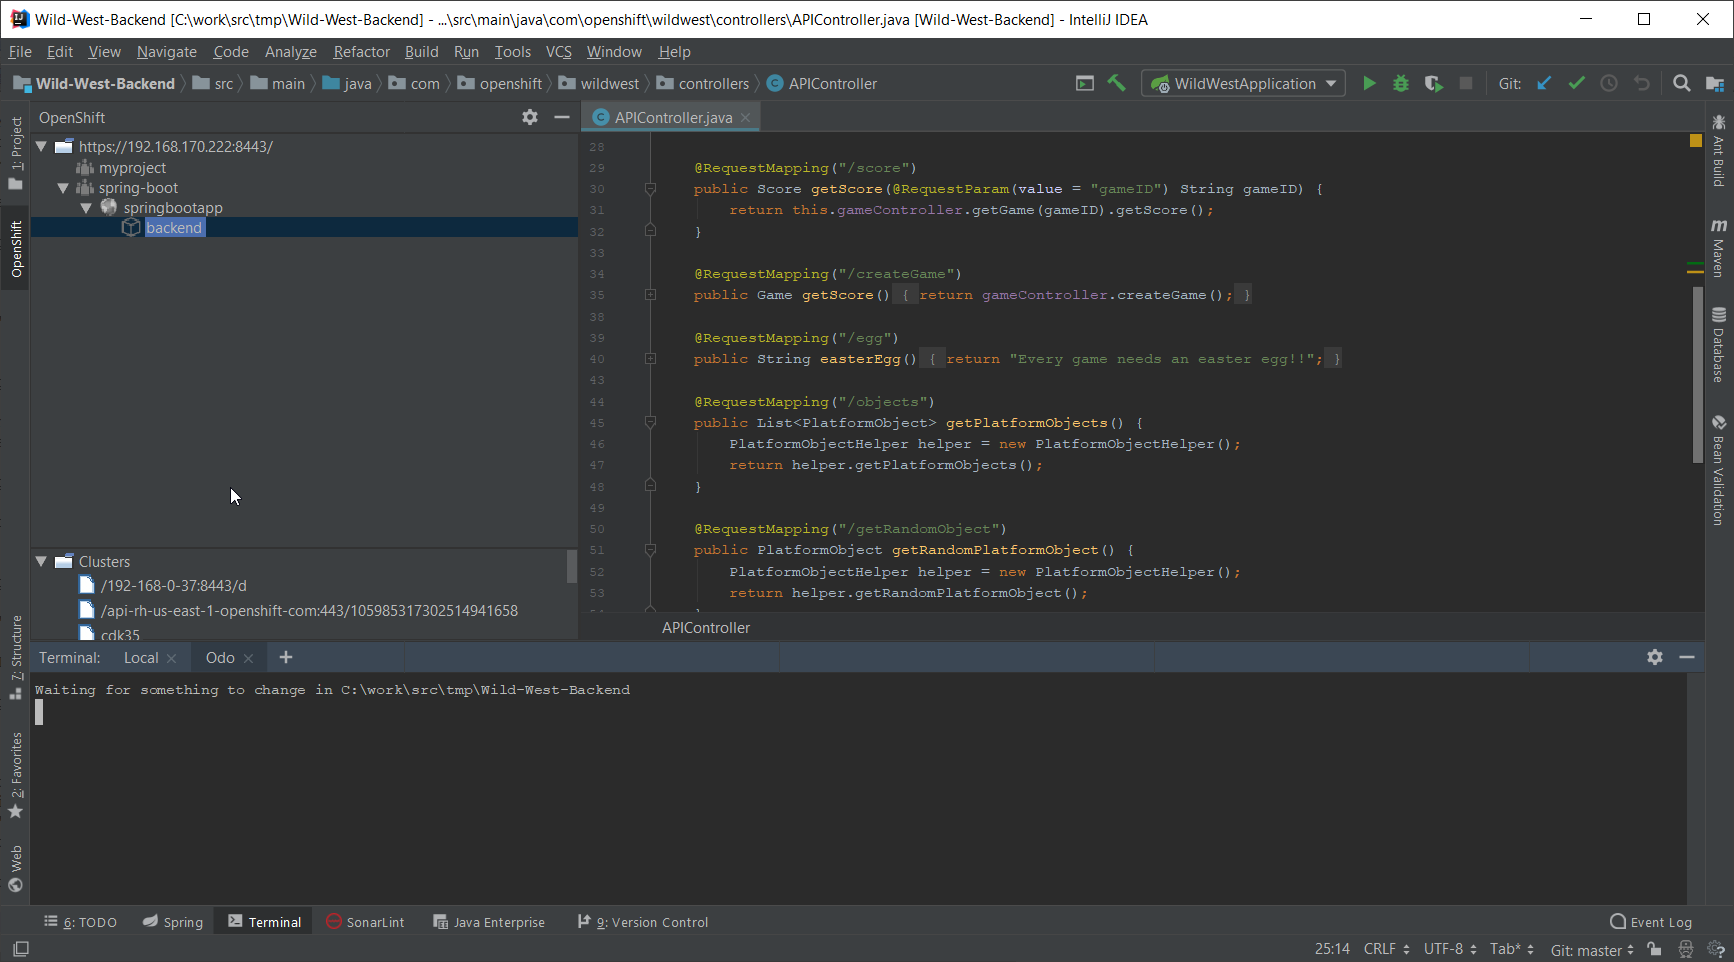
Now, in the Project view, open the src/main/java/com/openshift/wildwest/APIController.java file:

Modify the egg method:
	@RequestMapping("/egg")
	public String easterEgg() {
		return "Every game needs an easter egg!!";
	}
with the following content:
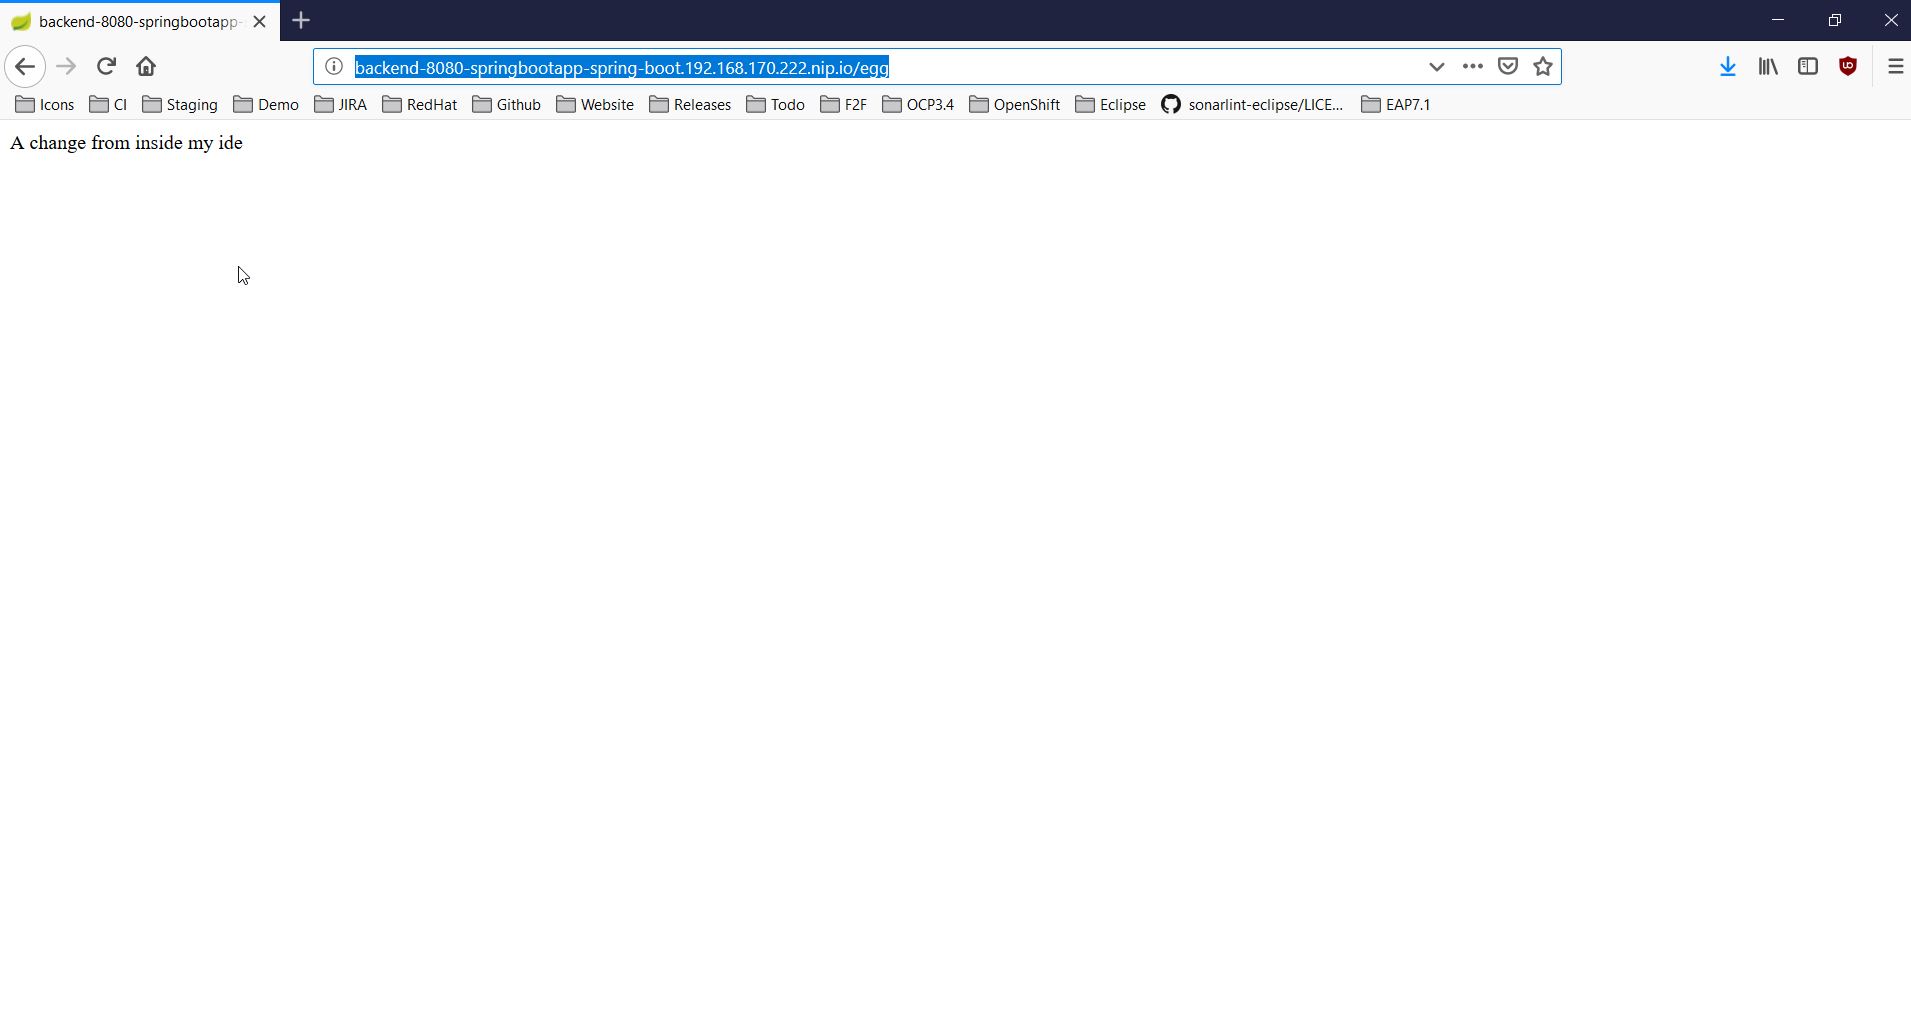
	@RequestMapping("/egg")
	public String easterEgg() {
		return "A change from inside my ide";
	}
Refresh the browser window and you should see the following output:
Enjoy!
Jeff Maury
Happy to announce 4.11.0.AM1 (Developer Milestone 1) build for Eclipse 2018-12.
Downloads available at JBoss Tools 4.11.0 AM1.
Full info is at this page. Some highlights are below.
When you need to defined a new OpenShift connection, you need to provide the following information:
cluster URL
username and password or token
If you’ve already logged in your cluster through the OpenShift Web Console, you can copy an oc command
in the clipboard that contains both the cluster URL and your token.
So, from now, there is a new option that allows you to initialize the wizard fields from the copied oc
command:
Click on the Paste Login Command button and the fields will be initialized:
Enjoy!
Jeff Maury
JBoss Tools 4.9.0 and Red Hat Developer Studio 12.9 for Eclipse 2018-09 are here waiting for you. Check it out!
Red Hat Developer Studio comes with everything pre-bundled in its installer. Simply download it from our Red Hat Developer product page and run it like this:
java -jar devstudio-<installername>.jar
JBoss Tools or Bring-Your-Own-Eclipse (BYOE) Developer Studio require a bit more:
This release requires at least Eclipse 4.9 (2018-09) but we recommend using the latest Eclipse 4.9 2018-09 JEE Bundle since then you get most of the dependencies preinstalled.
Once you have installed Eclipse, you can either find us on the Eclipse Marketplace under "JBoss Tools" or "Red Hat Developer Studio".
For JBoss Tools, you can also use our update site directly.
http://download.jboss.org/jbosstools/photon/stable/updates/
Our main focus for this release was on adoption of Java11, improvements for container based development and bug fixing. Eclipse 2018-09 itself has a lot of new cool stuff but let me highlight just a few updates in both Eclipse 2018-09 and JBoss Tools plugins that I think are worth mentioning.
Although Spring Boot applications were already supported by the OpenShift server adapter, the global developer experience has been enhanced. Let’s complete the full workflow.
A new generator (wizard) has been added to JBoss Tools. It’s called the Launcher application as it’s based on the fabric8-launcher project. When you launch JBoss Tools, you should see this in Red Hat Central:

Click on the Launcher application
Switch the Missionrest-http Runtimespring-boot current-community
Then set the Project namemyfirstrestapp
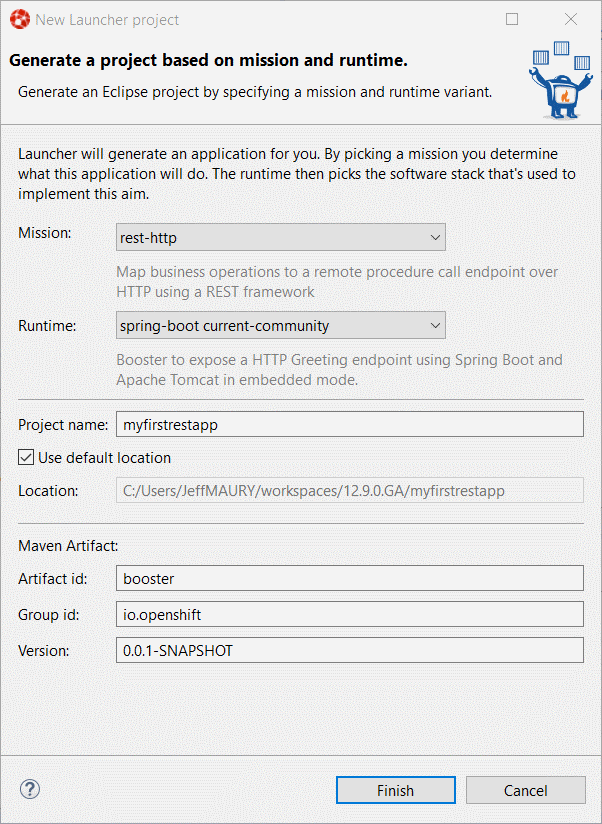
Click the Finish
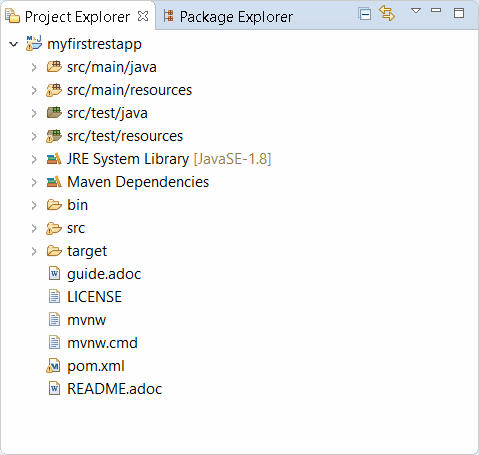
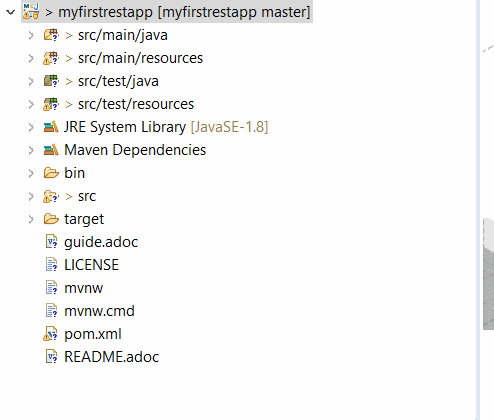
When the project is build and if you expand the myfirstrestappProject explorer
As OpenShift builder images retrieves code on a Git repository, we first need to push
the just generated application code to GitHub. The following section assumes that you
created a repository called myfirstrestapp
We will first create a local Git repository for our application code then push it to GitHub.
Select the myfirstrestappTeam → Share project…
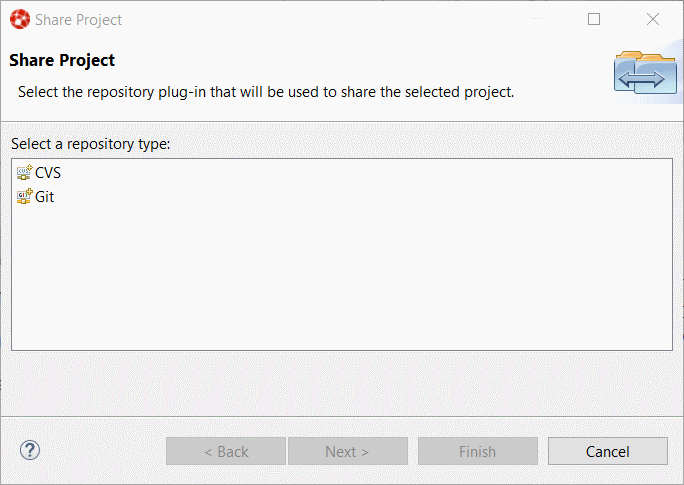
Then select the GitNext
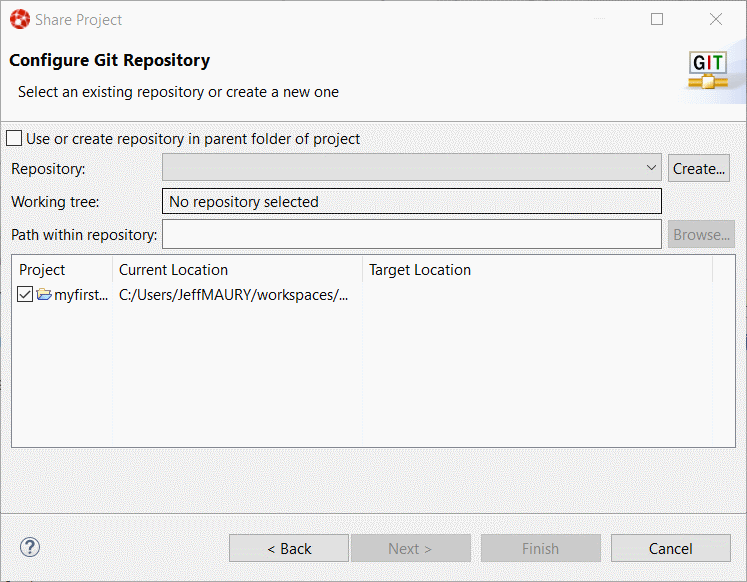
Select the Use or create repository in parent folder of projectmyfirstrestapp
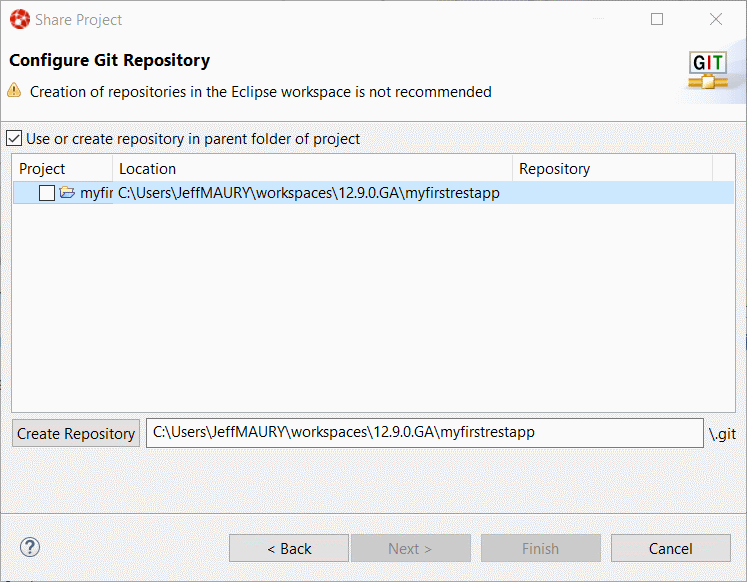
Click on the Create repositoryFinish
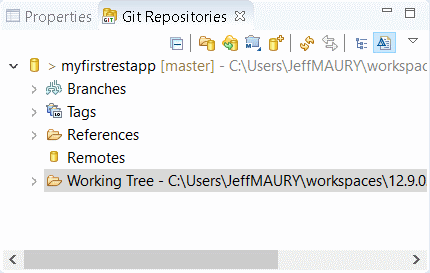
The Project explorer
Select the myfirstrestappTeam → Show in Repositories ViewGit Repositories
Inside this view, select the RemotesCreate Remote…
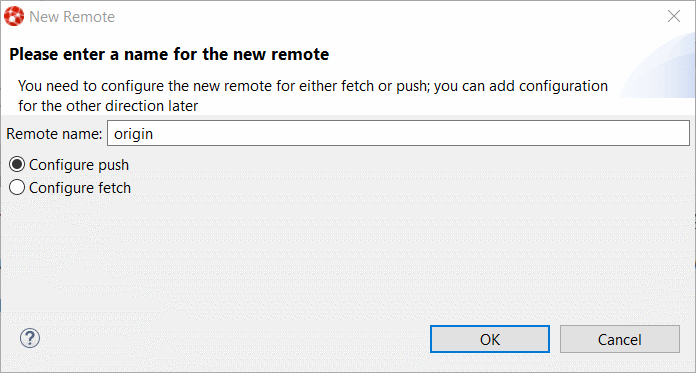
Click on the OK
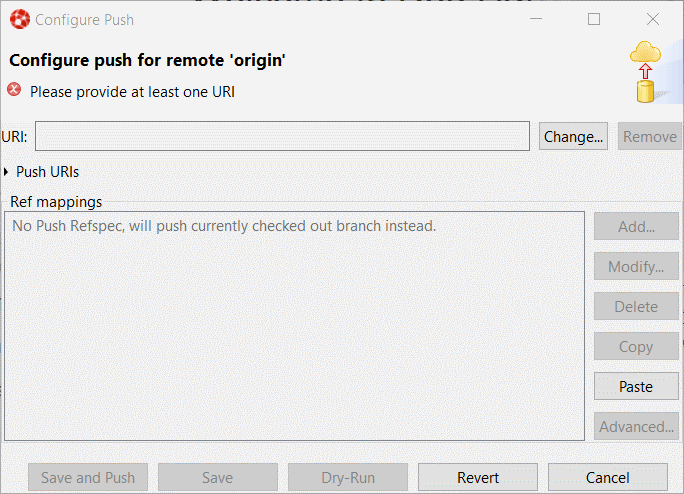
Click on the Change…git@github.com:GITHUB_USER/myfirstrestappURIGITHUB_USER
Then click the FinishSave
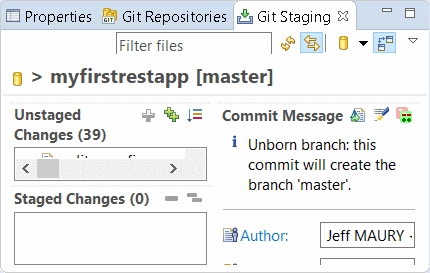
We are now ready to push our application code to GitHub. Select the myfirstrestappProject explorerTeam → CommitGit Staging
Double click on the view title to maximize it:
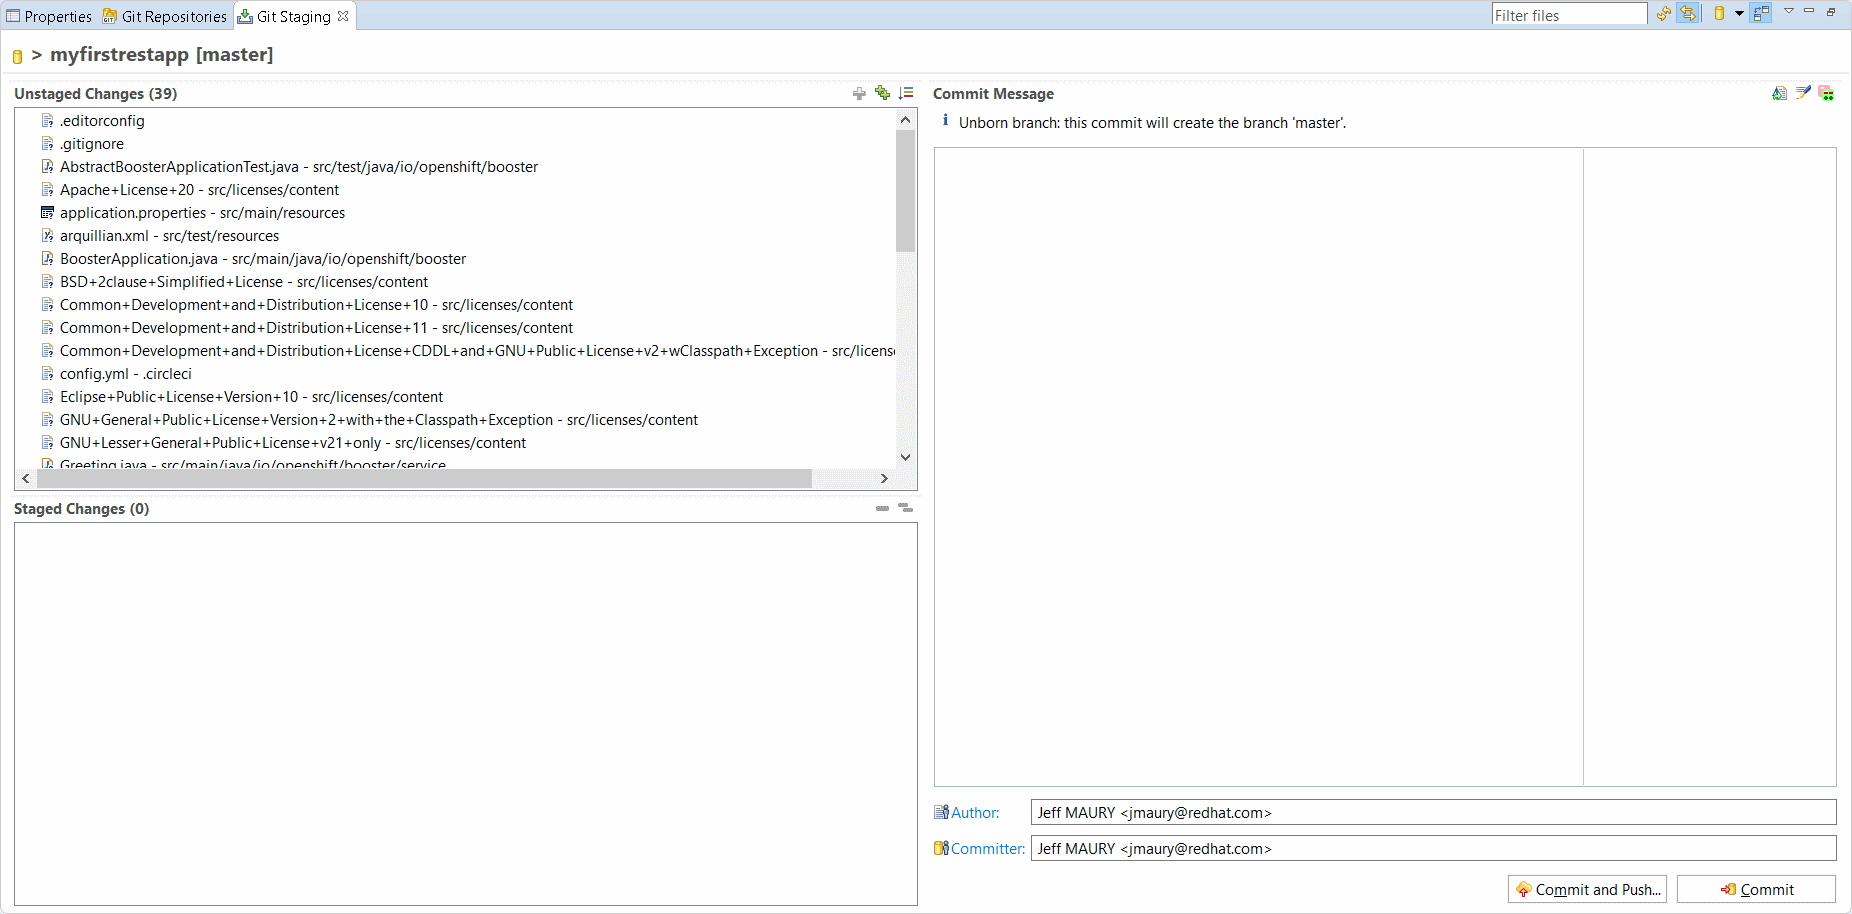
Select all the files listed in the Unstaged changesStaged Changes
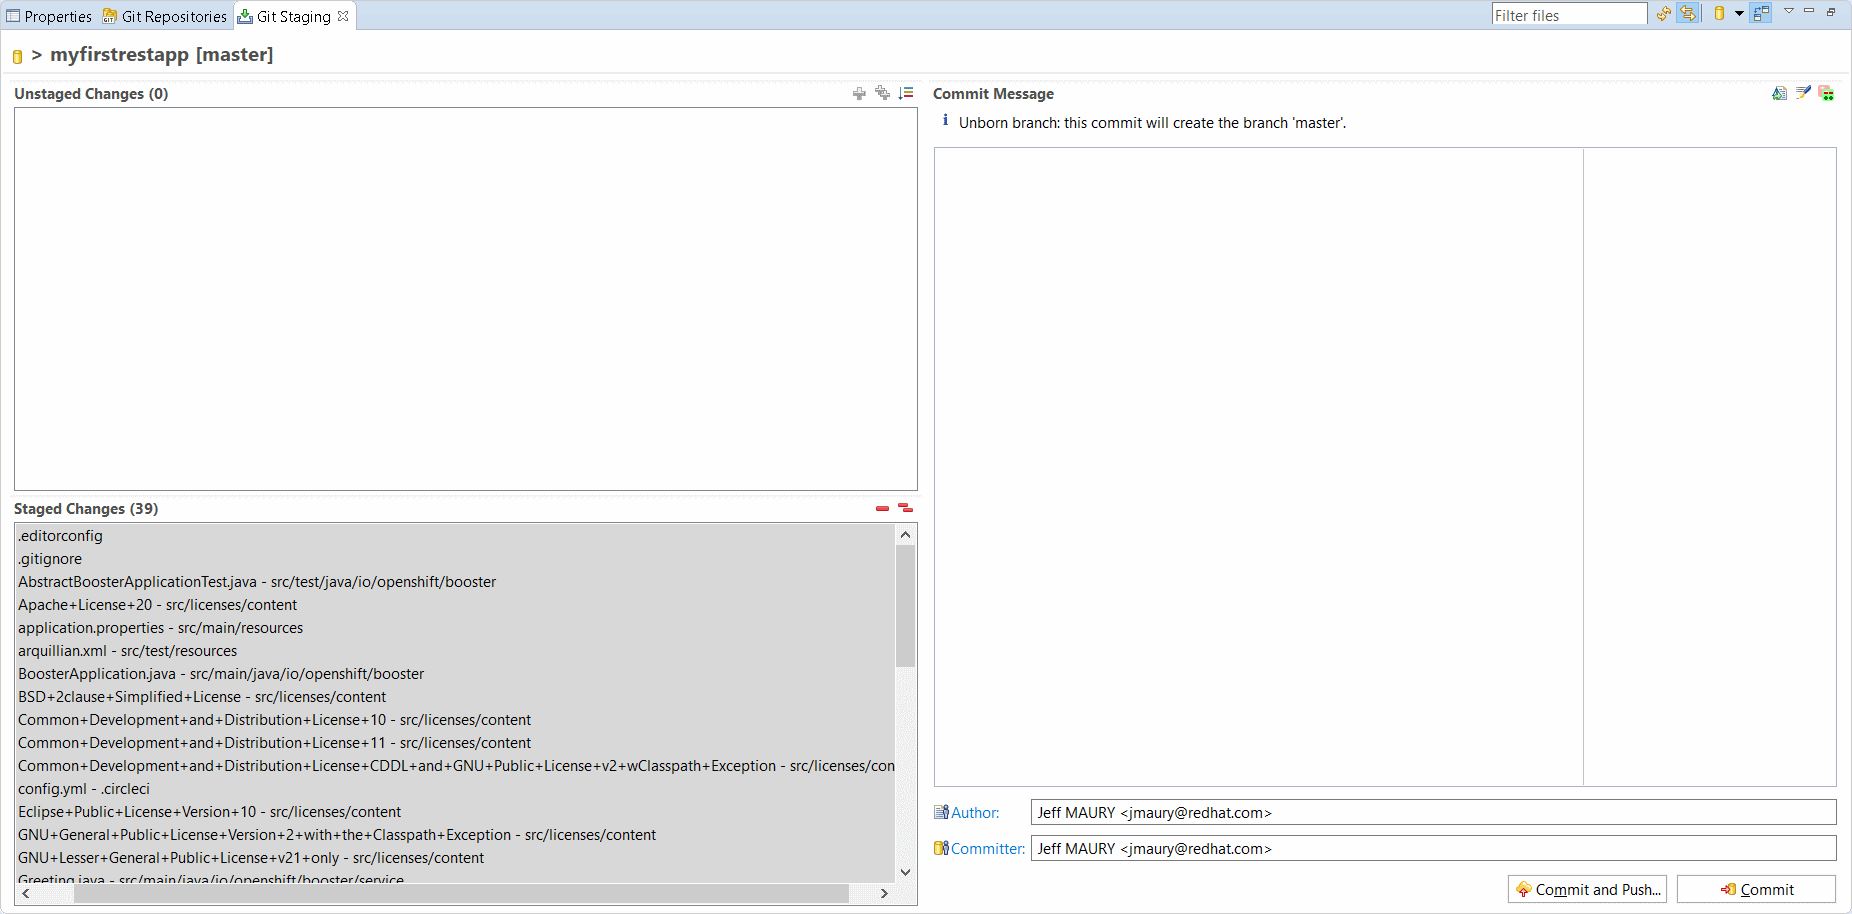
Enter a commit message (ex 'Initial version') and click the Commit and Push…
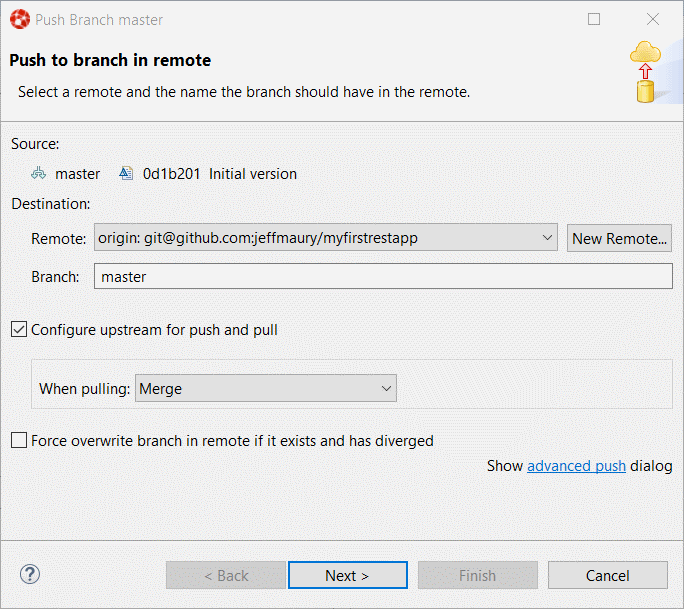
Click on the Next
Click on the Finish
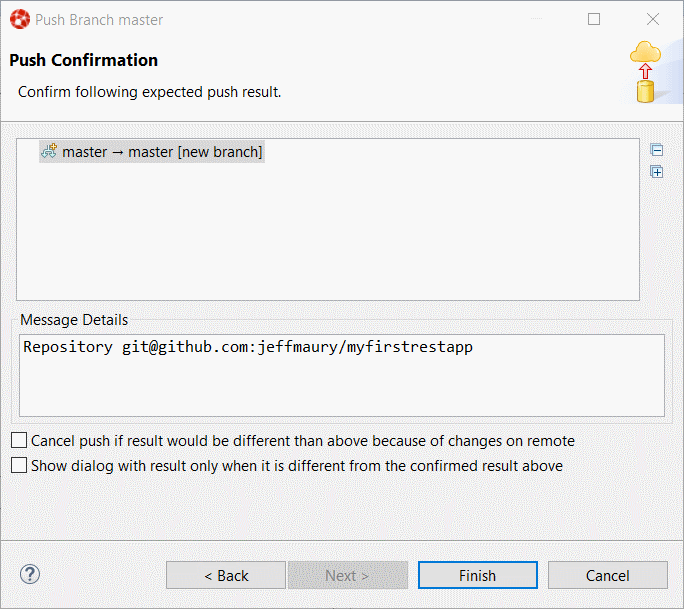
A dialog with the result of the push operation will be displayed. Click the OK
In order to support live update on an OpenShift cluster, we must add Spring Boot DevTools to our Spring Boot application.
Open the pom.xmlmyfirstrestappspring-boot-maven-plugin
            <configuration>
              <excludeDevtools>false</excludeDevtools>
            </configuration>
The whole spring-boot-maven-plugin
      <plugin>
        <groupId>org.springframework.boot</groupId>
        <artifactId>spring-boot-maven-plugin</artifactId>
        <executions>
          <execution>
            <goals>
              <goal>repackage</goal>
            </goals>
            <configuration>
              <excludeDevtools>false</excludeDevtools>
            </configuration>
          </execution>
        </executions>
      </plugin>
Close and save the pom.xml
Push the change to GitHub: select the Team → Commit…
Before we can deploy the application on OpenShift, we must first create an ImageStream on our OpenShift cluster. The reason is that the Spring Boot support relies on S2I builds that will explode the Spring Boot uber JAR when Spring Boot DevTools is present. As this is not supported by all Java based S2I images, we will use one that supports it, ie fabric8/s2i-java:2.2
First, in the myfirstrestappspringboot.json
{
    "apiVersion": "image.openshift.io/v1",
    "kind": "ImageStream",
	"metadata": {
		"name": "springboot"
	},
    "spec": {
        "lookupPolicy": {
            "local": false
        },
        "tags": [
            {
                "annotations": {
					"tags": "builder,java"
				},
                "from": {
                    "kind": "DockerImage",
                    "name": "registry.access.redhat.com/fuse7/fuse-java-openshift:1.1"
                },
                "importPolicy": {},
                "name": "1.1",
                "referencePolicy": {
                    "type": "Source"
                }
            }
        ]
    }
}
Then, from the OpenShift explorer view, select the OpenShift connection for your cluster (if you don’t have
one already defined, you must define it), right click on the New → Resource…
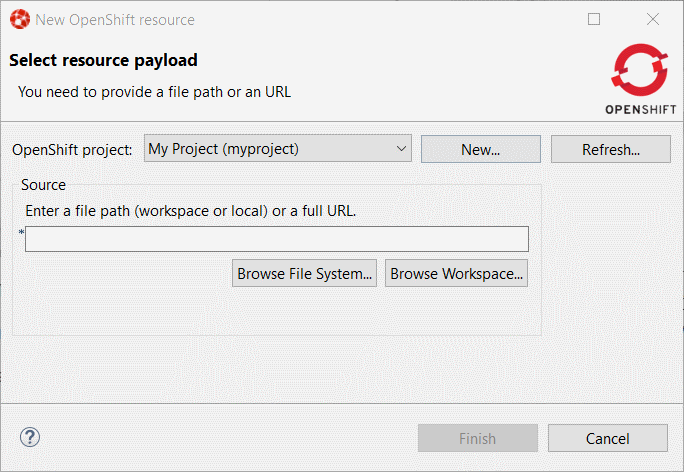
You can select the OpenShift project you want to work with and then click on
the Browse Workspace…springboot.jsonmyfirstrestapp
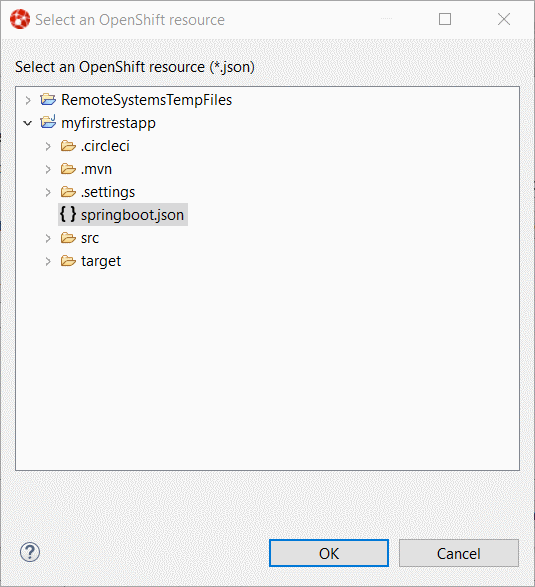
Click the OKFinish
We’re now ready to create the application on the OpenShift cluster. Select the OpenShift
connection, right click the New → Application…springboot
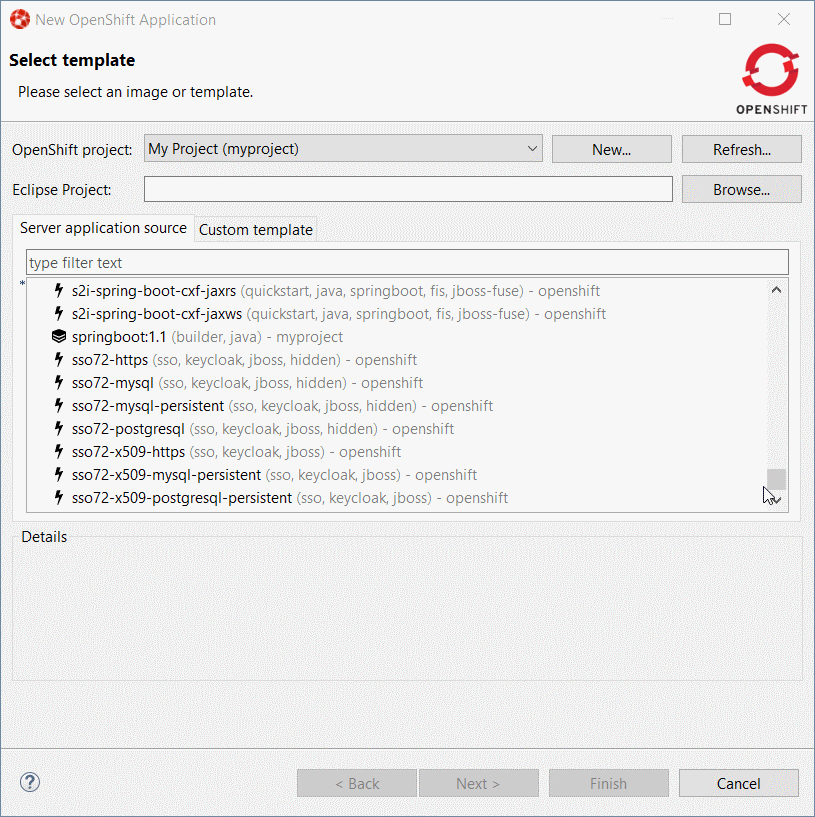
Select this ImageStream and click the Next

Enter `myfirstrestapp`Name
field, `https://github.com/GITHUB_USER/myfirstrestapp in the Git Repository URL
field, replacing GITHUB_USER by your real GitHub user name and click
the Next`` button.
On the Deployment Configuration & Scalability`Next
On the Service & Routing Settings8778-tcpEdit
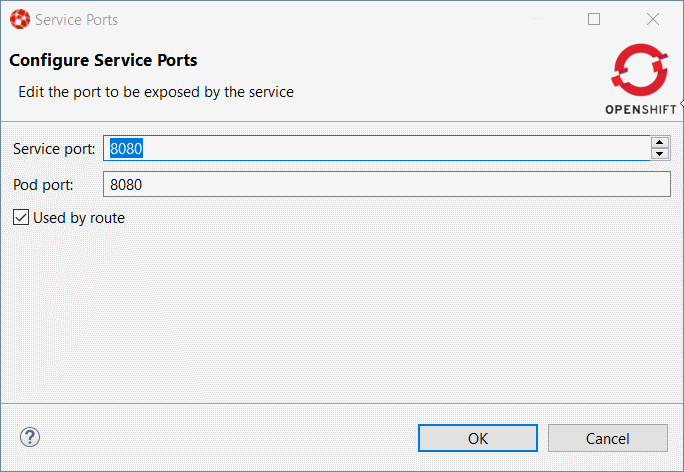
Click the OKFinish
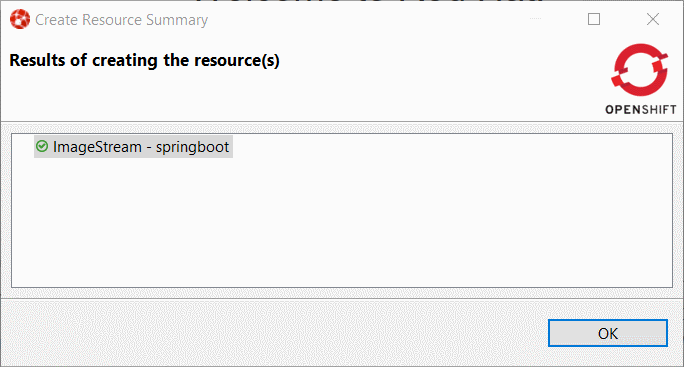
The list of OpenShift resources created will be displayed by a dialog:
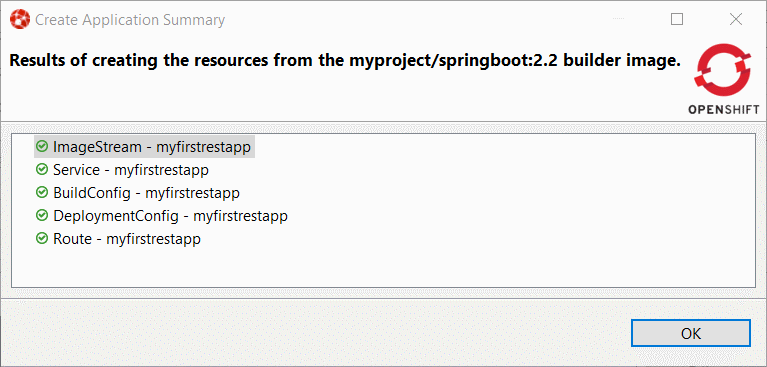
Click the OKCancel
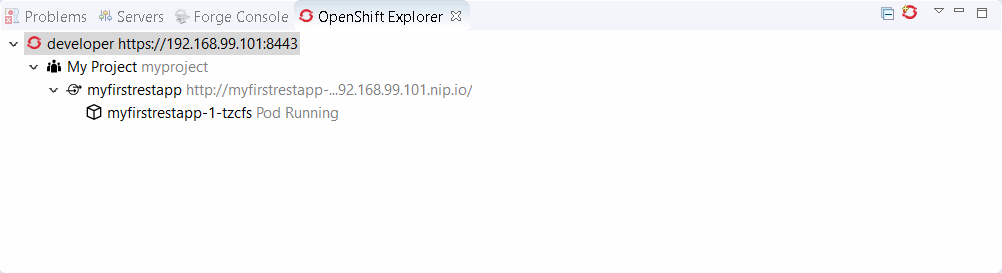
After the build is run (this may takes several minutes as the Maven build will download lots of dependencies), you should see a running pod:
We are going to synchronize the local Eclipse project with the remote OpenShift pod. Each time a file will be modified locally, then the pod will be updated accordingly.
Select the running pod in the OpenShift explorerServer Adapter…
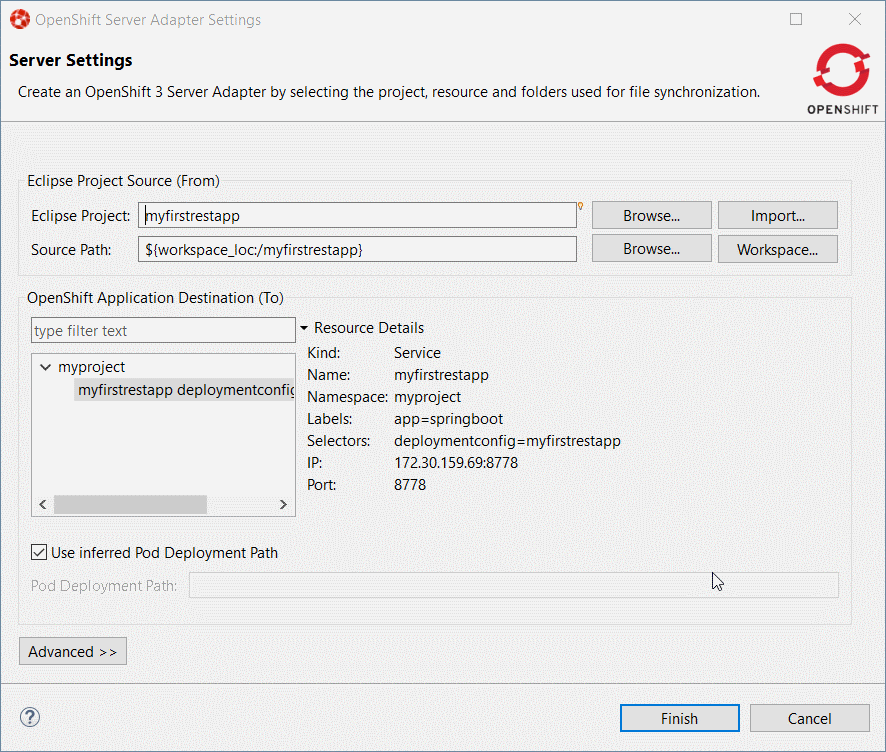
Click the OKServers
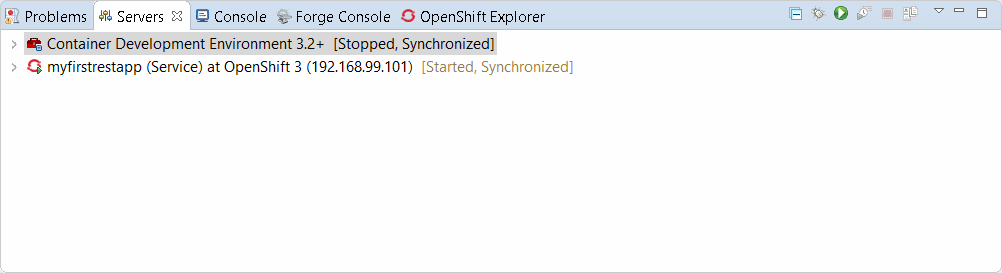
We’ve not setup the synchronization between our local Eclipse project and the remote OpenShift project. Each modification done locally will be reported on the remote OpenShift cluster.
Let’s modify our local application code and see the changes applied almost instantly:
Edit the file src/main/java/io/openshift/booster/service/Greeting.javamyfirstrestappFORMATHello, %s!Hello, Mr %s!
The file should be now:
/*
 * Copyright 2016-2017 Red Hat, Inc, and individual contributors.
 *
 * Licensed under the Apache License, Version 2.0 (the "License");
 * you may not use this file except in compliance with the License.
 * You may obtain a copy of the License at
 *
 * http://www.apache.org/licenses/LICENSE-2.0
 *
 * Unless required by applicable law or agreed to in writing, software
 * distributed under the License is distributed on an "AS IS" BASIS,
 * WITHOUT WARRANTIES OR CONDITIONS OF ANY KIND, either express or implied.
 * See the License for the specific language governing permissions and
 * limitations under the License.
 */
package io.openshift.booster.service;

// tag::snippet-greeting[]
public class Greeting {

    public static final String FORMAT = "Hello, Mr %s!";

    private final String content;

    public Greeting() {
        this.content = null;
    }

    public Greeting(String content) {
        this.content = content;
    }

    public String getContent() {
        return content;
    }
}
// end::snippet-greeting[]
Then, in the ÒpenShift explorer` view, select the myfirstrestapp`Show In → Web BrowserInvoke
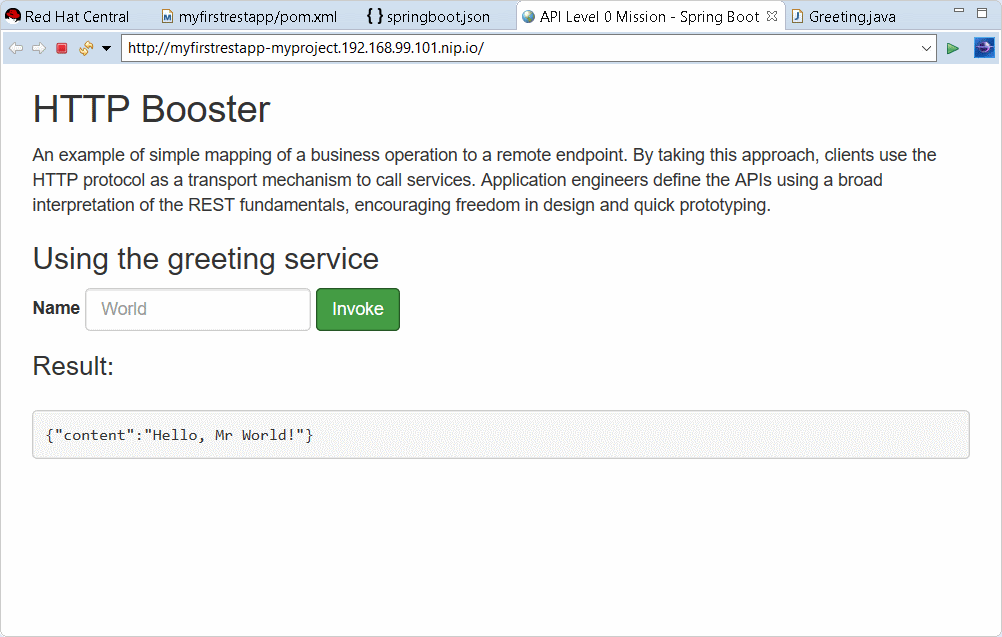
You’ve just experienced the inner loop on your Spring Boot application: any change done locally is reported and testable almost immedialtely on your OpenShift cluster.
You can restart the deployment in debug mode and you’ll be able to remote debug your Spring Boot application. Amazing, no ?
The Hibernate 5.3 runtime provider now incorporates Hibernate Core version 5.3.6.Final and Hibernate Tools version 5.3.6.Final.
The Hibernate 5.2 runtime provider now incorporates Hibernate Core version 5.2.17.Final and Hibernate Tools version 5.2.11.Final.
The Hibernate 5.1 runtime provider now incorporates Hibernate Core version 5.1.16.Final and Hibernate Tools version 5.1.10.Final.
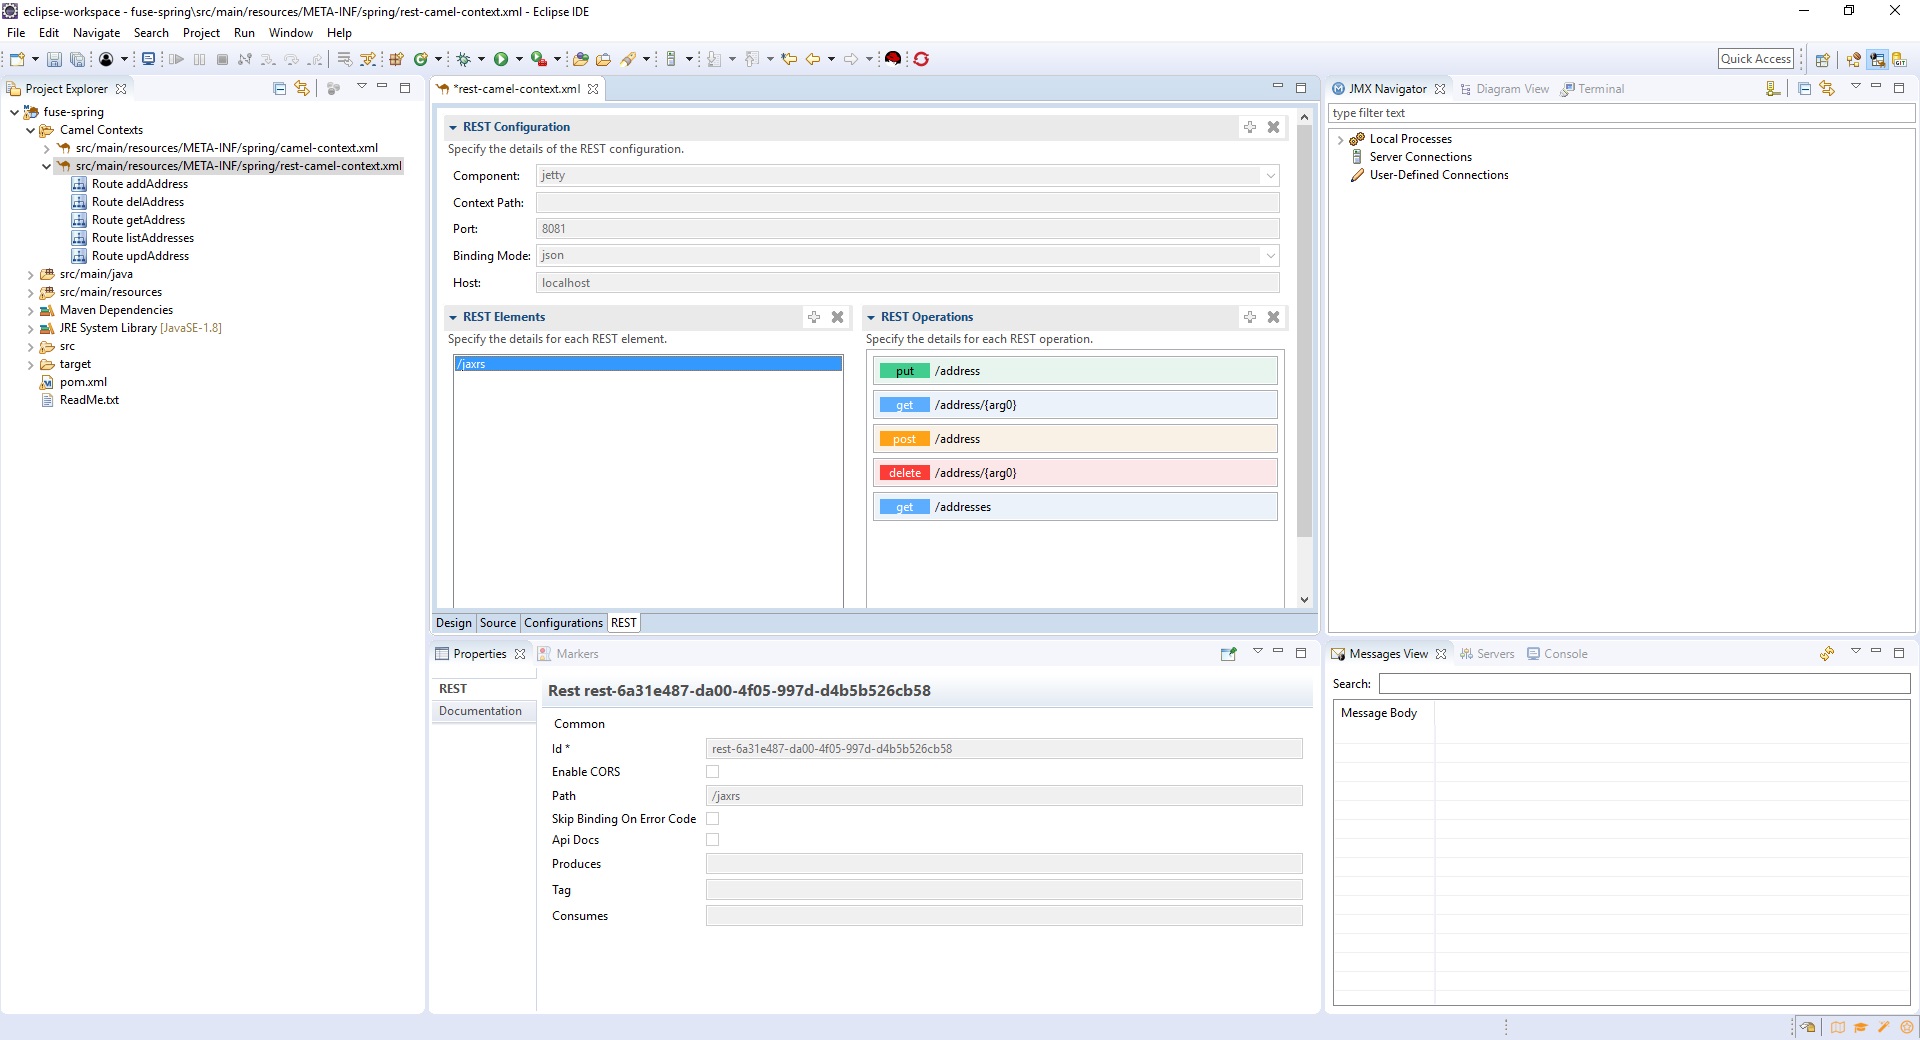
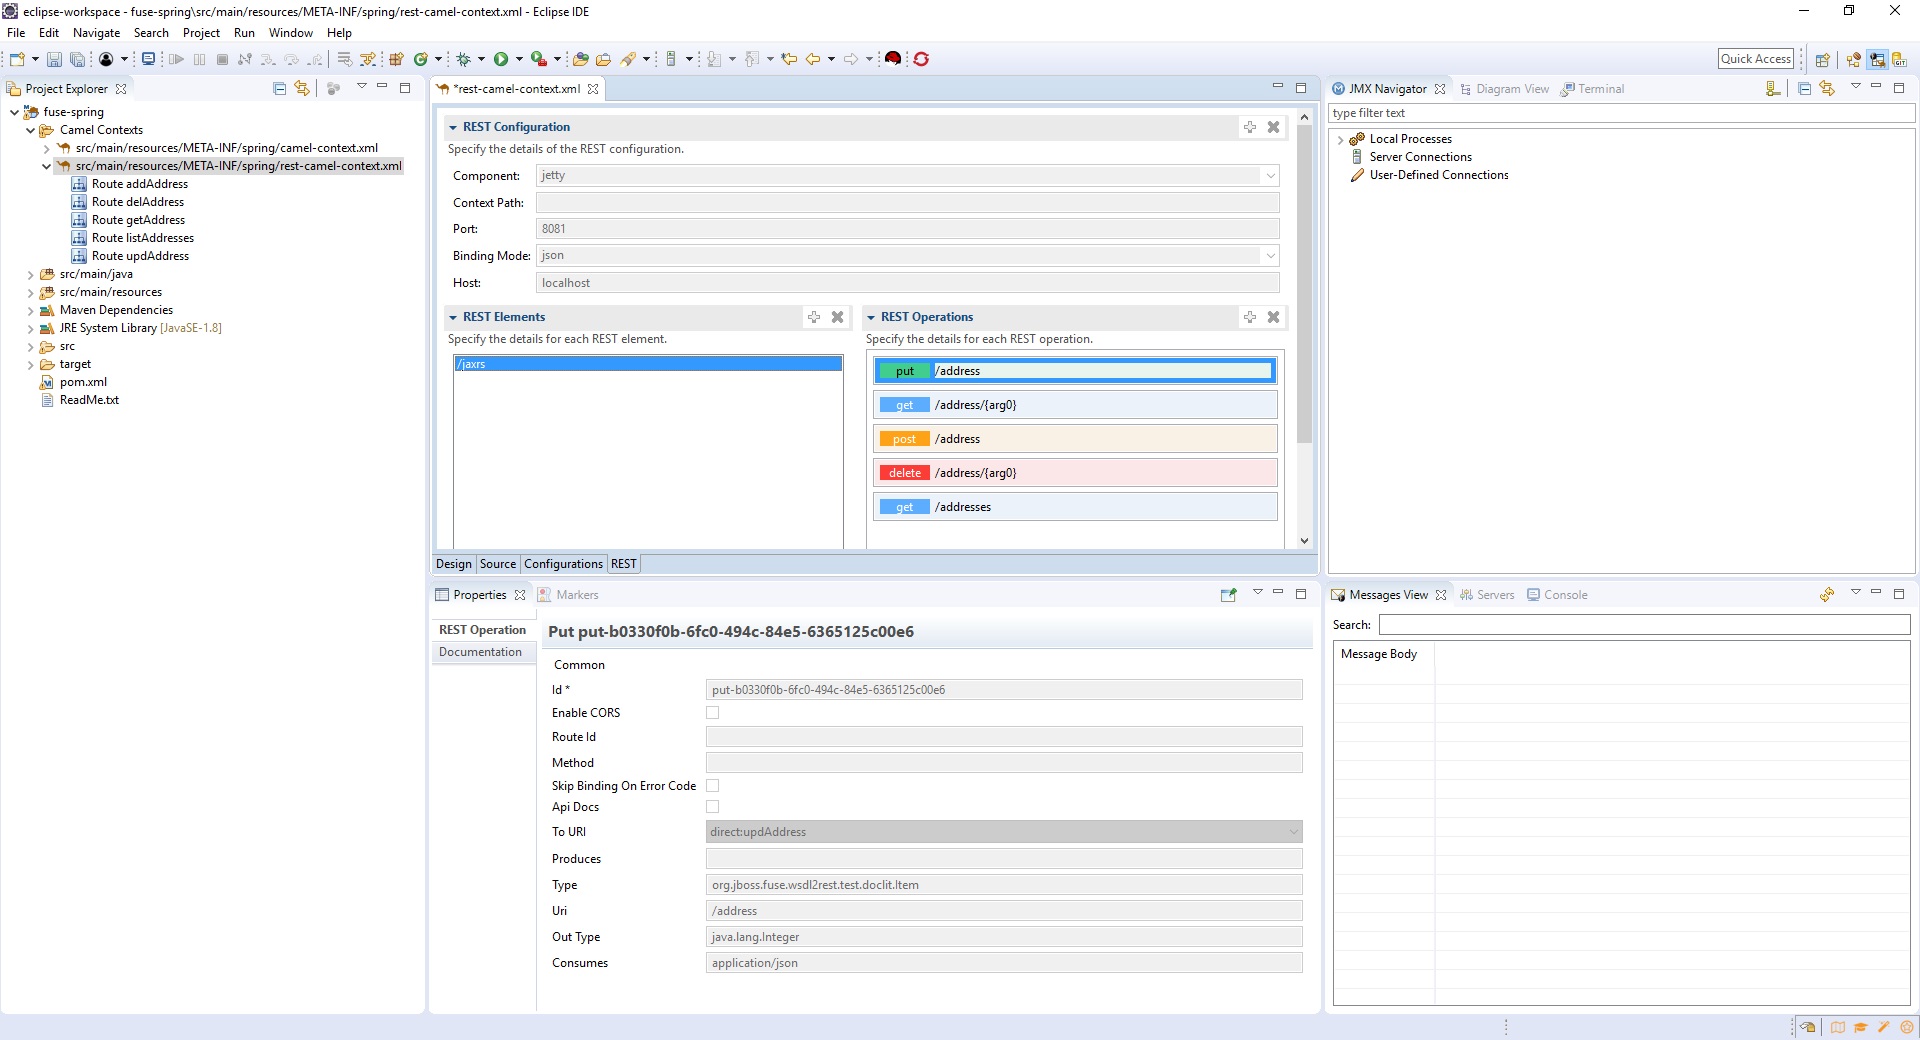
Previously, there was a REST editor which was read-only. It is useful to have a great overview of already defined Camel REST DSL definitions. Now the editor and its related properties tab are also providing editing capabilities allowing to develop faster.
You can now:
Create and delete REST Configurations
Create and delete new REST Elements
Create and delete new REST Operations
Edit properties for a selected REST Element in the Properties view
Edit properties for a selected REST Operation in the Properties view
In addition, we’ve improved the look and feel by fixing the scrolling capabilities of the REST Element and REST Operations lists.
The Breadcrumb in the Java Editor now uses a dark background in the Dark theme.

In the Light theme, the Breadcrumb uses a flat look style instead of a gradient.
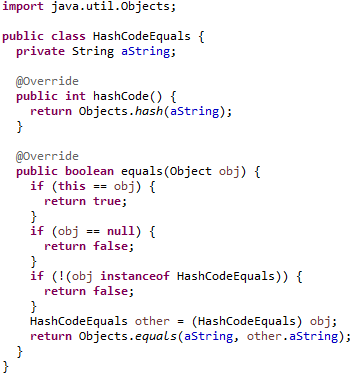
A new option in the Source > Generate hashCode() and equals()… tool allows you to create
implementations using the Java 7 Objects.equalsObjects.hash
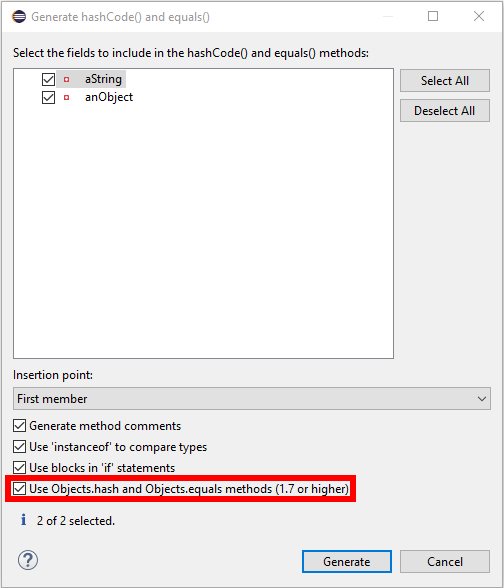
The above setup generates the following code:
Additionally, arrays are handled more cleverly. The generation prefers the Arrays.deepHashCodeArrays.deepEqualsObject[]Serializable[]Cloneable[]
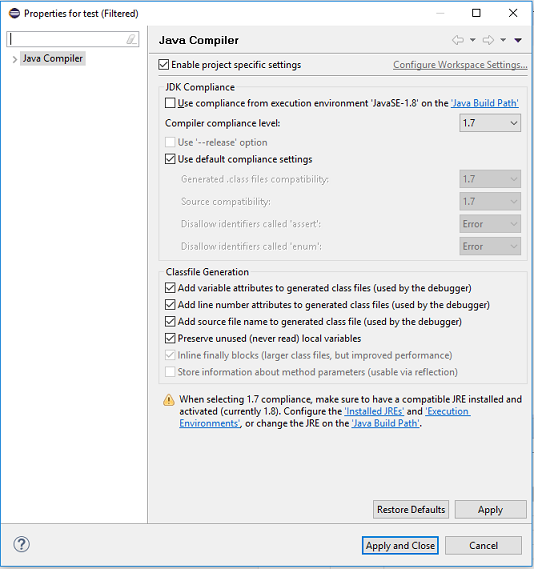
A new quick fix is provided on the JRE Compiler Compilance problem marker which is created when the compiler compliance does not match the JRE being used. This quick fix provides the option of opening the Compiler Compliance page of the project to fix the issue.
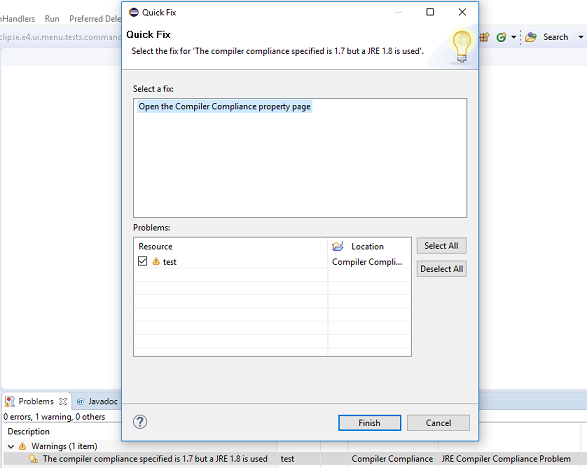
Selecting this option opens the Compiler Compliance property page for the specified project as shown below.
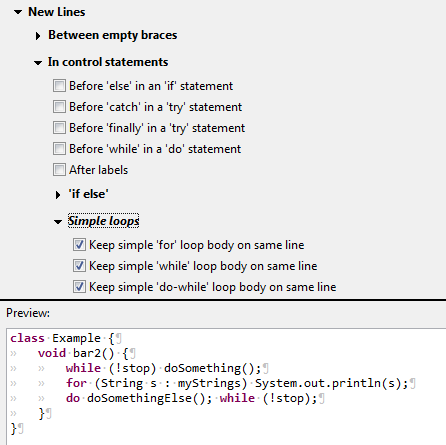
New formatter settings have been added that make it possible to keep the bodies of simple loops (without braces) in the same line as their headers, similar to previously existing setting for simple 'if' statements. Different kind of loops ('for', 'while', 'do while') can be controlled independently.
The settings can be found in the profile editor under New Lines > In control statements > Simple Loops.
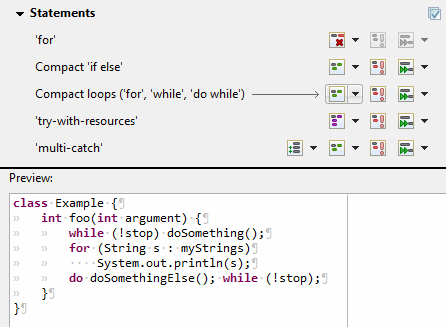
There’s also a new setting to control how these loops should be handled if they exceed the maximum line width. It’s located under Line Wrapping > Wrapping settings > Statements > Compact loops ('for', 'while', 'do while').
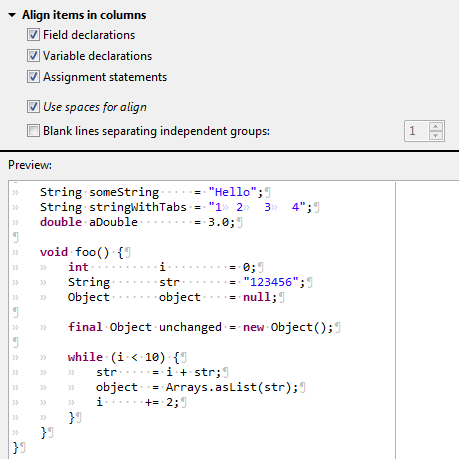
A feature previously known as align fields in columns has been expanded and can now be used for variable declarations and assignment statements as well.
An option has also been added to always align with spaces, even if tabs are used for general indentation. This is very similar to the Use spaces to indent wrapped lines option and is useful to make the code look good in editors with differing tab width.
All the settings related to aligning are now in the new preferences subsection: Indentation > Align items in columns.
Observing the result of step operations may slow down execution, which may be unusable if the step takes long already. Therefore a timeout (default: 7000 ms) has been introduced after which the observation mechanism is disabled until the end of the step operation.
The timeout can be configured in Preferences > Java > Debug > Don’t show if step operation takes longer than (ms).
A new option has been introduced in the Debug view to show or hide running threads.
Hiding running threads can be useful when debugging heavily multithreaded application, when it is difficult to find threads stopped at breakpoints among hundreds or thousands of running threads.

A new button Show Command Line has been added in the Java Launch Configuration dialog.
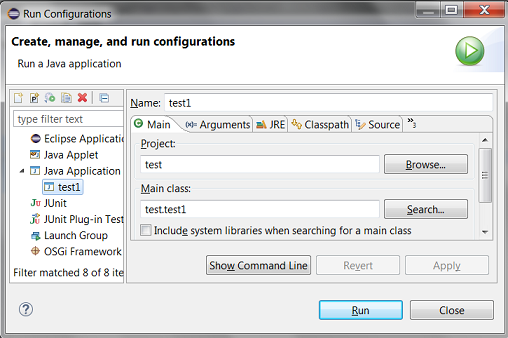
Clicking the button will open a dialog to show the command line used for launching the application.

Thread name changes in the debuggee JVM are reflected in the Debug View. A VM option can now be used to disable this behavior, in case the JVM communication necessary for the name updates is not desired.
The functionality can be disabled by specifying the following VM option
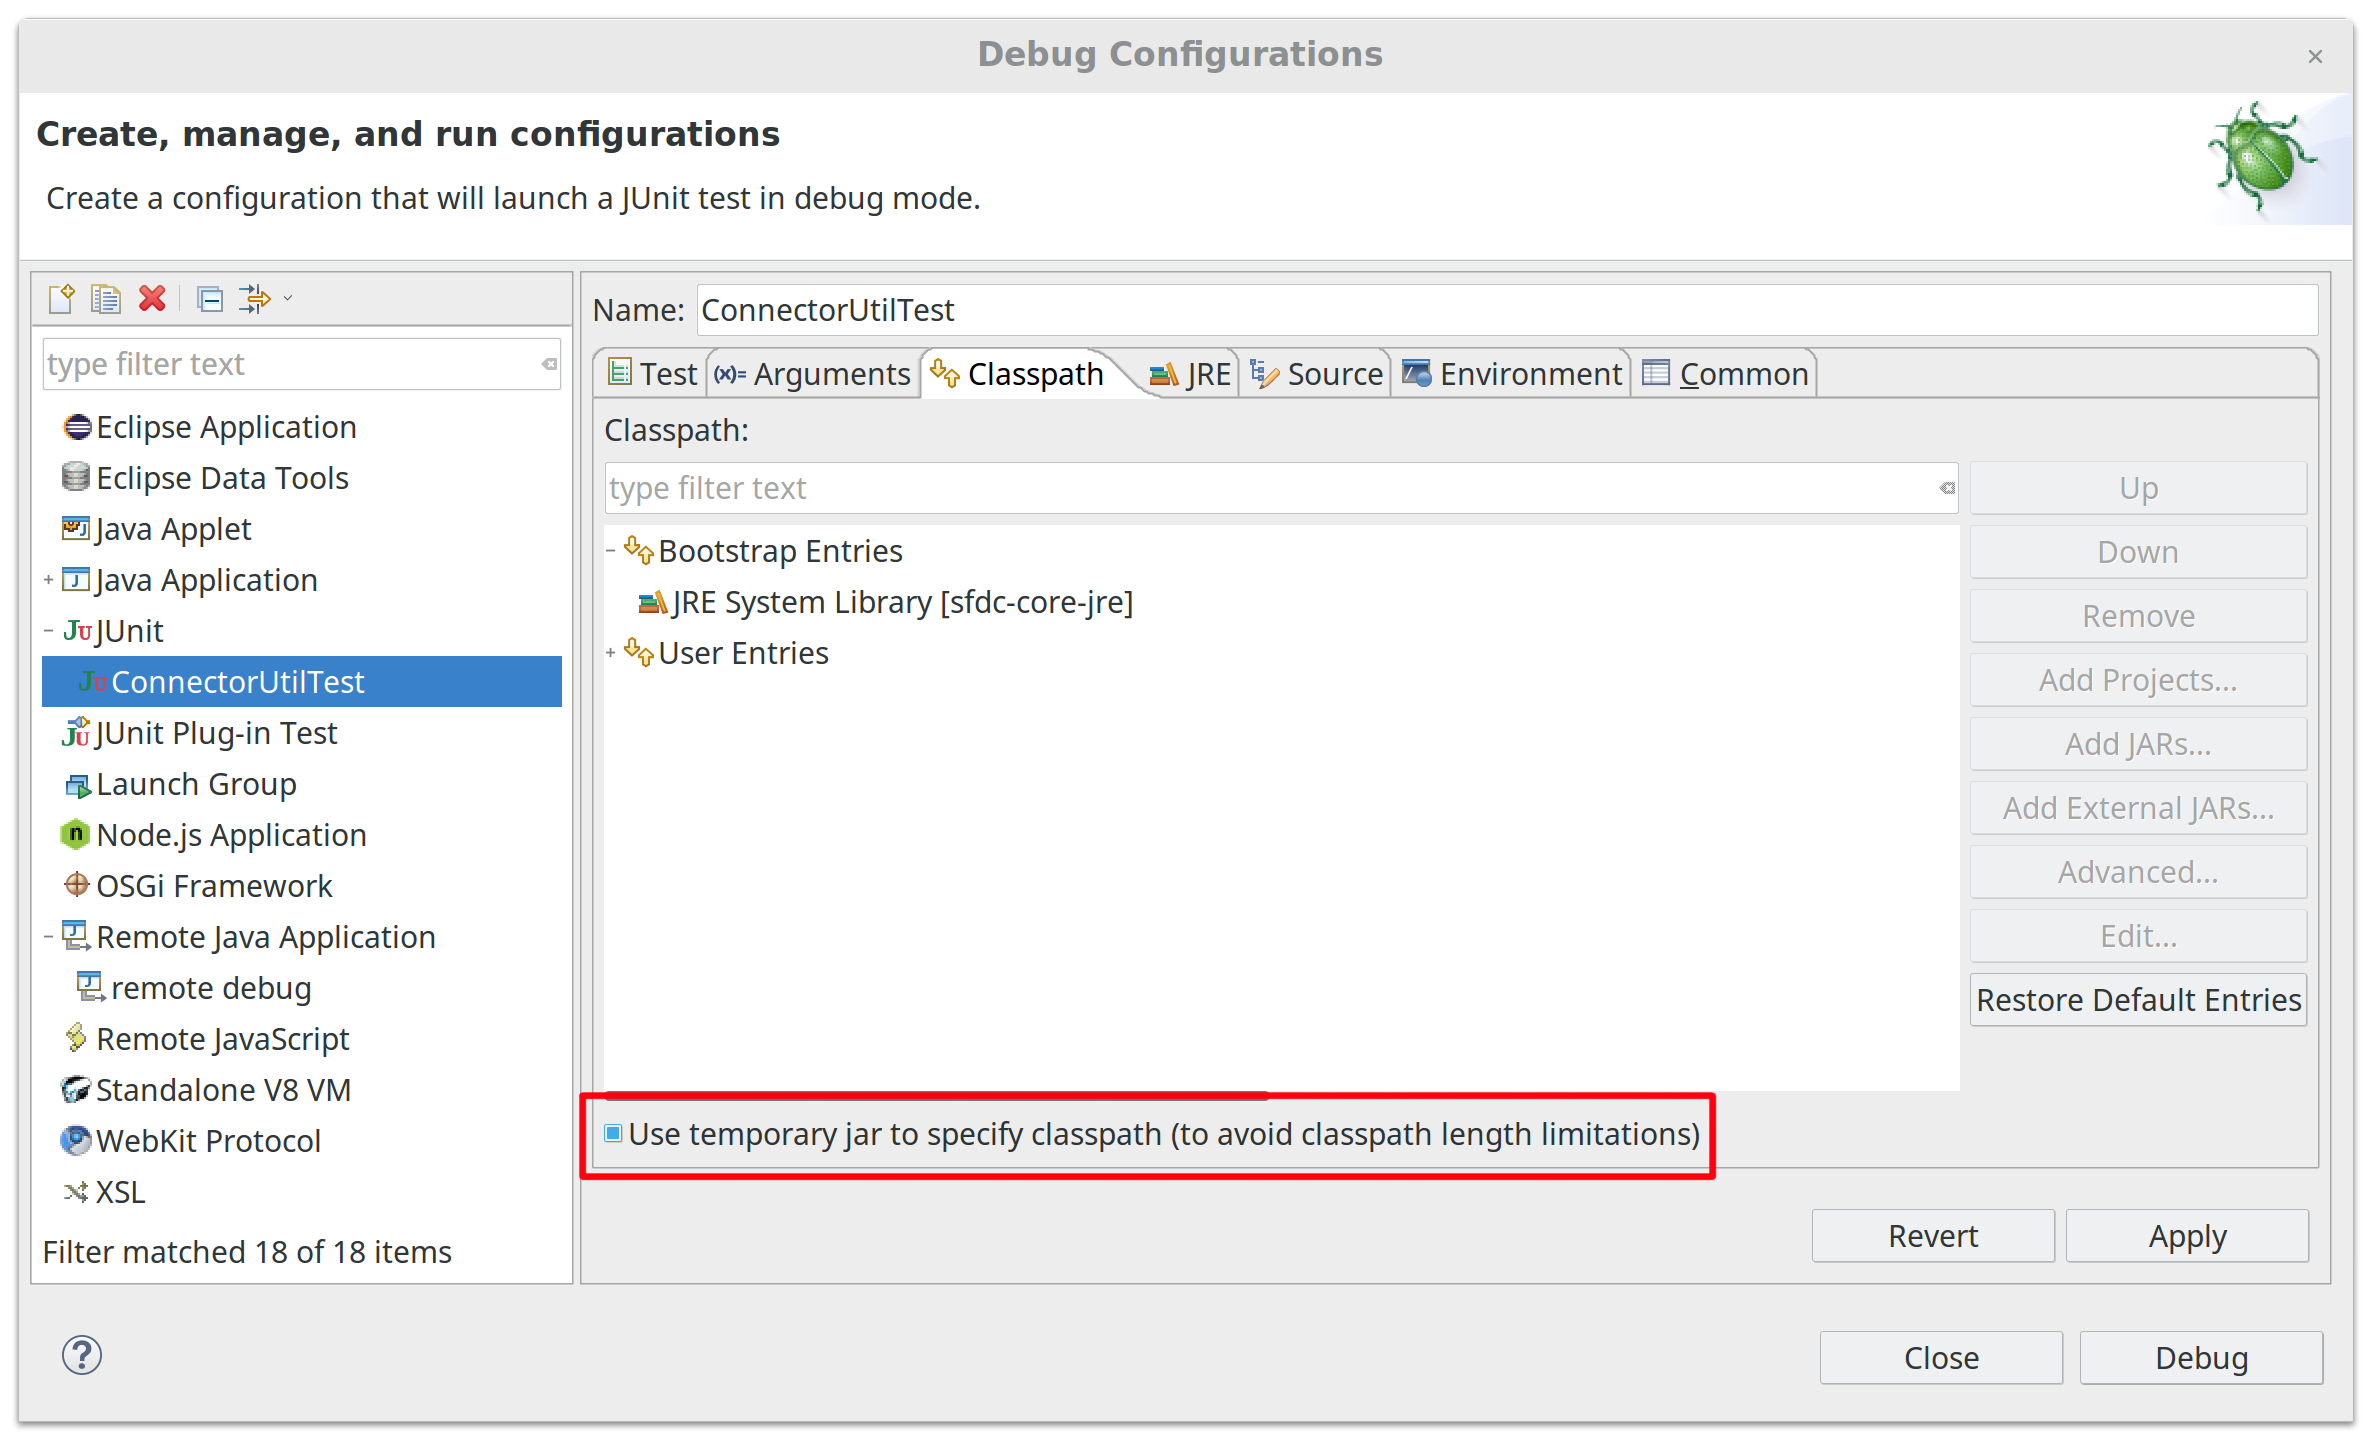
-Dorg.eclipse.jdt.internal.debug.core.model.ThreadNameChangeListener.disable=trueClasspath and/or modulepath are now shortened if they are longer than current operating system limits.
If a temporary jar is needed to shorten the classpath (Java 8 and previous versions), a dialog is shown asking for confirmation.
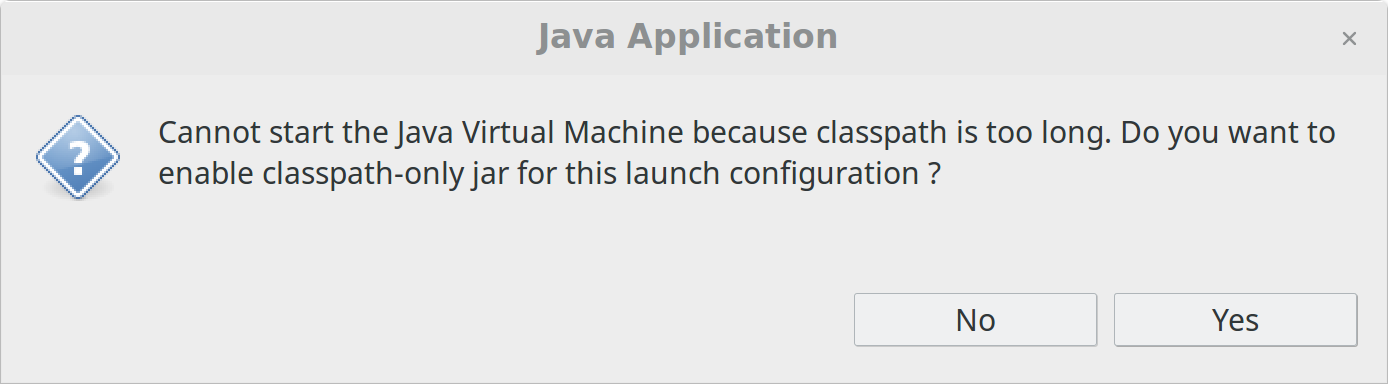
The option Use temporary jar to specify classpath (to avoid classpath length limitations) is available in the Classpath tab of the Run/Debug Configuration dialog.
You can find more noteworthy updates in on this page.
Happy to announce 4.9.0.AM3 (Developer Milestone 3) build for Eclipse 2018-09 M2.
Downloads available at JBoss Tools 4.9.0 AM3.
Full info is at this page. Some highlights are below.
The included Forge runtime is now 3.9.1.Final. Read the official announcement here.
A regression has been introduced touching all functionalities using Jaxb. It includes:
Variable content display in debug
Data Transformation wizard
Tracing Camel route via Jolokia Connection
It may affect other functionalities. In this case, you will have this kind of error in log:
java.lang.NullPointerException
	at javax.xml.bind.ContextFinder.handleClassCastException(ContextFinder.java:95)
Please note that it has been already fixed on nightly build
Enjoy!
Jeff Maury
Happy to announce 4.9.0.AM2 (Developer Milestone 2) build for Eclipse 2018-09 M2.
Downloads available at JBoss Tools 4.9.0 AM2.
Full info is at this page. Some highlights are below.
The version of the library used to generate Camel REST DSL from WSDl files has been updated. It now covers more types of WSDL files. See https://github.com/jboss-fuse/wsdl2rest/milestone/3?closed=1 for the list of improvements.
In the last milestone we began adding editing capabilities to the read-only REST tab to the route editor we added in the previous release. Those efforts have continued and we now have a fully editable REST tab.
You can now:
Create and delete REST Configurations
Create and delete new REST Elements
Create and delete new REST Operations
Edit properties for a selected REST Element in the Properties view
Edit properties for a selected REST Operation in the Properties view
In addition, we’ve improved the look and feel by fixing the scrolling capabilities of the REST Element and REST Operations lists.
Enjoy!
Jeff Maury
Try our leaner, complete Eclipse Photon and Red Hat Developer Studio 12 compatible integration tooling.
JBoss Tools Integration Stack 4.6.0.Final / Red Hat Developer Studio Integration Stack 12.0.0.GA
| All of the Integration Stack components have been verified to work with the same dependencies as JBoss Tools 4.6 and Red Hat Developer Studio 12. |
This is the initial release in support of Eclipse Photon. It syncs up with Developer Studio 12.0.0, JBoss Tools 4.6.0 and Eclipse 4.8.0 (Photon). It is also a maintenance release for Teiid Designer and BRMS tooling.
See the BPMN2 1.5.0.Final Known Issues Section of the Integration Stack 12.0.0.GA release notes.
See the Drools 7.8.0.Final Known Issues Section of the Integration Stack 12.0.0.GA release notes.
See the Teiid Designer 11.2.0.Final Resolved Issues Section of the Integration Stack 12.0.0.GA release notes.
Red Hat Developer Studio Integration Stack is a set of Eclipse-based development tools. It further enhances the IDE functionality provided by Developer Studio, with plug-ins specifically for use when developing for other Red Hat products. It’s where DataVirt Tooling and BRMS tooling are aggregated. The following frameworks are supported:
Business Process and Rules Development plug-ins provide design, debug and testing tooling for developing business processes for Red Hat BRMS and Red Hat BPM Suite.
BPEL Designer - Orchestrating your business processes.
BPMN2 Modeler - A graphical modeling tool which allows creation and editing of Business Process Modeling Notation diagrams using graphiti.
Drools - A Business Logic integration Platform which provides a unified and integrated platform for Rules, Workflow and Event Processing including KIE.
jBPM - A flexible Business Process Management (BPM) suite.
Red Hat Data Virtualization Development plug-ins provide a graphical interface to manage various aspects of Red Hat Data Virtualization instances, including the ability to design virtual databases and interact with associated governance repositories.
Teiid Designer - A visual tool that enables rapid, model-driven definition, integration, management and testing of data services without programming using the Teiid runtime framework.
Don’t miss the Features tab for up to date information on your favorite Integration Stack components.
The easiest way to install the Integration Stack components is through the stand-alone installer or through our JBoss Tools Download Site.
For a complete set of Integration Stack installation instructions, see Integration Stack Installation Guide
Let us know how it goes!
Paul Leacu.
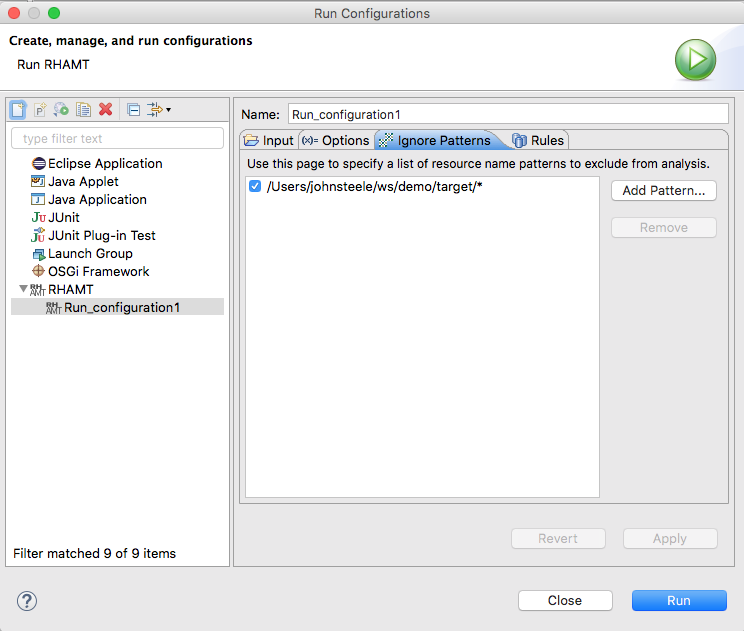
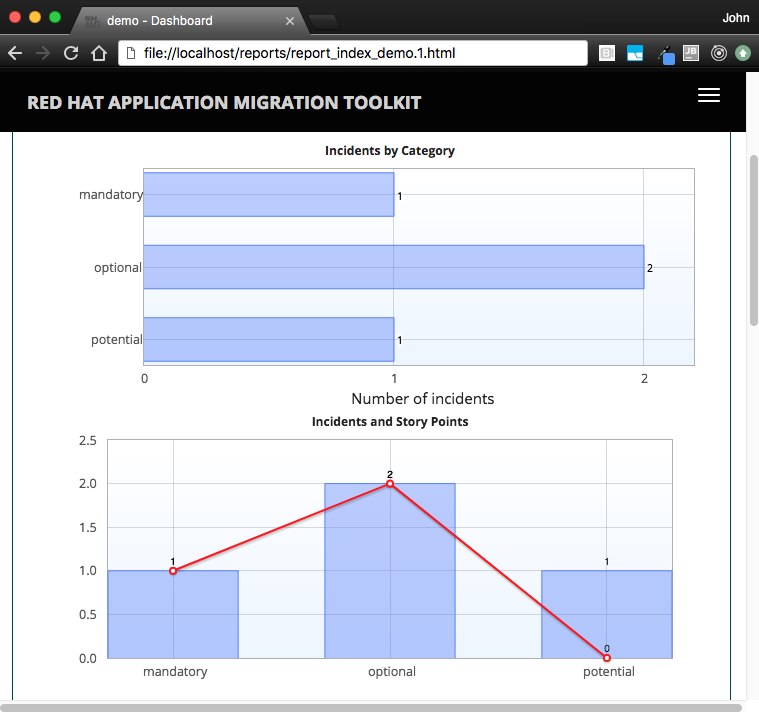
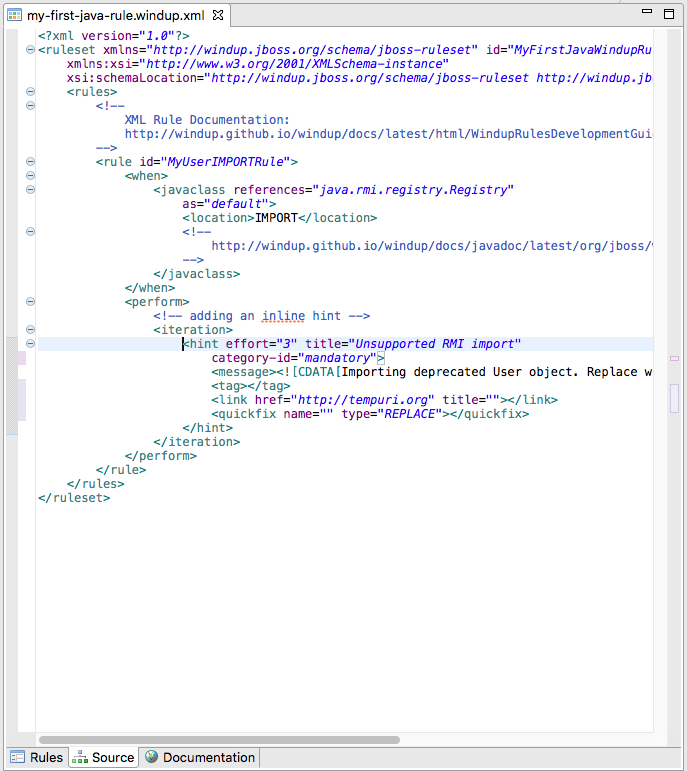
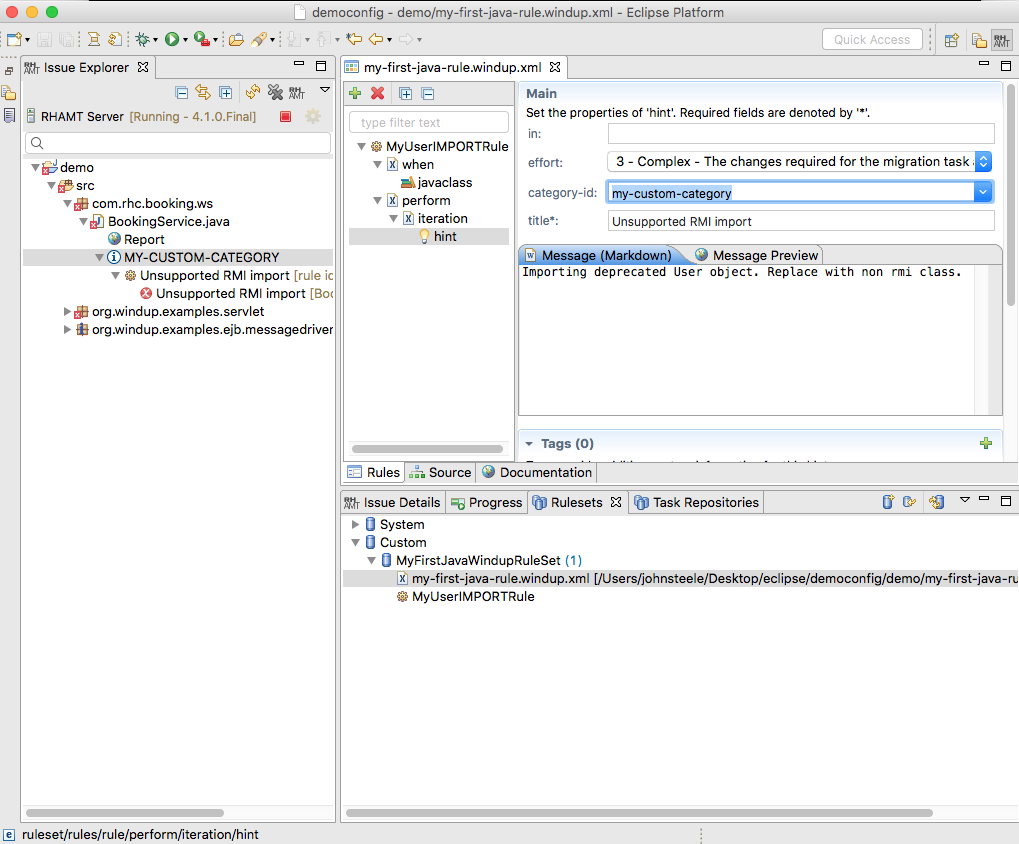
Happy to announce version 4.1.0.Final of the Red Hat Application Migration Toolkit (RHAMT) is now available.
Downloads available through JBoss Central and from the update site.
RHAMT is an application migration and assessment tool. The migrations supported include application platform upgrades, migrations to a cloud-native deployment environment, and also migrations from several commercial products to the Red Hat JBoss Enterprise Application Platform.
A good amount of time has been spent on ensuring the tooling functions consistently across Windows, OSX, and Linux.
You can find more detailed information here.
Our goal is to make the RHAMT tooling easy to use. We look forward to your feedback and comments!
Have fun!
John Steele
github/johnsteele
JBoss Tools 4.6.0 and Red Hat Developer Studio 12.0 for Eclipse Photon are here waiting for you. Check it out!
Red Hat Developer Studio comes with everything pre-bundled in its installer. Simply download it from our Red Hat Developer product page and run it like this:
java -jar devstudio-<installername>.jar
JBoss Tools or Bring-Your-Own-Eclipse (BYOE) Developer Studio require a bit more:
This release requires at least Eclipse 4.8 (Photon) but we recommend using the latest Eclipse 4.8 Photon JEE Bundle since then you get most of the dependencies preinstalled.
Once you have installed Eclipse, you can either find us on the Eclipse Marketplace under "JBoss Tools" or "Red Hat Developer Studio".
For JBoss Tools, you can also use our update site directly.
http://download.jboss.org/jbosstools/photon/stable/updates/
Our main focus for this release was on adoption of Java10, improvements for container based development and bug fixing. Eclipse Photon itself has a lot of new cool stuff but let me highlight just a few updates in both Eclipse Photon and JBoss Tools plugins that I think are worth mentioning.
Spring Boot runtime was already supported by the OpenShift server adapter. However, it has one major limitation: files and resources were synchronized between the local workstation and the remote pod(s) only for the main project. If your Spring Boot application had dependencies that were present in the local workspace, any change to a file or resource of one of these dependencies was not handled. This is not true anymore.
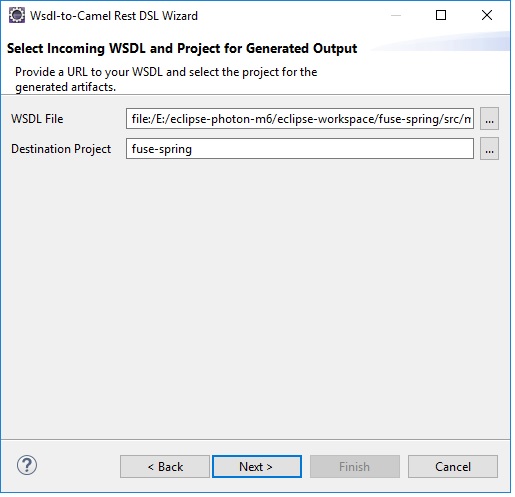
There is a new "Camel Rest DSL from WSDL" wizard. This wizard wraps the wsdl2rest tool now included with the Fuse 7 distribution, which takes a WSDL file for a SOAP-based (JAX-WS) web service and generates a combination of CXF-generated code and a Camel REST DSL route to make it accessible using REST operations.
To start, you need an existing Fuse Integration project in your workspace and access to the WSDL for the SOAP service. Then use File→New→Other… and select Red Hat Fuse→Camel Rest DSL from WSDL wizard.
On the first page of the wizard, select your WSDL and the Fuse Integration project in which to generate the Java code and Camel configuration.
On the second page, you can customize the Java folder path for your generated classes, the folder for the generated Camel file, plus any customization for the SOAP service address and destination REST service address.
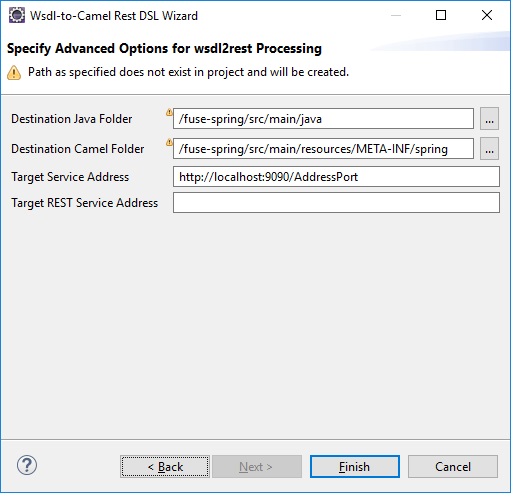
Click Finish and the new Camel configuration and associated Java code are generated in your project. The wizard determines whether your project is Blueprint, Spring, or Spring Boot based, and it creates the corresponding artifacts without requiring any additional input. When the wizard is finished, you can open your new Camel file in the Fuse Tooling Route Editor to view what it created.
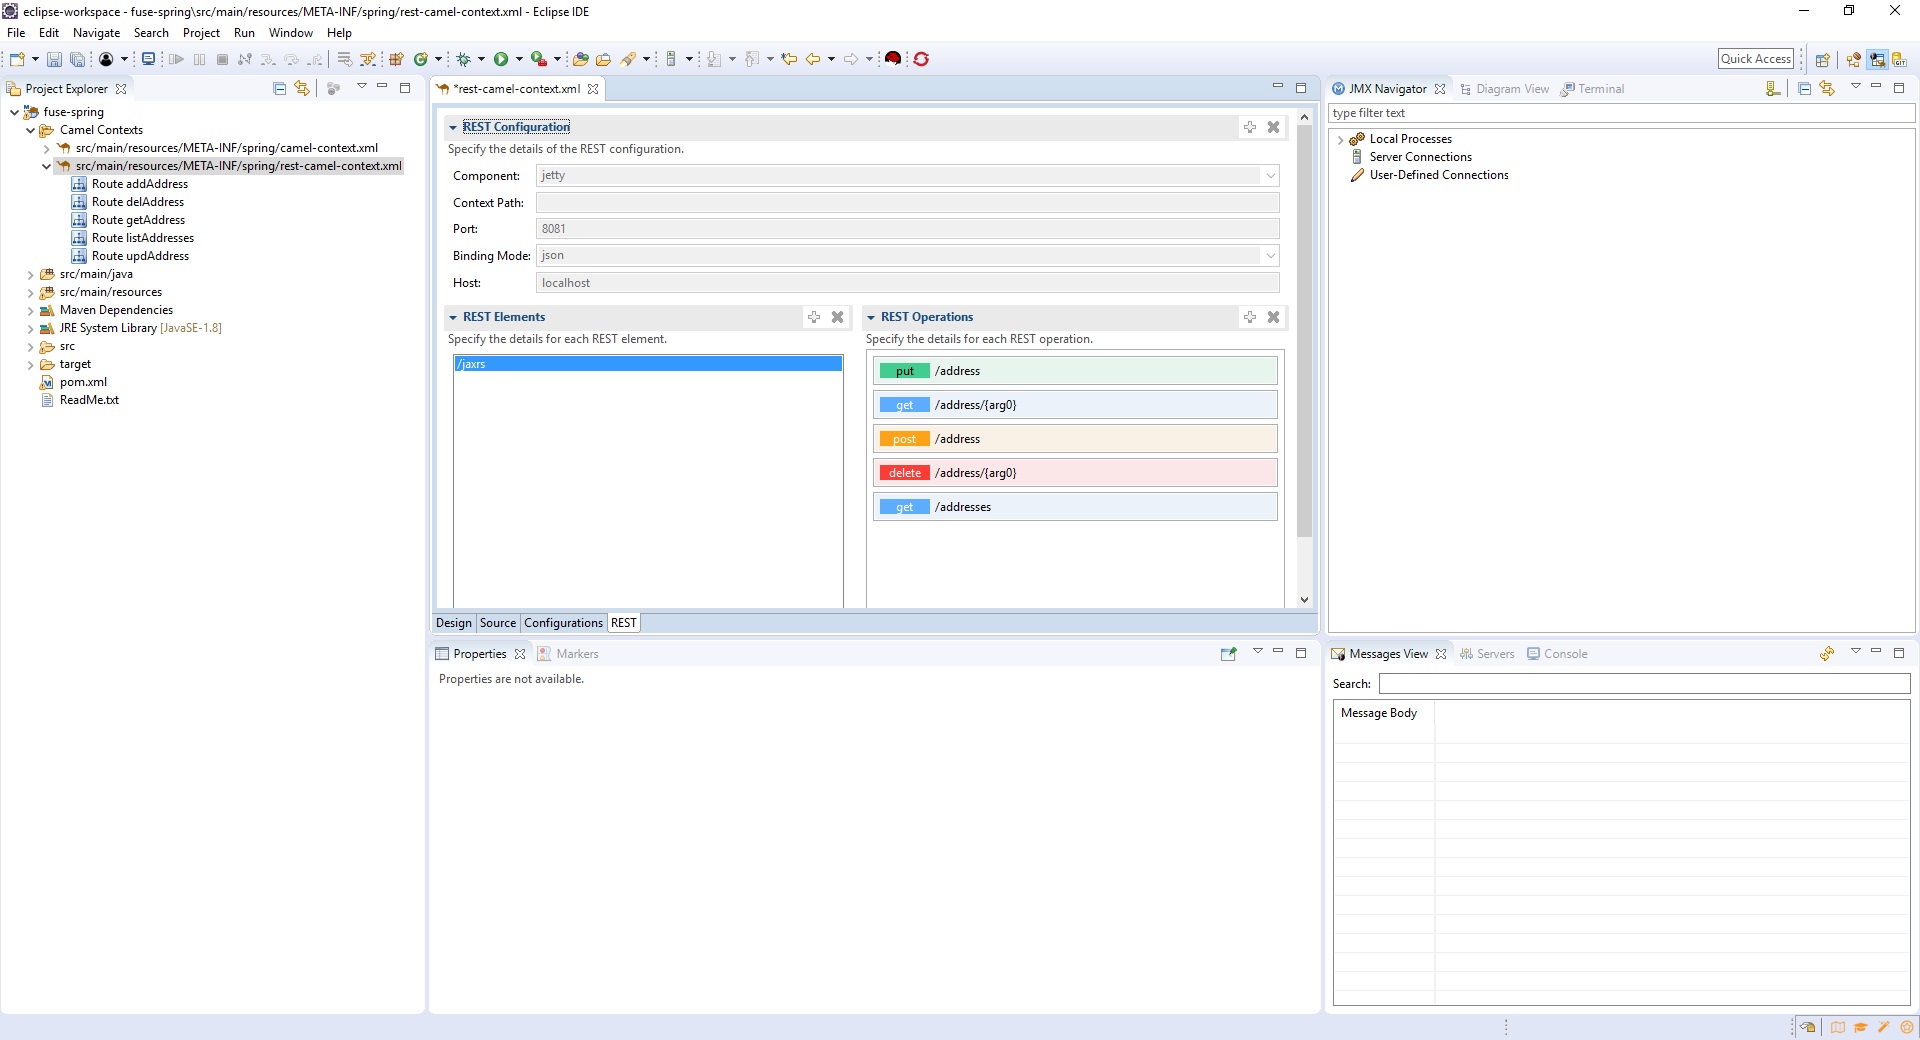
That brings us to another new functionality, the REST tab in the Fuse Tooling Route Editor.
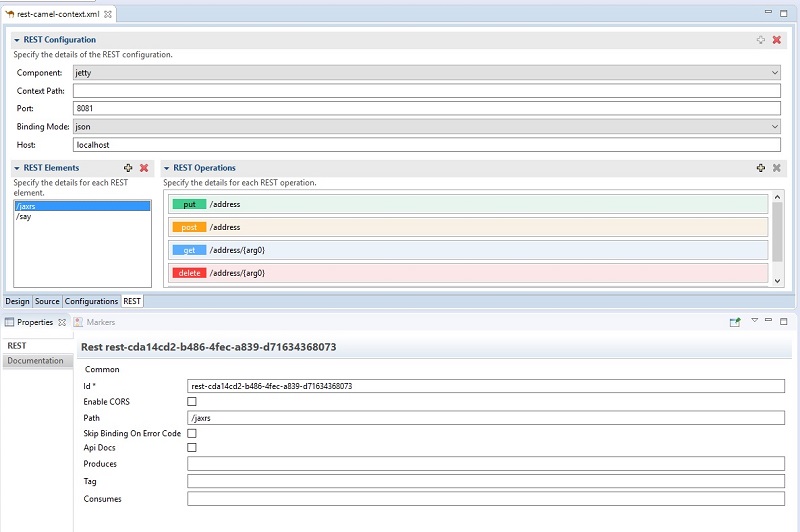
The Fuse Tooling Route Editor provides a new REST tab. For this release, the contents of this tab is read-only and includes the following information:
Details for the REST Configuration element including the component (jetty, netty, servlet, etc.), the context path, the port, binding mode (JSON, XML, etc.), and host. There is only one REST Configuration element.
A list of REST elements that collect REST operations. A configuration can have more than one REST element. Each REST element has an associated property page that displays additional details such as the path and the data it consumes or produces.
A list of REST operations for the selected REST element. Each of the operations has an associated property page that provides details such as the URI and output type.
For this release, the REST tab is read-only. If you want to edit the REST DSL, use the Route Editor Source tab. When you make changes and save them in the Source tab, the REST tab refreshes to show your updates.
As announced here, it was already possible to have Camel URI completion with XML DSL in the source tab of the Camel Route editor by installing the Language Support for Apache Camel in your IDE.
This feature is now installed by default with Fuse Tooling!
The Maven support is based on Eclipse M2E 1.9.1, bringing the following features:
A new quick fix is offered to fix issues that are reported when the Missing '@NonNullByDefault' annotation on package warning is enabled.
If the package already has a package-info.java

Otherwise, the quick fix must be invoked from the problems view, and will create a package-info.java
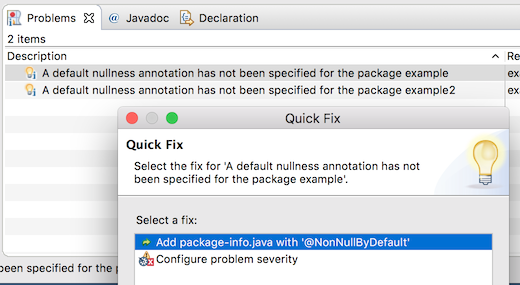
When invoked from the problems view, both variations of the quick fix can fix the problem for multiple packages simultaneously.
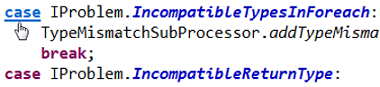
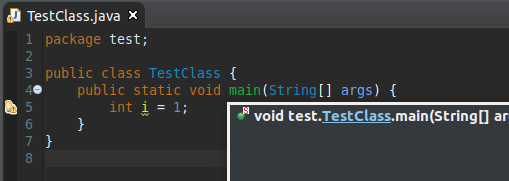
You can now Ctrl+click or use Open Declaration (F3) on case or default keywords to quickly navigate to the beginning of the switch statement.
The Java > Editor > Typing > Escape text when pasting into a string literal preference option now has a suboption Use Unicode escape syntax for non-ASCII characters:
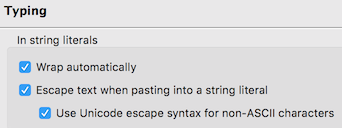
When enabled, characters outside the visible ASCII range will be replaced by unicode escape sequences when pasted into a string:

To improve readability in the dark theme, bold style usage has been reduced and some colors that were too close to each other have been altered.
The colors of links in code element information control now takes the color settings of the Hyperlink text color and the Active hyperlink text color from the Colors & Fonts preference page into account. The readability in the dark theme has been improved a lot by this.
Before:
After:
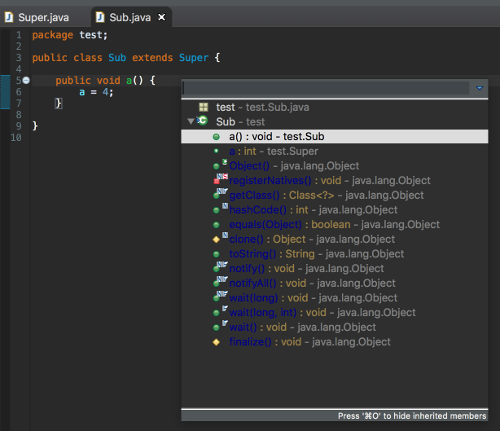
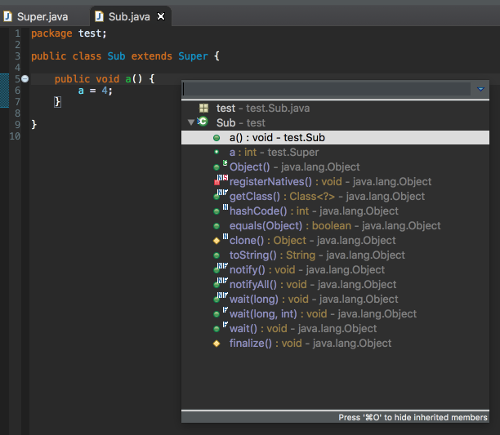
The Eclipse default dark theme now includes styling of inherited members in JDT’s Quick Outline. This improves readability in the dark theme a lot. The color can be configured via the Java > Inherited Members color definition on the Colors and Fonts preference page.
Before:
After:
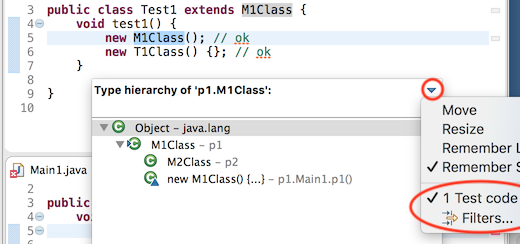
In the Java Build Path project settings, there is now an attribute Contains test sources to configure that a source folder contains test sources. (Note: test sources must have their own output folder). Similarly, for projects and libraries there is an attribute Visible only for test sources. This setting also exists for classpath containers, and if it is set to Yes for one of these, this value will be used for all contained libraries and projects.
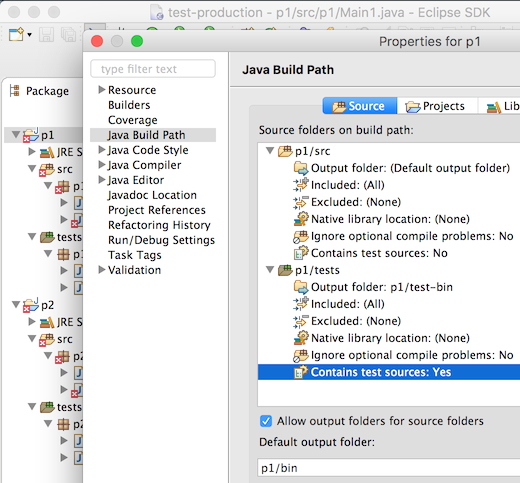
Test source folders and dependencies are shown with a darker icon in the build path settings, the package explorer and other locations. This can be disabled in Preferences > Java > Appearance:
Referenced projects can contain test sources and have test dependencies themselves. Usually, when test sources are compiled, the test code in projects on the build path will be visible. As this is not always desirable, it can be changed by setting the new build path attribute Without test code, that is available for projects, to Yes.
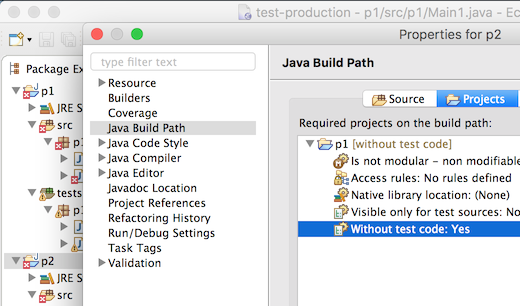
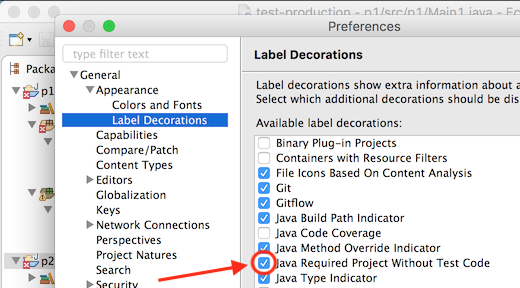
Build path entries configured like this have a decoration [without test code] after the project name, which can be disabled in Preferences > General > Appearance > Label Decorations:
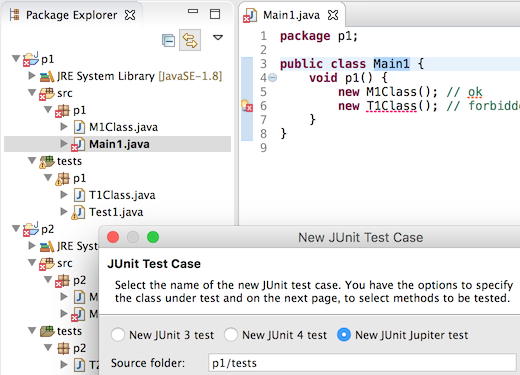
For each project, compilation is now done in two phases: First all main sources (which cannot see any test-code on the build-path) and then all test sources.
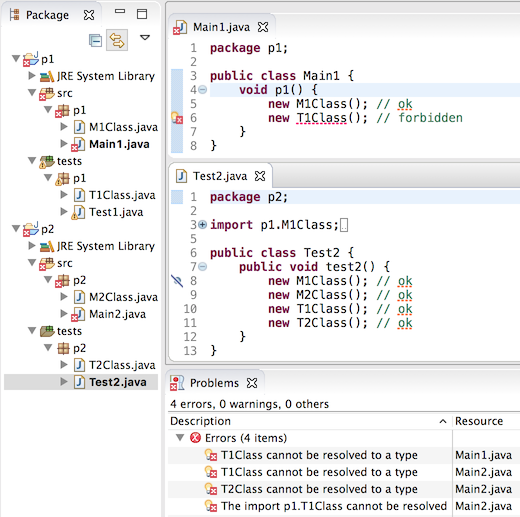
As a consequence, if the project is a modular Java 9 project, test dependencies like JUnit can not be referenced in the module-info.java
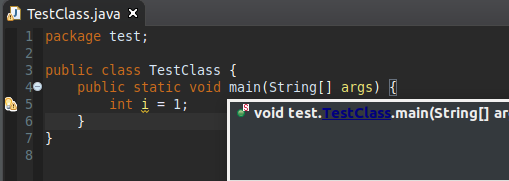
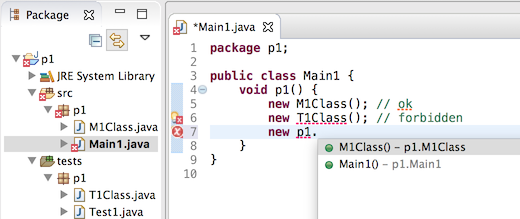
Of course, code completion will not suggest test code in main sources:
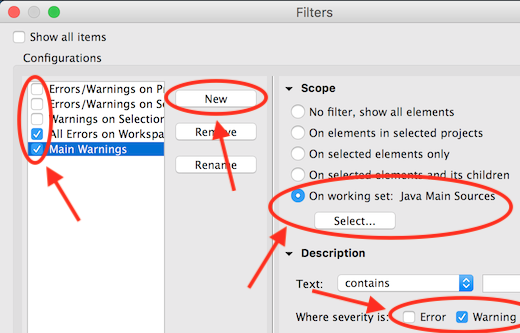
There are now two dynamic Java working sets Java Main Sources and Java Test Sources containing the source folders grouped according to value of the Contains test sources attribute. This can for example be used to remove warnings in test sources from the problems view:
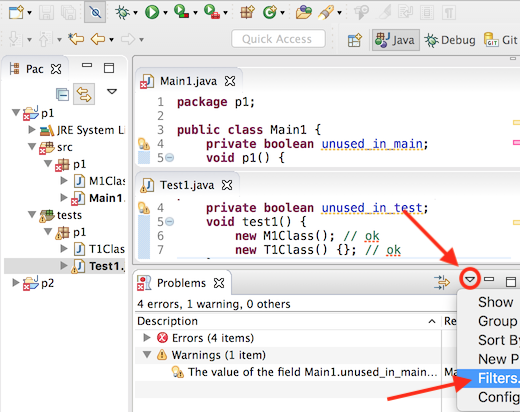
To achieve this, create a new filter that shows warnings for the Java Main Sources working set and select it with the All Errors on Workspace filter:
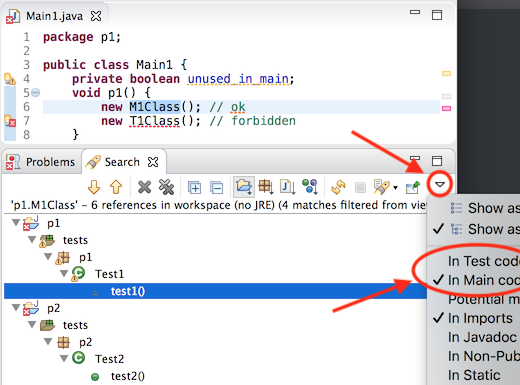
There are also dedicated filters to quickly remove hits in main code or test code from Java search results:
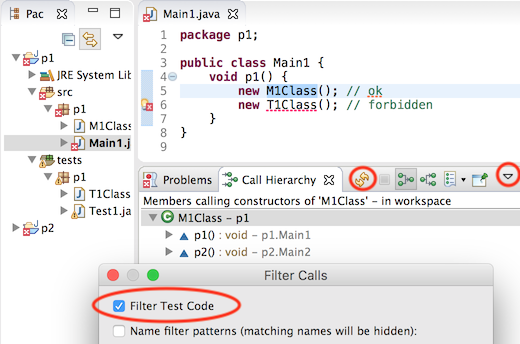
Similar, there is a filter to remove test code from Call hierarchies:
Another filter to remove test code exists for Quick type hierarchies:
Test source folders will be preselected in the New JUnit Test Case wizard
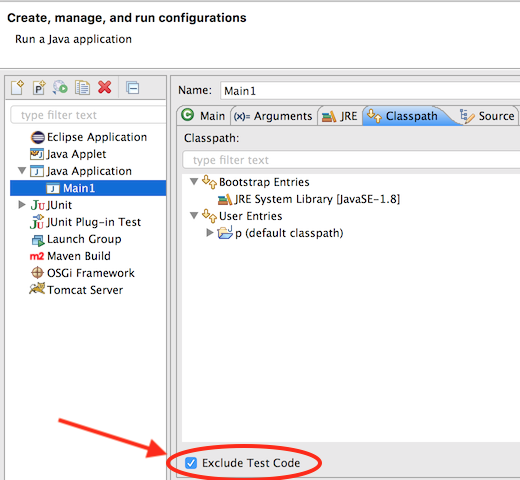
In Run and Debug configurations, the Classpath tab (or Dependencies tab when launching with Java 9) contains a new option Exclude Test Code, that is automatically preselected when launching a Java Application from a source folder that is not marked to contain test sources:
When launching with Java 9 and this option is not selected, command line options will automatically be added so modules that have a non-empty classpath read the unnamed module. These command line options are part of what can be overridden using the new Override Dependencies button.
The content of libraries are displayed in the order of the classpath. This makes it difficult to find specific libraries by their name, especially when projects have many dependencies. The library entries can now be sorted alphabetically when setting the preference Sort library entries alphabetically in Package Explorer on the Java > Appearance preference page:
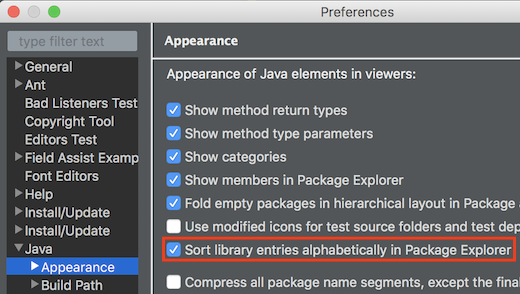
The default for this preference is OFF.
This is an experimental support provided to allow the regular expression usage in search field while searching for module declaration. This can be considered as a wrapper of the API change.
To invoke the regular expression search from the search field under Java Search, start the expression with "/r " i.e, a slash '/', the letter 'r' and a blank ' ' (not tab) followed by a regex, an example of which is shown below:
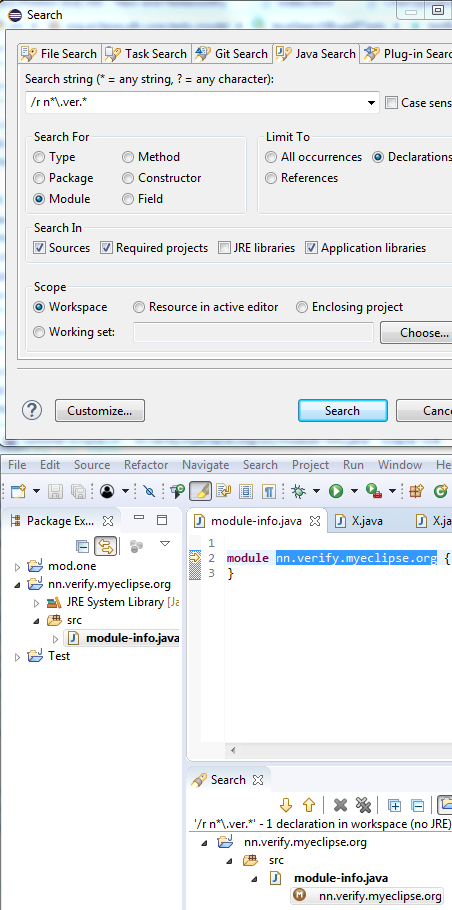
In the above example, all the characters trailing "/r " form a Java regular expression to denote a module name which starts with zero or more 'n’s followed by the string ".ver" and followed again by zero or more number of arbitrary characters.
Another example would be to search for all modules that start with java.x/r java\.x.*
Yet another example would be search for all module names that start with j followed by zero or more characters and ending with .xml which in regex language translates to /r j.*\.xml
Note: You should use this only for Declarations search for modules as it is not implemented for module references. Selecting All occurrences in conjunction with regex will default to finding only the Declarations matching the regex ignoring the references.
If a module is annotated with @NonNullByDefault
@org.eclipse.jdt.annotation.NonNullByDefault
module my.nullsafe.mod { ...
Note, however, that this requires an annotation type declared either with target ElementType.MODULEorg.eclipse.jdt.annotation
When using annotation-based null analysis, there are now more ways to define which unannotated locations are implicitly assumed to be annotated as @NonNull
@NonNullByDefaultDefaultLocationTYPE_USE
Support for @NonNullByDefault
Multiple different @NonNullByDefault
Annotations which use a meta annotation @TypeQualifierDefaultDefaultLocation@org.springframework.lang.NonNullApi
Version 2.2.0 of bundle org.eclipse.jdt.annotationNonNullByDefault
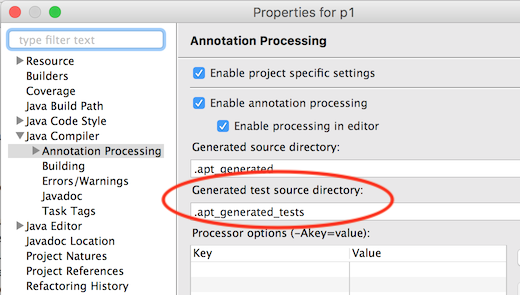
There is now support for running Java annotation processors on test sources. The output folder for files generated for these can be configured in the project properties in Java Compiler > Annotation Processing as Generated test source directory.
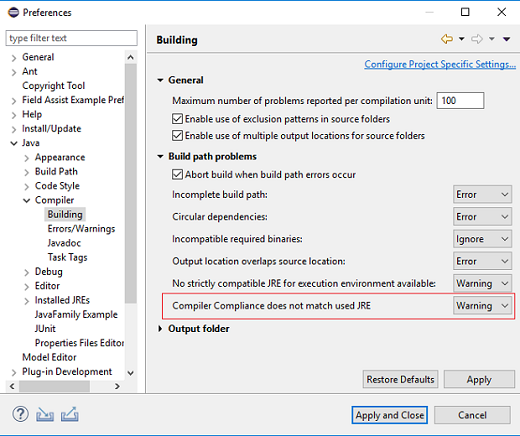
A new preference Compiler Compliance does not match used JRE is added to Compiler Preference Building Page.
This preference indicates the severity of the problem reported when project’s used JRE does not match the compiler compliance level selected. (e.g. a project using JRE 1.8 as JRE System Library, and the compiler compliance is set to 1.7).
The value of this preference is by default WARNING.
If the JRE being used is 9 or above and the --release option is selected and even if the compiler compliance does not match the JRE being used, this option will be ignored.
This preference can be set as shown below:
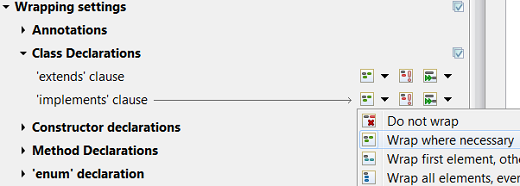
The formatter profile preference page (Java > Code Style > Formatter > Edit…) has a new look which makes it much easier to set preferences for formatting Java code. Instead of multiple tabs, all preferences are presented in an expandable tree.
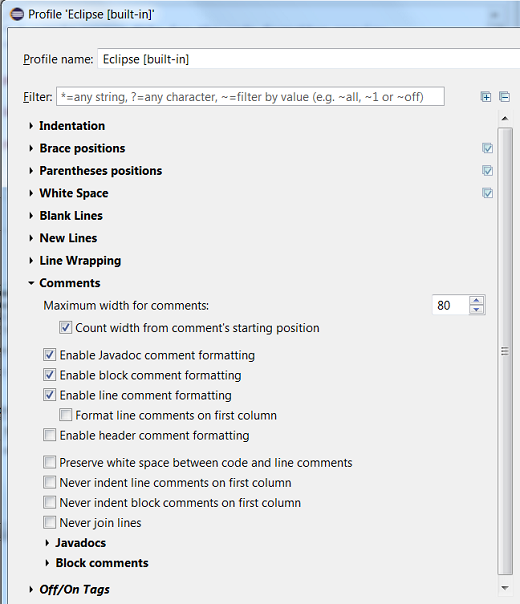
You can use filtering to display only the settings with names matching a specific phrase. Filtering by values is also possible (prefix a value filter with a tilde).
Most sections have a Modify all button in their header that lets you set all their preferences to the same value with one click.
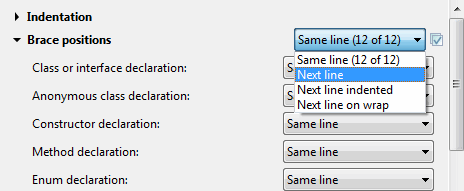
Some preferences have more convenient controls. For example, number values can be easily modified with arrow buttons. Wrap policy settings are controlled by simple toolbars so that you can see and compare multiple policies at once.
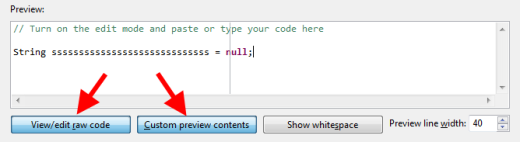
In the preview panel you can now use your own code to immediately see how it will be affected by the modified settings. You can also see the raw form of standard preview samples and make temporary modifications to them.
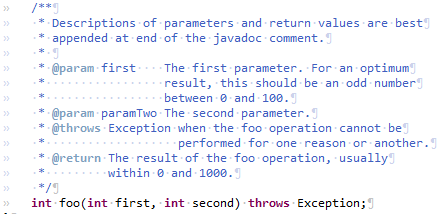
The formatter can now align names and/or descriptions in Javadoc tags in new ways. The formatter profile editor is available for selection, under Comments > Javadoc.
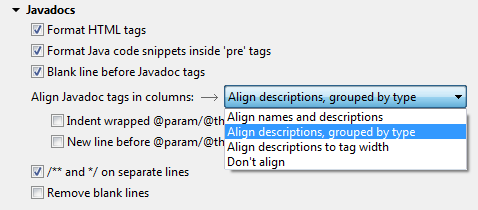
For example, the Align descriptions, grouped by type setting is now used in the built-in Eclipse profile.
The setting previously known as Indent Javadoc tags is now called Align descriptions to tag width. The two settings related to @param tags also had their labels changed to better describe what they do.
The formatter preferences tree styling has been fixed to work properly in the dark theme.
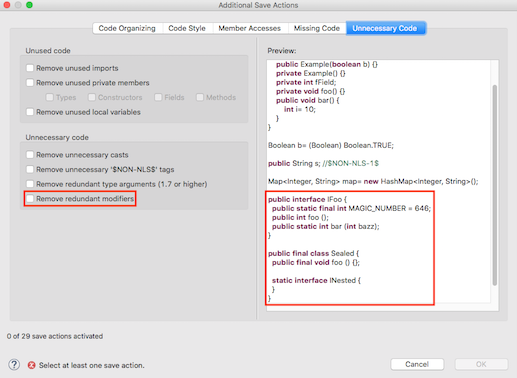
The new cleanup action "Remove redundant modifiers" removes unnecessary modifiers on types, methods and fields. The following modifiers are removed:
Interface field declarations: publicstaticfinal
Interface method declarations: publicabstract
Nested interfaces: static
Method declarations in final classes: final
The cleanup action can be configured as save action on the Unnecessary Code page.
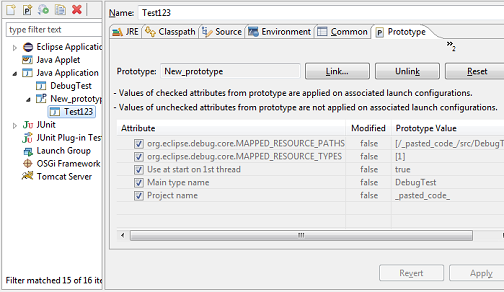
A Java Launch Configuration can now be based on a prototype.
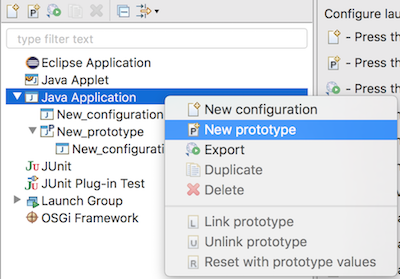
A prototype seeds attributes in its associated Java Launch Configurations with the settings specified in the Prototype tab.
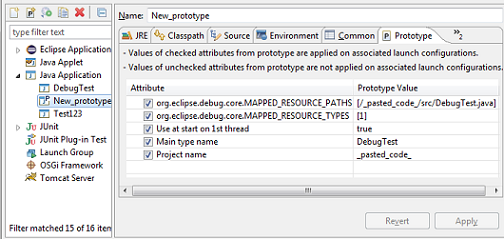
Once a Java Launch Configuration has been created, you can override any initial settings from the prototype. You can also reset the settings of a Java Launch Configuration with the ones from its prototype. A Java Launch Configuration maintains a link to its prototype, but is a complete stand-alone launch configuration that can be launched, exported, shared, etc.
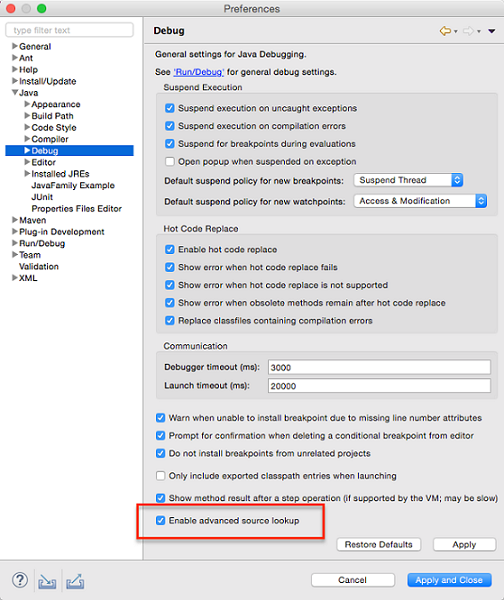
More precise advanced source lookup implementation, particularly useful when debugging applications that load classes dynamically at runtime.
New org.eclipse.jdt.launching.workspaceProjectDescribers
New org.eclipse.jdt.launching.sourceContainerResolvers
Advanced source lookup affects debug launches only and can be enabled or disabled with Java > Debug > Use advanced source lookup (JRE 1.5 and higher) preference option:
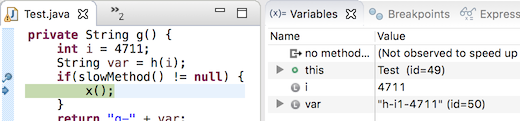
Debug view now automatically updates thread names if they are changed in the debuggee JVM. This shows live information for worker instances, as described above.
Technically speaking, Java debugger automatically adds a new (user invisible) breakpoint in the JVM and notifies clients (like Debug view) on a breakpoint hit. If this behavior is undesired for some reason, product owners can disable it via product customization.
The property value is: org.eclipse.jdt.debug.ui/org.eclipse.jdt.debug.ui.javaDebug.ListenOnThreadNameChanges=false
You can find more noteworthy updates in on this page.